Electronic Health Record
Quick
Start Guide
Electronic
Health Record– Quick Start
Overview: The electronic
health record ( EHR ) allows for complete
documentation of every aspect of the patient’s care. This includes not only
patient encounters but injections, patient voice, text and email
communications, diagnostic
results, electronic prescribing, and health goals. The EHR
program also interfaces with the billing module, the appointment system, and offers
a myriad of diagnostic aids including Medline and the Single Payer Screening
Tool SPNIH. The EHR starts by selecting a Patient from a variety of efficient methods
including the Encounter List ( Patients whom are signed in the waiting room ), the
queuing system for phone messages, refills requests, abnormal values, reviewable
records, or any actionable item ( “TODO” ) organized by priority. Each “TODO” item
is assigned to a category, user or a Care Team that covers a broad
category. Example: All Nurses (“NURSE”) or All Refills. (“RX”)
Selecting a Patient by Name or other item in
the Demographic Record
From
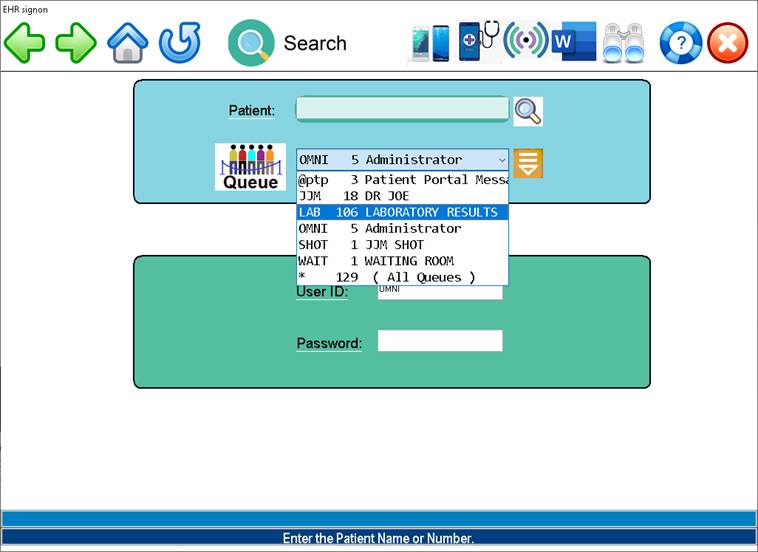
the initial EHR sign-on Screen (shown below ) type the
patient’s medical record number and <Enter> or type 3 or more letters of the patient
surname and press the <Enter> key.
Search
by medical record number or name is the default method. No special steps are
needed to search by name or number. Simply type the name or number and press
<Enter>
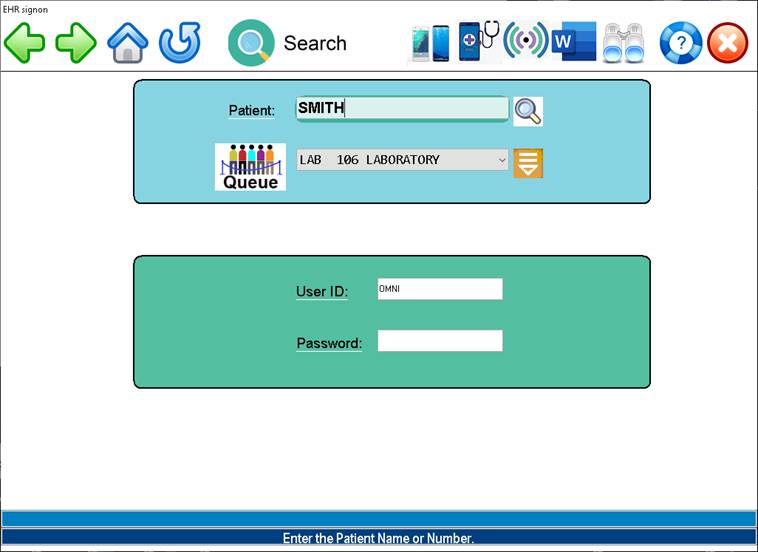
Example
Patient Search Screen:
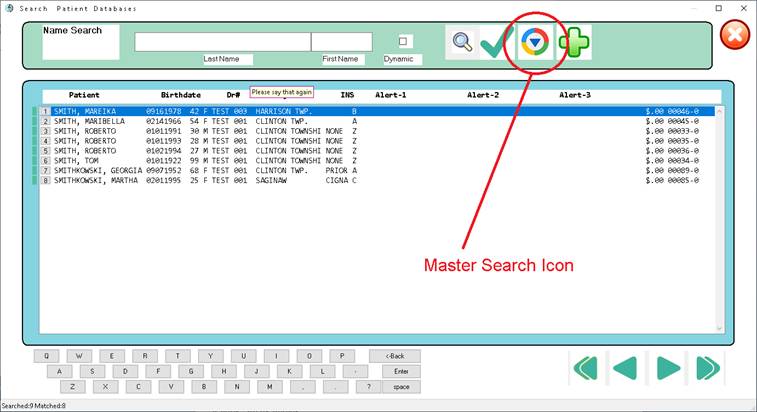
From the search screen shown above, select
the patient by typing the row number and<Enter> (
Example “1” <Enter>, or you
may click on the patient record. Further refinement of the patient search may
be done at this time. Simply type additional information in the last name field
or click on the master search icon where other search methods like DOB may be
employed.
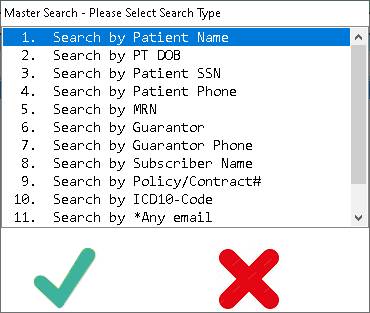
Master Search Categories shown above.
Selecting
a Patient from the Patient Tracker
A
patient can be checked in at the front desk, self serve kiosk or via a bar code
scanner. The checked in Patient will then appear in the encounter list for
the day as “Checked In”. Click on the patient in the tracker screen and the
Patient Dashboard screen will appear.
.
Steps to select patient from waiting room (Encounter List):
- Click
on
 icon located on the upper toolbar
 - *or*
Press the <Down> arrow key when the cursor is located in any
“Patient:” ID field throughout the system.
- The
Patient Tracker screen will open:
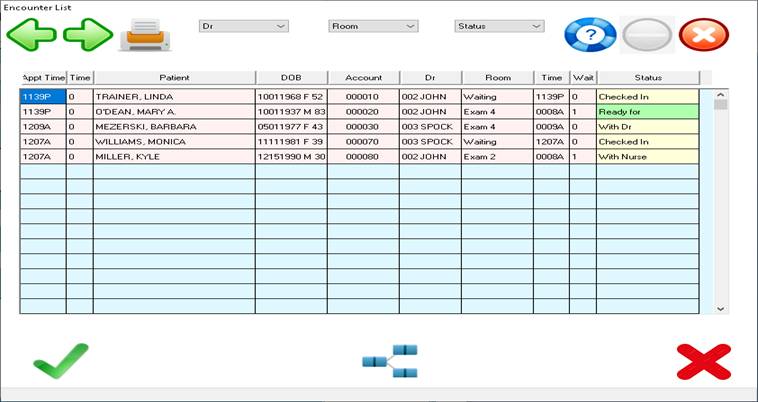
- Select
the patient by clicking on the patient name
- A
specific Physician’s list can be filtered by selecting “Dr” Dropdown. Also see Changing Room./Status
section below.
Note: Once an open
chart is reviewed/signed – the patient will drop
from the tracker list.
Selecting a Patient
from the Queue List ( “TODO” )
Procedure:
Selecting a
patient from the Queue ( “TODO” list )
1. Click
on the drop down located to the in the field to the right of the “Waiting
Queue” icon
2. Select
the Queue type as needed – Queues may be defined by Physician, Operator ID or
Visit type.
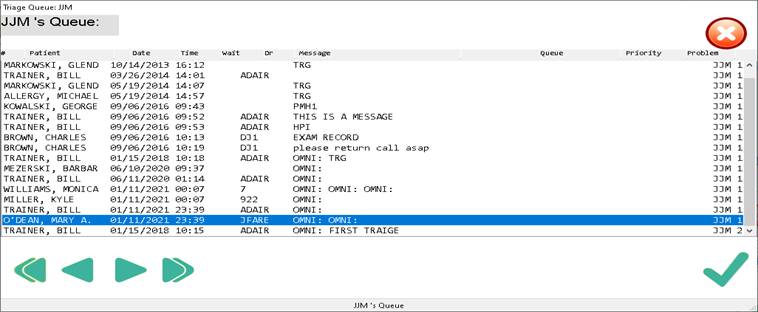
3. A
list of patients assigned to this queue will open.
4. Click
on a patient and the dashboard screen for this patient will appear.
Example List of Patients assigned to the queue.
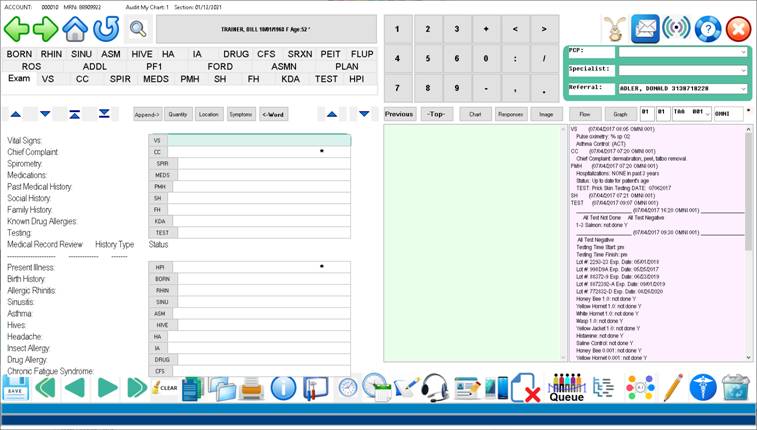
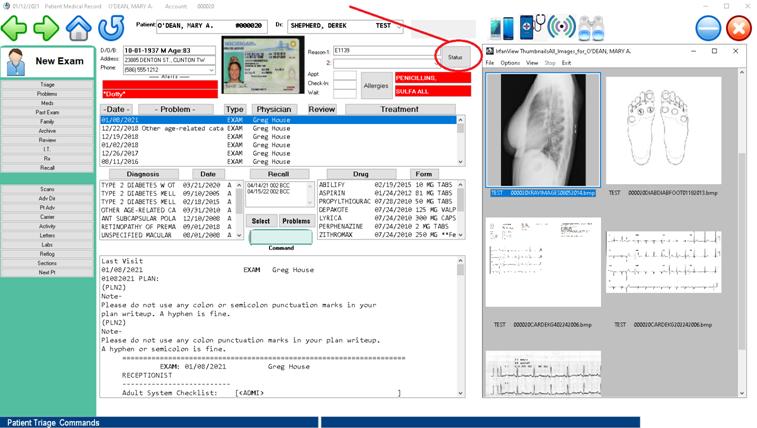
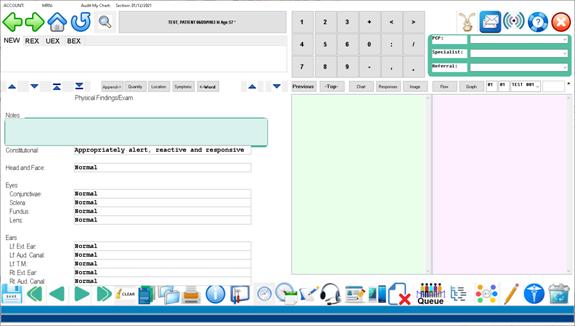
After selecting a
patient by any method above, the “Dashboard” summary screen will open.
The
dashboard summary screen contains demographics, a list of all patient events
(encounters or communications ), the current active problem list, the current
active medication list, the last complete progress note, and the upcoming
appointments and recall list. From the screen you can view in detail any of
these items. The items contained on the screen are fully user configurable.

Quick Start
Commands:
To enter a
communications note, click on the button labeled “Triage” located in the row of
buttons on the left.
To Start the
Charting process for the current date Click the large “NEW EXAM”
button located on top of the column of
buttons on the left.
To chart a
previous date select “Past Exam”
Procedure:
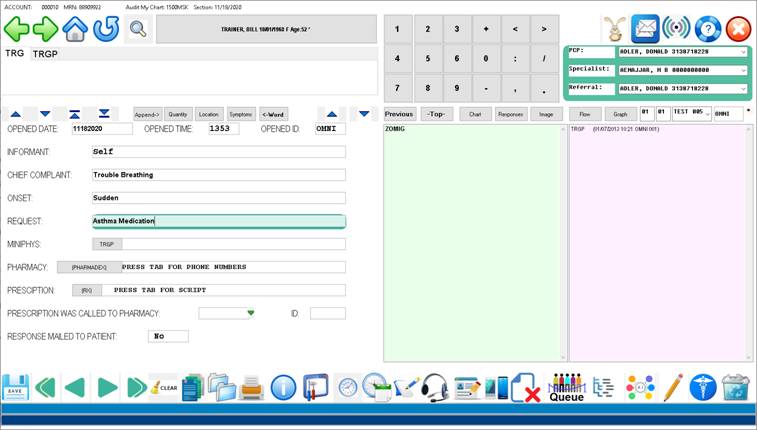
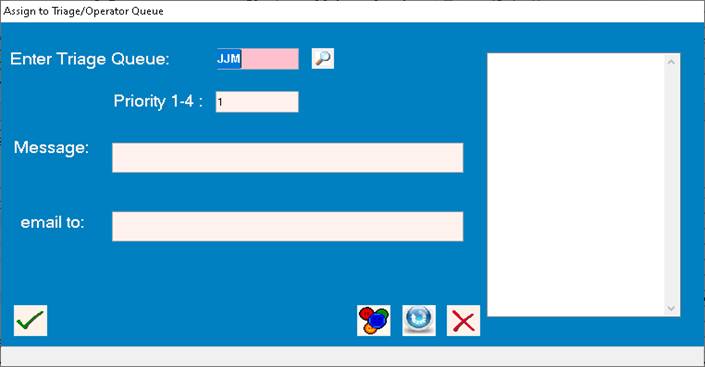
Entering a Communications Call (Triage) and
assigning the call to the Queue:
- Pull up patient
- Click on Triage
Button ( Far Left Button Toolbar – 1st icon )
- Fill out triage
informational fields as required ( This pulls from the TRG template in the
form library )
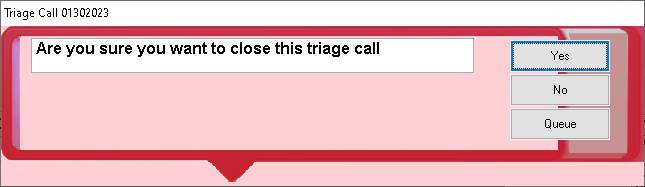
- Click “Back”
button ( Upper Left Toolbar ) or press Escape
Key.
- Click “Queue”
when prompted
- Select Operator
ID and Priority ( 1- 4) and click “OK”

Assigning to the Physican’s Queue from Patient Master Profile ( Patient Information )
Patients
can be assigned to the Physician/Nurse/PA queue from the front desk through
Patient Information.
Procedure:
- Pull up patient
in the master profile screen.
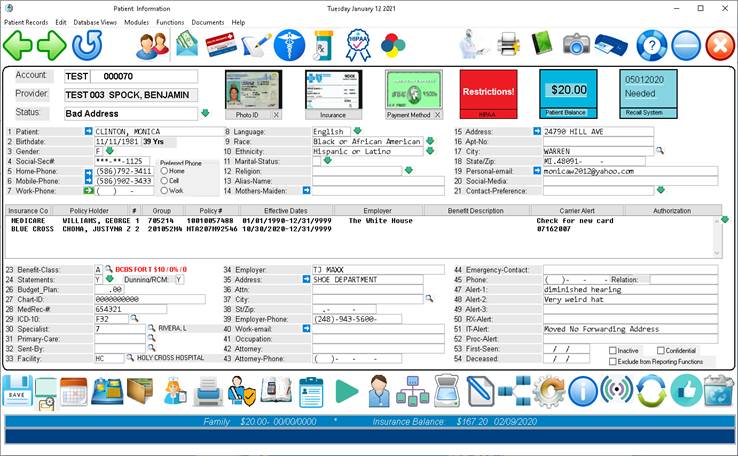
- Type “AQ” in the
command line ( Lower Left Toolbar ) – This action
places the patient in the specific Queue for the Physician as well as in
the Encounter List as “in Waiting Room” for the status.
- Select ID and Priority
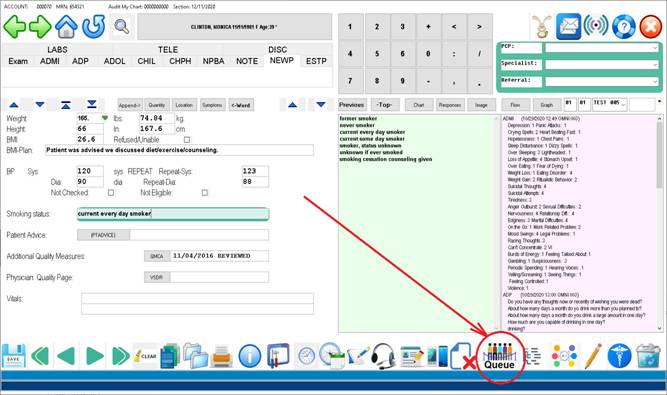
Individual
record sections from the EHR and any sub-section (example: results) may also be
queued by using the “Queue” button located on the lower right toolbar after
bringing up the record or section of concern.
Procedure:
- Bring up the patient
- Select the
date/section of interest
- Select the
template or sub-section if appropriate
- Click on the
QUEUE button located in the lower right toolbar

The done message is an optional message that can be disabled in the configuration.
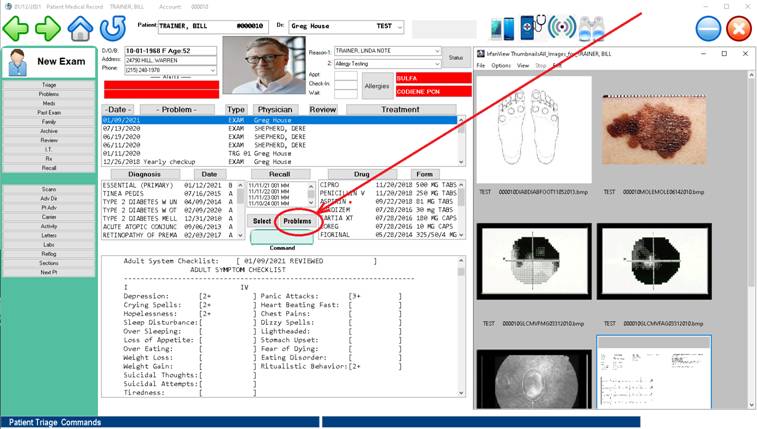
Starting the Patient Visit Documentation ( Charting )
Electronic Health Record– Chart / Diagnoses Setup
Overview: The Exam Setup function allows
for easy selection and ordering of diagnoses from the Patient Problem List. The
exam setup button may also be labeled as “Select
Problems”
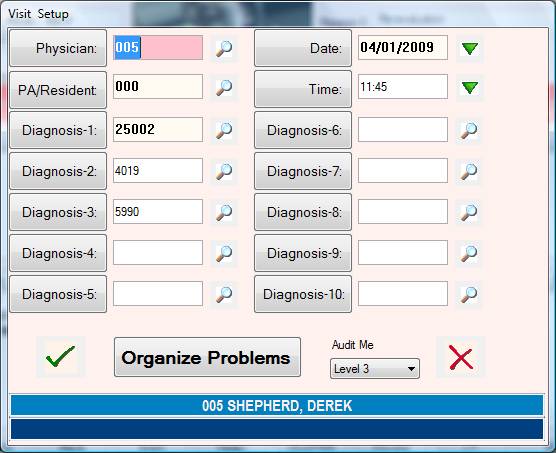
Procedure:
1. From the
Chart Summary Screen, click on the Problems button.
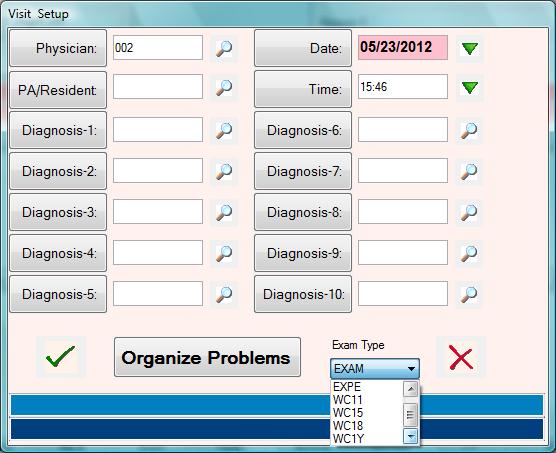
2. The following
screen will display allowing selection of Date, Time, Provider and the patients
registered problems.
 3. You may add additional problems by
either typing the ICD10 number or clicking the SEARCH to the right of the diagnosis field.
The attending Physician for the visit may also be entered here.
3. You may add additional problems by
either typing the ICD10 number or clicking the SEARCH to the right of the diagnosis field.
The attending Physician for the visit may also be entered here.
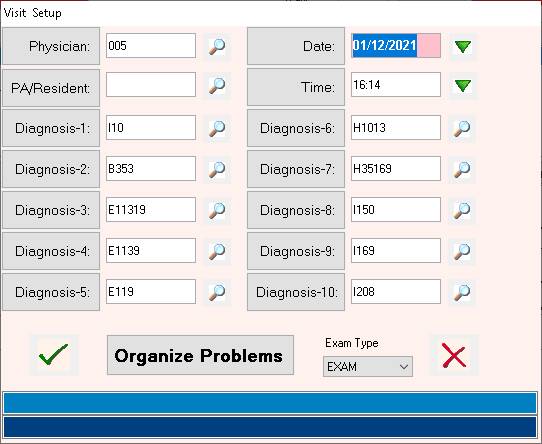
4. In order to
re-order or rank the diagnosis for this visit, click on
“ORGANIZE
PROBLEMS”
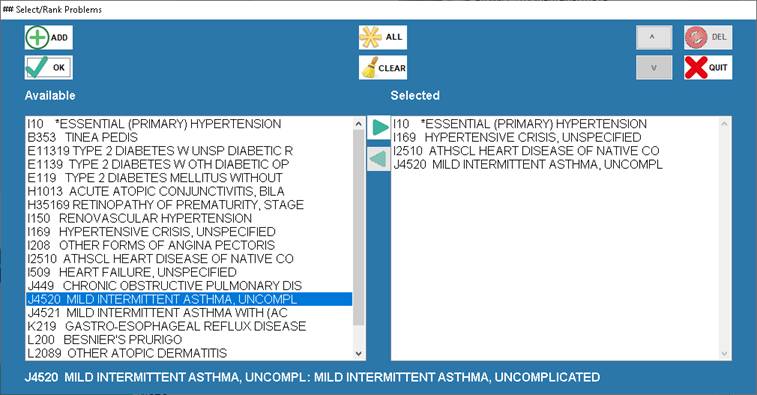
5. You may now
select certain diagnosis to be first, second, third ,etc.
6. By Clicking the
“ALL” button, the remaining unselected diagnosis will be added to the bottom of
the list.
![]()
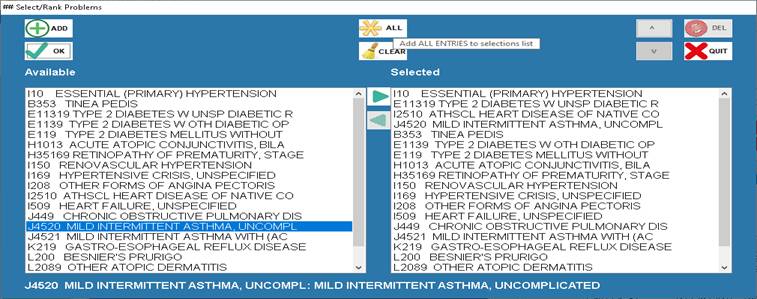
7 The Diagnoses will now re-ordered:
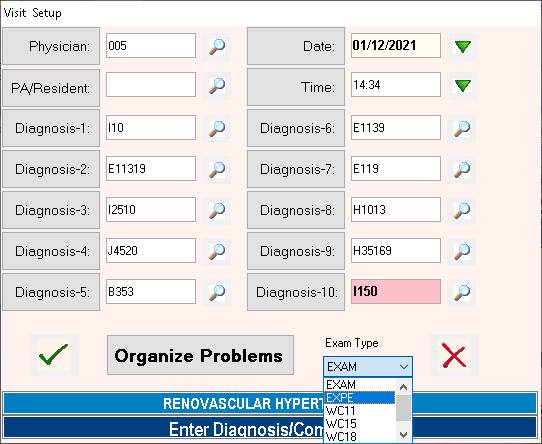
8. The primary exam type can optionally
be specified here:
9. Example: Workmans Comp Visit vs
Normal Encounter
Now click “OK” and
then click the Green Check Button to bring up the
Visit template (Screens )
The diagnosis for
this visit will be ordered as selected in the “ORGANIZER
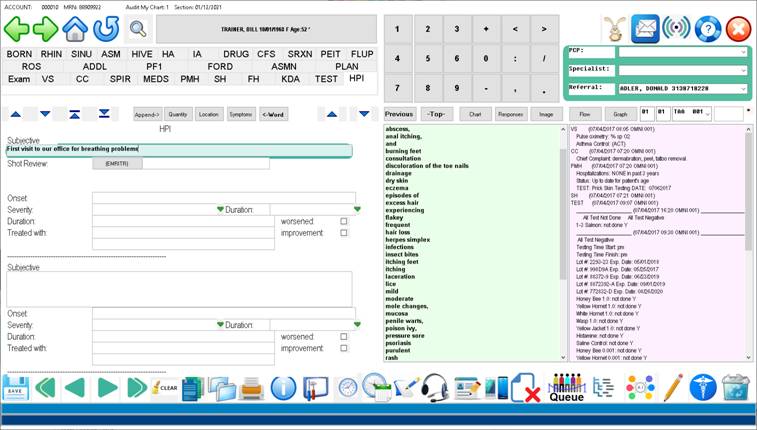
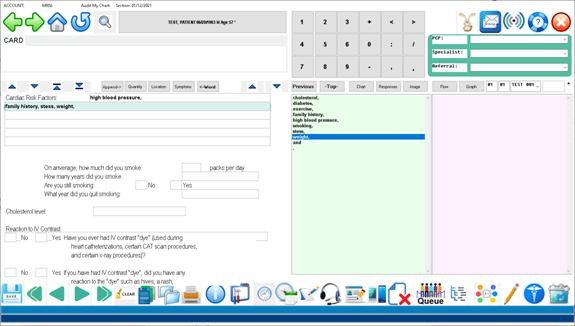
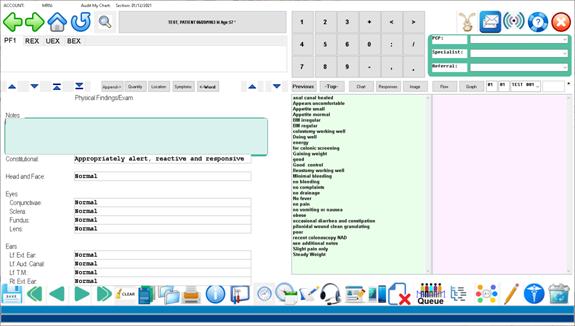
To commence charting: Click on the section buttons and fill in the necessary fields, Click
the “BACK” icon or press escape to move back to the previous screen.
Example: HPI
Steps: 1. Click on
HPI
2. Enter
appropriate fields by clicking on the responses in the right pane.
3. Press the
ESCAPE key or click on the “BACK icon to proceed with charting or select
another function.
Lower
toolbar icons explained in order left to right:
SAVE: - Saves
the current records and moves back to the summary view.
Double Left Arrow: Moves to
the first date for this template (the current screen displayed).
Left Arrow: Moves
back to the previous date for this template.
Right Arrow: Move to
the next date for this template
Double Right Arrow: Moves to
the current date for this template
“Clear”: This
function will blank the field where the cursor is located.
Blue Green Grey 3 documents: This
allows selection of a form letter or report to be merged into Word.
Double light blue folders: This
function allows review of all selected chart sections e.g. “All Plans”
Orange Printer: Prints complete chart or report for the selected date.
Blue Circle “i”: Audit log of entry session
Screwdriver/Hammer: Brings up flow chart for this template
Small blue clock: Enters the time into the field where the cursor is
located
Larger blue clock with calendar: Enters the date into the field
where the cursor is located
Blue pen and tablet: Enters the signature into the field where the cursor is
located
Headset: Starts Dragon Naturally Speaking dictation. ( if
installed )
Yellow pencil on chart: Final chart review and signature.
Two Mobile phones: Allows voice call or text to patient.
Blue paper with red X: Closes current screen without saving changes.
Queue: Sends this
record to the selected queue. ( TO-DO list )
Blue/Grey dashed lines: Searches online medical databases with data from current
field ( e.g. Medline )
Six Circles AI: Adds the information in the current field to the AI
panel for this field.
Yellow Pencil: Edits the AI panel for this field.
Blue Circle Caduceus: Sets up certain problems and visit type.
Trash Can: Deletes the current template (screen).
When charting is completed: Press
ESCAPE or click the “BACK” icon from the MAIN NAVIGATION PAGE. To close the exam and return to the dashboard. Press ESCAPE
or “BACK” again to select another patient.
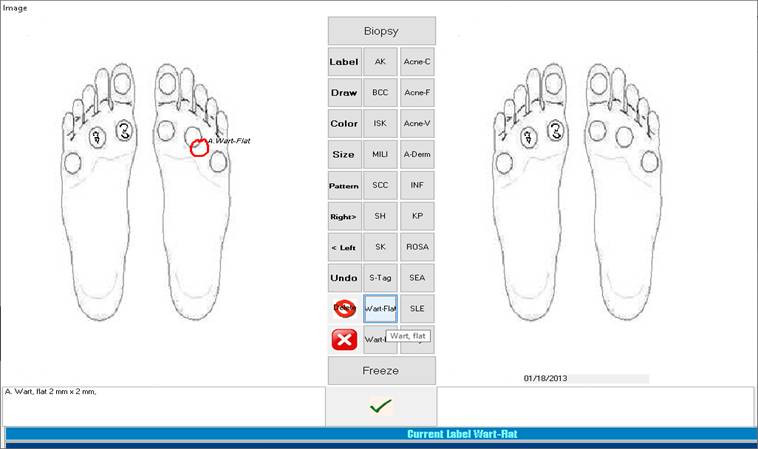
Example
anatomic drawing:
Drawings are noted by { Drawing }
curved braces during template setup.
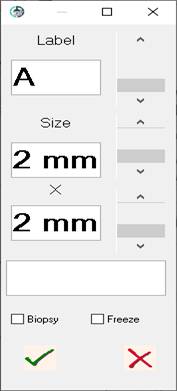
Procedure: Images may be annotated by
double-clicking the image thumbnail contained in the template.

Annotation tool
bench will come up after double-clicking the image thumbnail. The annotation
workbench contains predefined lesions and other frequently used notations.
Annotations are added to the image by clicking one of the predefined buttons.
The size and description of the item being documented on the image can be recorded.
After annotation
of the image is complete, the image will be saved for future reference.
Example Diabetic Foot Care Template
Annotation Tool Workbench:
Function Key Assignments used during the charting process:
F3 = MOVE
BACK ONE FIELD
F4 = MOVE FORWARD ONE FIELD
F5 = PATIENT INFORMATION
F6 = SCHEDULER
F7 = PATIENT LEDGER / BALANCES
F8 = REVIEW MENU
F9 = SEARCH DISEASE DATABASE
F10 = REVIEW ENTIRE CHART
F11 = QUEUE
F12 = FLOW CHART
PAGE UP = GO BACK TO LAST PAGE
PAGE DOWN = GO DOWN TO NEXT PAGE
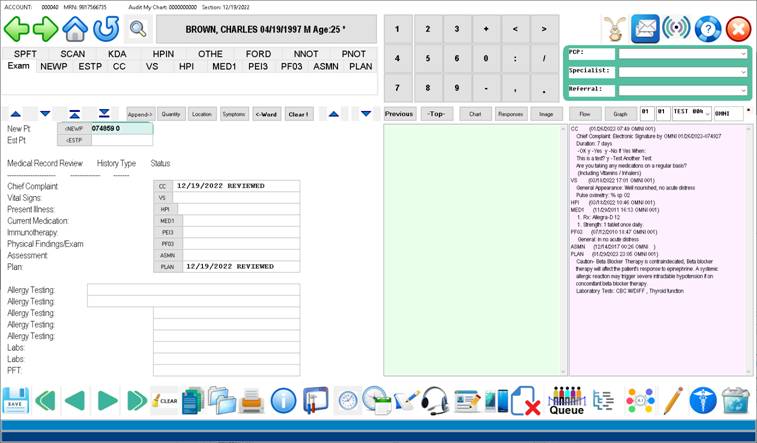
To change the Physician of record on the EHR.
1. For New Patients, change field number one (Physician) as show above. This will allow selection of the attending
Physician before the exam is entered.
Changing
Physician for a previous visit
- Pull up the patient in the EMR.
- Pull up section to be changed by clicking on the
appropriate date:
- Click on "Setup Chart" Icon ( Right lower
corner )
- Enter new Physician Number. Example: 002
- Click "OK" (Green Check-mark) icon
- Order
/ Method of assigning a Physician to the EHR visit:
a)
Patient Demo Physician is pulled as used as the EHR Visit Physician.
b) Checks to see who has appt, if it is with another Physician, the EHR Visit
Physician switches to that Physician.
c) If a Physician labeled user is logged into the account when the exam is
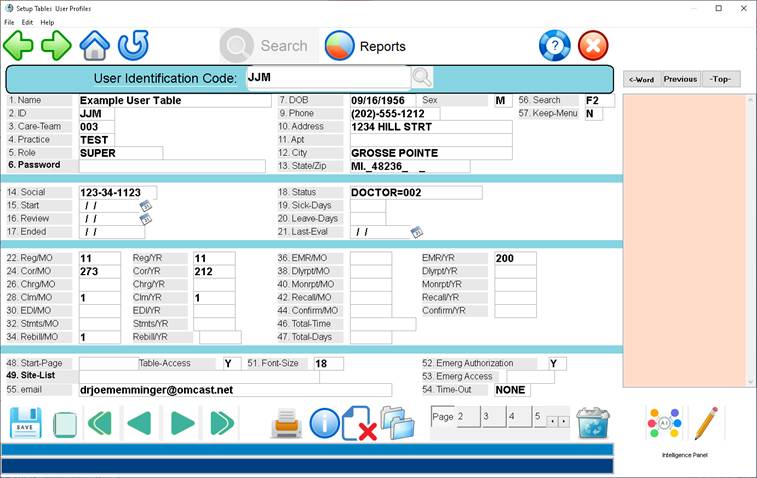
first opened, the EHR Visit Physician switches to that Physician
. Physician users are labeled by entering DOCTOR=001 (
example ) in the #2 ID field in the operator table. – See example screen below
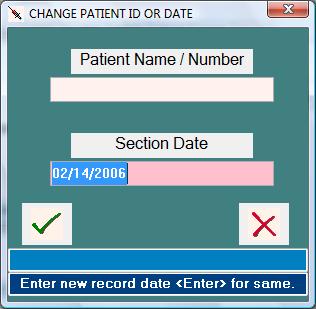
Changing
Record ( Section ) Date
1. Pull up the
patient.
1. Pull up section to be changed by clicking on the date:
2. Click on "New ID" Icon which located in the upper right side of
the screen just to the right of the red "Quit" icon and left of the
number "1".
(
Password “SAFE”)
3. Press <Enter> for the patient ID ( remains the same )
4. Enter the correct date and press <Enter>
5. Respond "Y" to the verify step.
![]()
EHR – Visit Level
Coding:
History
and Physical Exam Are Eliminated as Elements for Code Selection
- Performing a medically
appropriate examination and/or evaluation
- Documenting clinical
information in the patient’s chart
- Ordering medications,
procedures or tests
- Coordinating care (when not
separately reported)
- Referring to or
communicating with other healthcare professionals (when not separately
reported)
- Preparing for the patient
visit
- Obtaining and/or reviewing
separately-obtained history
- Counseling and educating
the patient, the patient’s family or caregiver
- Independently interpreting
results (where not separately reported) and communicating results to the
patient, the patient’s family or caregiver
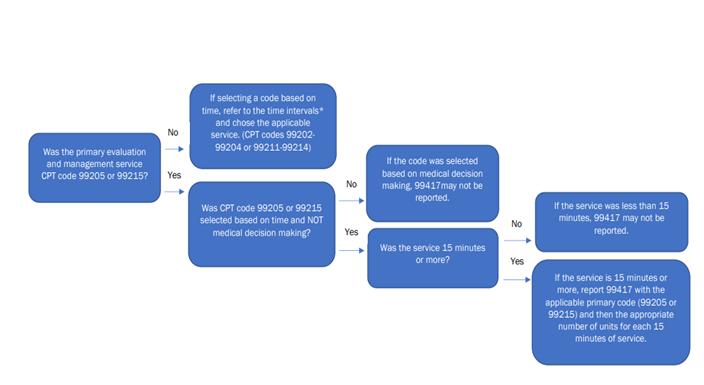
Prolonged
Services Coding Changes
Prolonged services
codes are typically used when E/M services extend beyond the total time
identified with the code level that would otherwise be billed for the primary
procedure.
Here are some of the
changes that apply to these codes:
- 99417 is new and can be used in conjunction
with 99205 or 99215
- These codes apply to face-to-face time
and non-face-to-face time
- Less than 15 minutes will not be
considered “prolonged”
The AMA
provided the following prolonged services tables as resources for physicians:
Prolonged
Service Without Direct Patient Contact
|
Total Duration |
Code(s) |
|
Less
than 30 minutes |
Not
reported separately |
|
30-74
minutes |
99358
X 1 |
|
75-104
minutes |
99358
X 1 AND 99359 X 1 |
|
105
or more |
99358
X 1 AND 99359 X 2 |
Source: The American
Medical Association
Prolonged
Service With Direct Patient Contact
|
Total Duration |
Code(s) |
|
Less
than 30 minutes |
Not
reported separately |
|
30-74
minutes |
99356
X 1 |
|
75-104
minutes |
99356
X 1 AND 99357 X 1 |
|
105
or more |
99356
X 1 AND 99357 X 2 |
Source: The American
Medical Association
A New Medicare
HCPCS Code: GPC1X
Specialists who need
to document medical services that are part of ongoing care will want to know
about this new Medicare add-on code.
The CMS describes
GPC1X as, “Visit complexity inherent to evaluation and management associated
with medical care services that serve as the continuing focal point for all
needed health care services and/or with medical care services that are part of
ongoing care related to a patient’s single, serious or complex chronic
condition.”4
Quick facts
about the GPC1X:
- It’s used in conjunction with
99202-99215
- It’s listed separately in addition to an
E/M code
The EHR auto codes
the visit in the following manner:
History Component: This takes responses to
the HPI , PMH, FH, SH, MEDS , Allergies and any other history template to
arrive the correct code value as documented by the HCFA.
Examination
component: Values number of examinations
and responses to determine level of examination. The total time is also captured.
Decision making Component: Includes number
if diagnoses treated, Number of new diagnoses, number of medications, number of
new or changed medications, diagnostic tests review, family members, other
providers consulted with, whether you read x-rays yourself, etc.
Required Components, based on your own standard of the given level, are highlighted in RED if they are incomplete or omitted.
|
HCFA MEDICARE RULES POPUP Level of Service Determination Time Component Chief Complaint 2 Starting Time:
22:51 Informant 1 Ending Time :
23:29 HPI 4 Total Time: 0:38 Past Medical Hx 3 Counseling: 50% Face to Face Family Hx 1
Social Hx 1
Medication Hx 2
Allergies 1
Systems Review 2
Recognized ------------------------------ History 16 COMPREHENSIVE Physical
Examination 8 ( PROBLEM FOCUSED ) Diagnostic NONE
Decision Making 3 ( STRAIGHT FORWARD )
Click to close: 99213 - Established Patient |
Changing
Patient Room and Status for the Tracker
The
Electronic Health Recordcontains an encounter tracking system. This system can
be used to indicate the stage of the patient’s treatment and also the location
of the patient. If the patient is checked in at the front desk, the status will
automatically be “Waiting Room”. Patients can be checked into the encounter
tracking system by one of three methods:
- Printing an
encounter form. ( The encounter form must contain an encounter number )
- Entering the
encounter command “E” at the patient demographics screen command line.
- Entering the
patient into the medical staff queue system by way of the “AQ” command at
the patient demographics screen command line.
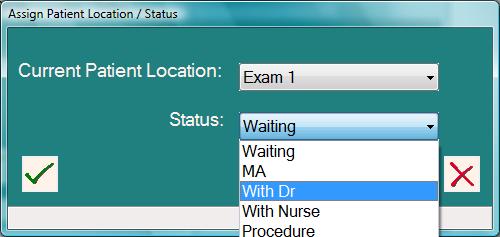
By
clicking on the “Status” button, the patient can be assigned to a location and
a status.
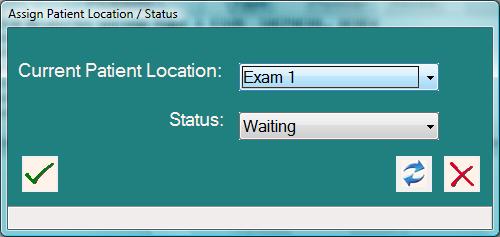
To
assign location and status, click on the drop-down buttons and select.
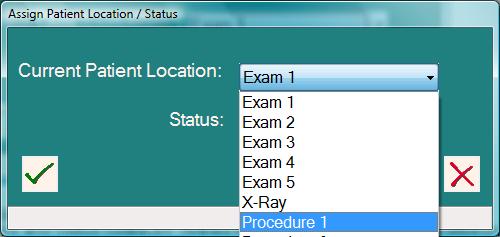
Locations
and Status codes are defined by selecting these choices located on the EHR tools
menu.
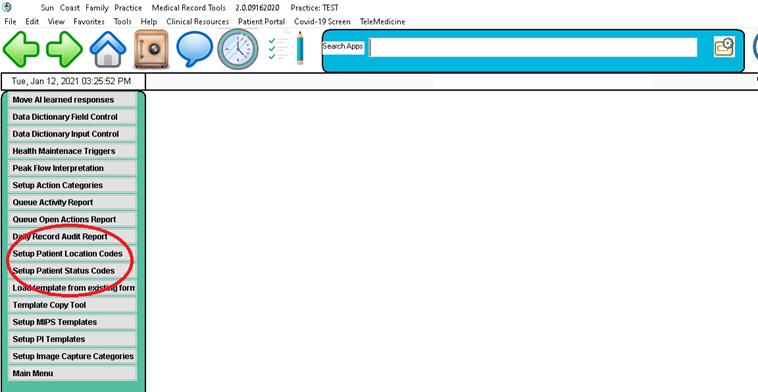
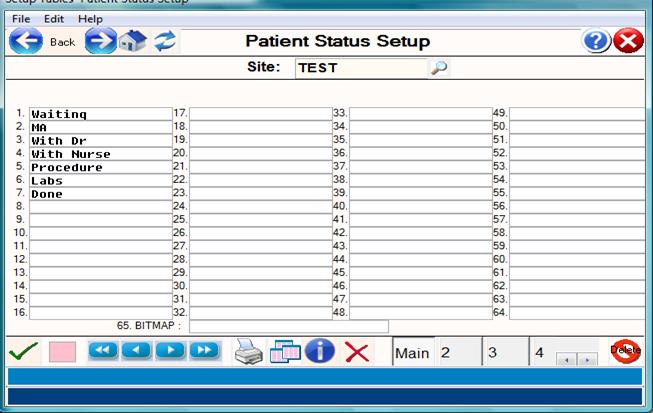
You
may add, change or delete patient location and status codes as needed by way of
the EHR tools and tables menu.
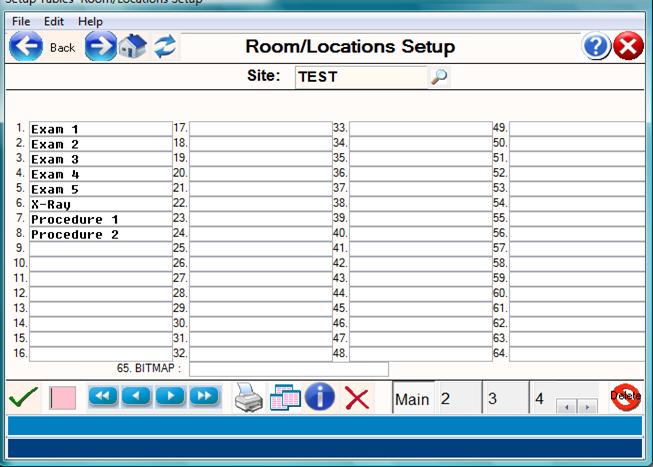
Please
see the following two examples of locations and status codes.
Locations/Room
setup example
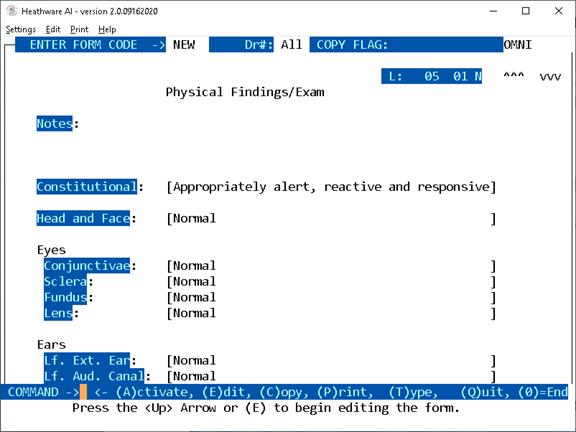
Electronic
Health Record
INTELLIGENT
FORM LIBRARY
Electronic Medical Records –
Intelligent Forms Library
OVERVIEW: The Intelligent Form Library program is used
to create and maintain standard data entry forms or "Intelligent
Forms" used for the documentation of histories, physicals, plans,
diagnostic results, and other pertinent patient medical information. The term
entry FORM and INTELLIGENT FORM simply
describe a method to arrange pre-selected fields and their associated choices
into a screen for data entry purposes together with learned Artificial
Intelligence features.
Intelligent Forms
are made by using a simple word processor type of program in order to layout
the screen and create fields for any procedure or purpose.
PROCEDURE: From the Patient Medical Record Menu (#5)
select Option 2, Intelligent Form Library ( or Entry Form Library ), and press
<Enter>. The screen below will be
displayed.
Example Intelligent Form Screen:
Until you have forms entered into the Entry
Form Library, the
Search
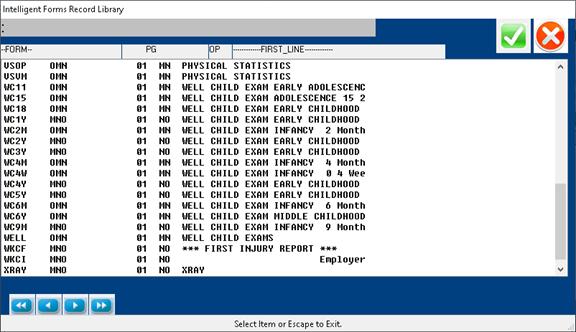
Screen will appear without entries. When
you have forms on the database, the Summary Search will contain a list of the
forms as shown in the following example.
EXAMPLE SEARCH SCREEN:
FIELD DEFINITIONS:
FORM—Lists the code which identifies the
form.
PG—The actual number of pages contained in
the form.
OP—The operator or user ID of the person who
was the last one to update this form.
FIRST LINE—The first line of text on
each form.
As you add Intelligent Forms to the
Library, they will be displayed to the Summary Screen. The first line of every
Intelligent Form is shown on the Search Screen under the column heading --FIRST
LINE--. This can be helpful when you are searching for a particular existing
Intelligent Form.
To select a Intelligent Form from the
Summary Screen, type the form code when prompted and press <Enter>. You may view the form or edit it (editing
information is found below). To exit the
form, press the <Escape> key to access
the
COMMAND LINE, type <END>.
When creating a new Intelligent Form,
enter a 1-4 alpha numeric code for the Intelligent Form at the ENTER INTELLIGENT FORM CODE field (prompt) and
press the <ENTER> key.
Example: PLAN <Enter>
EXAMPLE SCREEN:
ENTER INTELLIGENT FORM CODE -> Type numbers or characters (up to 4
alpha/numerical characters) that will
identify the form and press <Enter>.
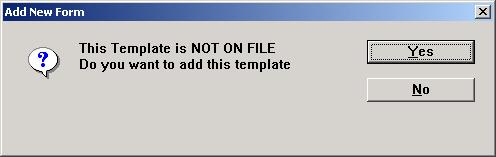
NOT ON FILE ADD? (Y=YES, N=NO): If you decide to cancel the
entry, type N (no). The program will
return
you to the ENTER INTELLIGENT FORM CODE
prompt without adding the form.
To add a form, type Y (yes) and press
<Enter>. The screen will
prompt with ENTER FORM TYPE as shown
in the example below:
EXAMPLE SCREEN:

ENTER FORM TYPE: At this prompt you have the option to copy
From an existing Intelligent Form
(form) in order to create a new
Intelligent Form, or you may press
<Enter> for a blank screen and
design a new Intelligent Form using
free text.
COPY AN EXISTING INTELLIGENT FORM: To
create a new Intelligent Form by editing
an existing Intelligent Form. Type the code that will identify that
Intelligent Form at the ENTER FORM
TYPE prompt and press <Enter>.
(Be sure the Intelligent Form is free
of errors as all information on
Example: Form PF1 presently exists in your Library.
You are creating a new
Intelligent Form (form) and want to edit
the format of Form PF2 to
create this new Intelligent Form.
At the ENTER FORM TYPE prompt,
type PF1 and press
<Enter>. The format of Form PF1 will be copied
into your new PF2 Intelligent
Form. The original Form PF1 will
not be disturbed.
From
the Command Line:
To
start creating or editing a form enter “E” or simply press the <Up>
Arrow.
See
“Command Line Functions” for more information below.
As you edit this form, any free text
will automatically wrap-
around at the end of each line.
Arrow Key Functions:
<Left> = Moves back one
space at a time erasing text.
<Right> = Moves to the
right one space at a time, but
does not erase
text.
<Down> = Moves down one
line at a time.
<Up> = Moves up one line
at a time.
<Page-Down> = Moves down
1 page at a time.
<Page-Up> = Moves up 1
page at a time.
If you make an error in typing, press
<Enter> and then press
the <Up> Directional Arrow key
to access the line you were on.
<Right> arrow to the area you
need to correct.
Control Key Functions:
Ctrl a: To add a blank line, hold the Ctrl key
down and press the letter a.
Ctrl d: To delete a line (with or without text), hold
the Ctrl key down and
press the letter d.
Ctrl w: Blanks a line from the cursor to the end of
that line.
Ctrl t: Inserts a blank space.
Ctrl r: Reformat a paragraph from cursor down using
cursor as left margin.
Ctrl z: Moves the cursor to the end of the current
line.
The upper toolbar
also provides “Copy” and “Paste” functions by clicking on the “edit” command.
To exit and save this form, press the
<Escape> key to access
the COMMAND LINE then <Escape>
again to save the record.
The cursor will return to the ENTER
INTELLIGENT FORM CODE prompt
located at the top of the screen.
USING FREE TEXT ONLY: Here you will
not be copying an existing
Intelligent Form to alter; you will
design an original Intelligent Form.
Enter
the characters that will identify the
Intelligent Form at the ENTER FORM
NUMBER prompt and press
<Enter>. A blank page 1 will be
displayed. You may now design a
Intelligent Form to your specific needs.
When entering free text, it will
automatically wraparound at
the end of each line.
If you make an error in typing, press
<Enter> and then press
the <Up> Directional Arrow key
to access the line you were on.
<Right> arrow to the area you
need to correct.
Control Key Functions:
Ctrl a: To add a blank line, hold the Ctrl key
down and press the
letter a.
Ctrl d: To delete a line (with or without text), hold
the Ctrl key down and
press the letter d.
Ctrl z: Blanks a line from the cursor to the end of
that line.
Ctrl w: Inserts a blank space.
Ctrl r: Reformat a paragraph from cursor down using
cursor as left margin.
To exit and save this Intelligent
Form, press the <Escape> key to access
the COMMAND LINE then type 0 (zero)
and press <Enter>. You
will return to the ENTER INTELLIGENT
FORM CODE prompt.
An example of a defined Intelligent
Form is on the next page.
EXAMPLE OF DEFINED INTELLIGENT FORM:
L:
This indicates what line you are on in the Intelligent Form.
In this example, the cursor is
on line 01.
SCRN:
This indicates what page you are on in the Intelligent Form.
This example shows page 1 of
the form.
To exit and save your Intelligent
Form, press the <Escape> key to access
the COMMAND LINE, Press Escape again
to save.
This Intelligent Form will be stored
by the name you assigned it. An
explanation of the COMMAND LINE
functions may be found on
the next page.
COMMAND LINE FUNCTIONS:
Example
Command Line:
COMMAND
-> <- (A)ctivate, (E)dit, (C)opy,
(P)rint, (T)ype, (Q)uit, (0)=End
(A)ctivate: This command emulates testing of the form as
used in the EMR module. Closing the EMR
“ACTIVATE” window will return the cursor to the command line.
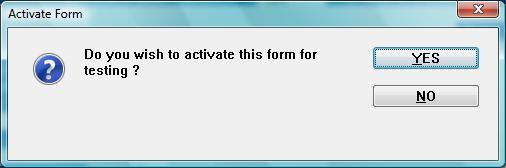
A yes response will
bring up the following screen for testing the Intelligent Form changes.
Closing the EMR “ACTIVATE” window will
return to the command line.
( C
)opy: Sets the form to behave when called up in
the EMR as follows:
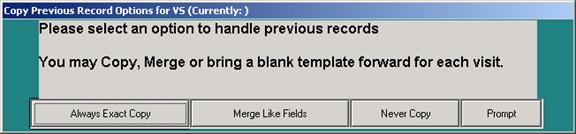
Exact
Copy: Copies the exact form from the previous
visit.
Merge Like
Fields: Copy the matching data elements from the
OLD form to the current form – If the data elements ( fields) match.
Never
Copy: Just brings up the blank default form.
Prompt:
Ask operator to “Copy or Merge”.
(E)dit:
Places the cursor on the form so that the form may be changed by
using arrow keys to navigate around
the form. Pressing the “UP” arrow key from the command line also does this.
(T)ype:
This will set the form as a primary exam Intelligent Form, or a secondary
Intelligent Form to be used within an exam.
Example: An age dependent well child visit Intelligent Form can be
created for age specific milestones and used as a primary example Intelligent
Form in lieu of the default “EXAM” Intelligent Form in the “Exam Setup”
window. Most likely this function will
result in too much complexity so it is
recommended only for unique situations.
Exams set to primary
are visible in the exam “Select Problems” setup window under “Exam Type”
(P)rint: Type P to print a hardcopy of this page. The program
will open a window allowing you to
select a printer.
There is an additional prompt to
include the field knowledge base responses along with printing the form body
itself.
(Q)uit:
This command will exit the form without saving any changes made since last
saving the form.
(T)Type: This
function allows setting of the Intelligent Forms as a primary exam Intelligent Form this Intelligent Form will
now appear under the “EXAM” selection area.
End:
Type <END> key or a '0' (zero) and press <Enter> to exit and
save
your Intelligent Form. The program will display the ENTER
INTELLIGENT FORM CODE
prompt. To exit to the Medical
Records Menu type <END> or O (zero)
again and press <Enter>.
Although not listed in the COMMAND
LINE, you may press the <Up>
Directional Arrow key to edit the
form directly. Your cursor will move to
line 1 of the document. You may arrow to the line of field to correct.
Press <Escape> to return to the
COMMAND LINE.
Altering the
lengths of a field:
Fields are defined
by a left and right bracket. The
database will store the area inside the brackets as a database field.
To make a field
smaller or larger, simply position the brackets until the field is the desired
length.
Adding
default text to a field:
In order to add a
default (automatic) answer to a field, simply edit the form and type the
default test directly into the field (between the brackets)
Example:
Throat
Presence: [
] <- Before Default
Throat
Presence: [erythematous ] <-
After default
Adding drop
down choices for a field:
You may add a set
of choices and buttons to a given field by using the form in the Activated
Mode.
- From the command line enter the
command 'A' to activate the form.
- Please the cursor in the field where the
choices will be added
- Enter the text for the answer, then
click the “Add Responses” icon located on the lower toolbar.

- You will be prompted to add the
text to the field choices.
Example:
Throat:
Presense: [cobblestone
appearance-------------------------------------]
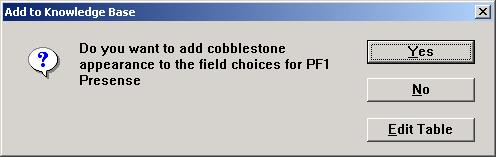
Enter 'Y' to add
this response to the field list for Presence.
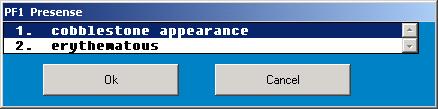
When the cursor is
placed on a certain field within the Intelligent Form, the “ACTIVATE” mode will
display the available selections in the right side selection panel specifically
for that field. Clicking “EDIT TABLE” allows access to existing selections or
the entire table for this field can be edited by way of the Trigger list
program located as selection #4 on the Medical Records Menu.
Adding links
to other Intelligent Forms:
To add a link to another Intelligent Form, put the Intelligent Form code inside “<” and “> characters. This will designate another form to the form compiler.
Example:
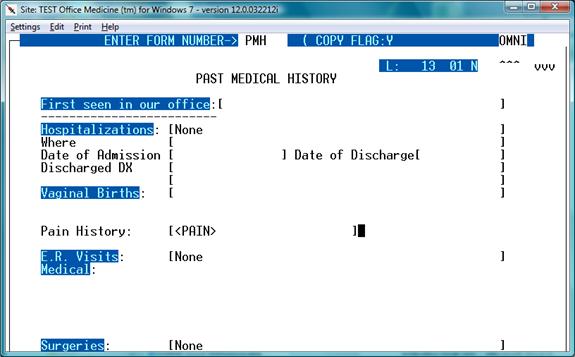
To make the Intelligent Form “PAIN accessible from another Intelligent Form, add the following:
PAIN HISTORY:
[<PAIN> ]
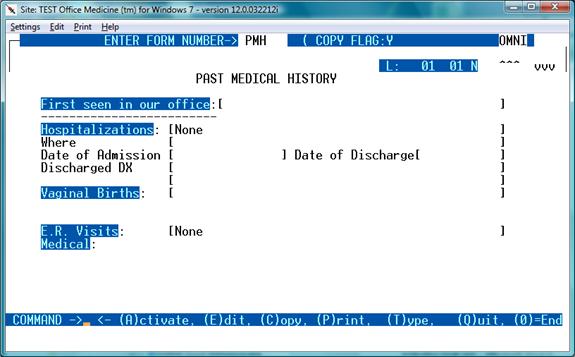
Screen before
adding Intelligent Form:
Screen after adding
Intelligent Form:
Extend the right
hand bracket to approx 40 characters in length in order to accommodate time
stamp and reviewing information. There is no limit to the number of Intelligent
Forms that can be nested. ( drill down ).
Initially,
Intelligent Forms are displayed from the “EXAM” Intelligent Form.
Types of fields:
Brackets: [The answer goes here ]
This creates a
single line field where a non-verbose response can be entered.
Example as viewed
in the “ACTIVATE” window:
Field Name:
The field name w/o
brackets creates an unlimited length paragraph for voice dictation or “Word”
processing type of data input. This
field does word wrapping.
Be sure to leave
several lines below the field for space for multiple lines ( if needed ).
Example:
Examination Notes:
Checkboxes:
Checkboxes are
automatically created by use of [y] or [n]
[y]= Checked –
checkbox
[n]= Un-Checked –
checkbox.
Example:
Chest
Retractions: [n]
Rales [y]
Ronchi: [y]
Wheezing:
[n]
How
to remove a permanent medication from EHR dashboard screen
1. Bring
Up Patient in Dashboard
2. Click
on Medication to be removed in the lower right quadrant
3. See Screenshot
Below
4. 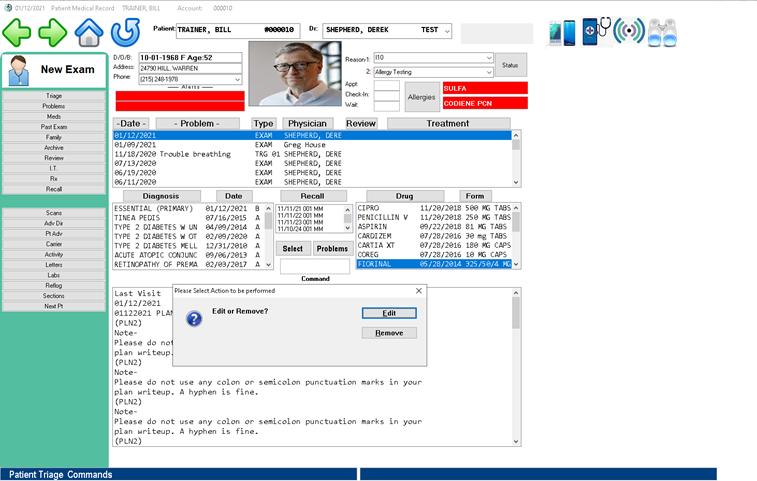
5. Now
click the “Remove” button
6. Done