TRANSACTION
CODES
OVERVIEW:
The Transaction Codes Dictionary allows you to
define a one-or-two character code to be used
as a financial transaction code. This code can
be applied to any program which prompts for a
TRANSACTION CODE. Transactions codes are used
to post
payments, refunds and adjustments.
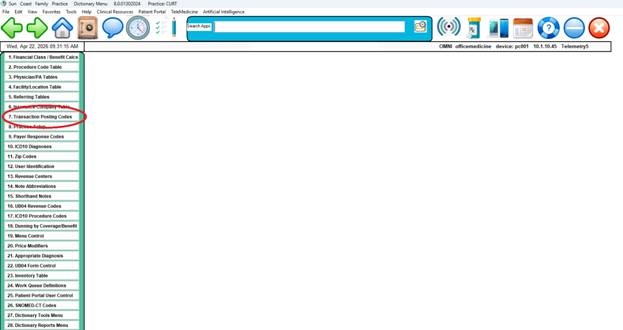
PROCEDURE: After you select Option 7, Transaction Codes,
and
press <ENTER KEY> the screen below will
be displayed.
______________________________________________________________________
After
you click on, or enter a 7 and press <ENTER KEY>, the screen below
will be displayed.
EXAMPLE SCREEN:
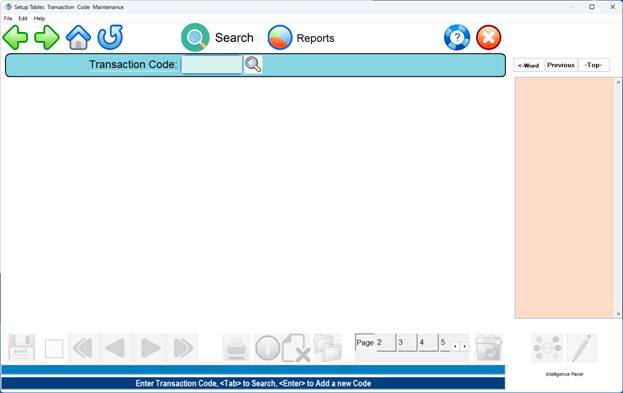
ENTER CODE:
Enter up to a two-digit character code (letters,
numbers, and/or any special characters on the keyboard
except
*). If this code is not already on
file, the following message
will be displayed:
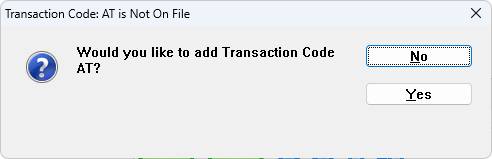
If
you do not want to add this code, type an N and press
<ENTER KEY>. The cursor will return to the ENTER CODE prompt.
If
you do want to add this code, type a Y and press <ENTER KEY>.
If
the transaction has already been defined, that information
will be displayed to the screen.
EXAMPLE
SCREEN:
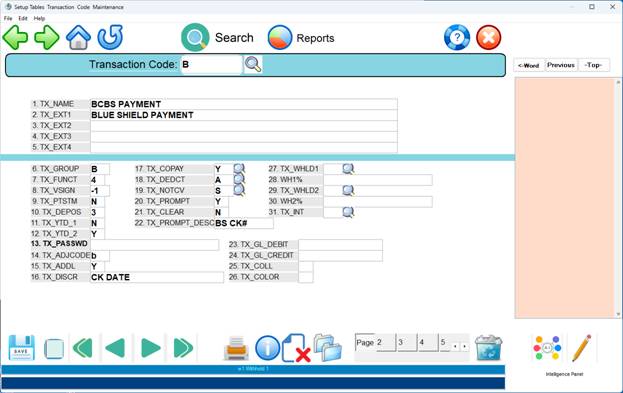
1.
TX_NAME: This field contains the
in-house description of
the transaction. The
maximum field length is 60 characters.
Approx
25 or so will appear on screens, however statements
and ledgers will contain the entire description.
2.
TX_EXT1: This is external label 1, and
it is used whenever
a statement, ledger, etc., is printed.
3.
TX_EXT2: This is external label 2. Additional text lines
for external label 1 may be entered here. If line 2 is 30
characters or less, lines 3 through 5 will also print.
4.
TX_EXT3: This is external label 3. Additional text lines
for the external label may be entered here also.
5.
TX_EXT4: This is external label 4. This is the last of
the external label lines.
6.
TX_GROUP: Use one or two characters that
match a transaction
code. If this
transaction should be included with a different
code on the Date of Entry report, enter the common group.
Normally, you just use the transaction code itself. The defi-
nition of the code you enter here
will be displayed to the
bottom of your screen.
7.
TX_FUNCT: You must enter a one-digit
function code. After
you enter a number and press <ENTER KEY>, the system
will auto-
matically display a description of
that code. This response
will determine what function this transaction has, and which
balance (insurance or patient) is affected.
FUNCTIONS CODES: These function
codes are not used to
post.
0 Claim charges
1
Patient payment
2 Patient refund
3 Insurance refund
4 Insurance payment
5 Insurance payment - credit
patient
6 Write-off/adjust patient
balance
7 Transfer from patient to
insurance or vice versa
8 Write-off/adjust insurance
balance
9
Comment
purposes only
OMNI'S EXAMPLE LIST OF PRE-SET TRANSACTION CODES
The
transaction codes below will reflect charges/payments/
adjustments to the patient's side of the ledger.
CODE DESCRIPTION FUNCTION SIGN
C CASH PAYMENT 1 -1
K CHECK PAYMENT 1 -1
P INSURANCE PAYMENT 5 -1
R REFUND TO PATIENT 2 +1
V CREDIT CARD PAYMENT 1 -1
W WRITE-OFF BALANCE 6 -1
X CHARGE IN ERROR 6 -1
t TRANSFER PATIENT TO 7 -1
INSURANCE
OMNI'S EXAMPLE LIST OF PRE-SET TRANSACTION CODES
The transaction codes below will reflect
charges/payments/
adjustments to the insurance side of the ledger.
CODE DESCRIPTION FUNCTION SIGN
A APPLIED TO DEDUCTIBLE 7 -1
B BLUE SHIELD PAYMENT 4 -1
D MEDICAID PAYMENT 4 -1
E EMPLOYER PAYMENT 4 -1
H HMO PAYMENT 4 -1
I INSURANCE PAYMENT 4 -1
L LEGAL PAYMENT 4 -1
M MEDICARE PAYMENT 4 -1
N NO COVERAGE ON DATE OF SERVICE 7
-1
S SERVICE NOT COVERED 7 -1
T TRANSFER INSURANCE TO
PATIENT 7 -1
b BLUE SHIELD
ADJUSTMENT 8
-1
d MEDICAID
ADJUSTMENT 8 -1
e EMPLOYER
ADJUSTMENT 8 -1
h HMO
ADJUSTMENT 8 -1
i INSURANCE ADJUSTMENT 8 -1
l LEGAL
ADJUSTMENT 8 -1
m MEDICARE
ADJUSTMENT 8 -1
r REFUND TO
INSURANCE 3 +1
w INSURANCE
ADJUSTMENT 8 -1
x INSURANCE
CHARGE IN ERROR 8 -1
8.
TX_VSIGN: You must enter +1 or -1 in
this field. This
indicates if the amount is usually positive or negative.
9. TX_PTSTM: This should be answered with a Y (yes) or an
N
(no). If you enter an
N, transactions will not display on
the patient statement and the resulting amounts will be
included as a balance forward.
10.
TX_DEPOS: Valid answers are Y (yes), N
(no), 1 (cash),
2 (patient check), or 3 (insurance check). If you answer
N,
this transaction would be excluded from appearing on the
bank deposit summary, even if the basic function code were
a payment or credit.
If you answer Y, this transaction
would be included in the bank deposit listing and total.
11.
TX_YTD_1: This field is used for
year-to-date totals. If
the dollar amount of this transaction would cause a change
in
the year-to-date totals enter a Y (yes). If not enter an N
(no).
12.
TX_YTD_2: This field is used for
payments.
13.
TX_PASSWD: This is an optional field. If
the use of a
password is
needed to work with this transaction code, enter
it here.
14.
TX_ADJCODE: This is used by the Posting
program to post
the transaction code for the insurance adjustment.
15.
TX_ADDL: Enter Y (yes) or N (no) if you
would like to
to enter a date pertaining to this transaction. An example
would be Voucher date, Check date, etc.
16.
TX_DISCR: Description of additional
date.
17.
TX COPAY: This is used by the Posting
program to post
the transaction code for the patient's copay.
18.
TX DEDCT: This is used by the Posting
program to post
the transaction code for the patient's deductible.
19.
TX NOTCV: This is used by the Posting
program to post
the transaction code which stands for not covered.
20.
TX PROMPT: This field requires a Yes or
No response.
Y = Yes prompt for a
check number.
N = No do not prompt
for a check number.
21.
TX CLEAR: This field also requires a Yes
or No response.
Y = Clears the number out between patients.
N = Defaults to previous number between patients or
transactions.
22.
TX PROMPT_DESC: This field allows you to
enter what the
check number prompt should say. Example:
At the TX PROMPT
description you may type CHECK #. That is what the prompt will
display for this transaction code.
23.
TX GL DEBIT: If the software is linked
to an accounting
package, at this prompt you would enter the General Ledger
account to debit.
24.
TX GL CREDIT: If the software is linked
to an accounting
package, at this prompt you would enter the General Ledger
account to credit.
25.
TX OT DEBIT: If the software is linked
to an accounting
package, at this prompt you would enter any other account to
debit.
26.
TX OT CREDIT: If the software is linked
to an accounting
package, at this prompt you would enter any other account to
credit.
27. TX COLL:
This field requires a Yes or No response.
Y = Yes apply to
collection balance.
N = No do not apply to
collection balance.
Note: You may access the Action
Line from any field by pressing
the <Home> key.
On
the following page is an explanation of the Action Line
functions.
DEFINITION OF ACTION LINE FUNCTIONS:
ACTION-> <-# to correct,(P)rt,(F)wd,(B)ck,(K)py,(D)el,(V)fy,Esc=END
Enter
# to Correct: Enter the number of the
field you need to
correct and press <ENTER KEY>. The cursor will move to the first
character on that line (information on that line will not
be
erased). You may retype the entire line, or position the
cursor
on the character that needs correcting. Press <ENTER KEY> to go
back to the Action Line.
(P)rint: Type P and press <ENTER KEY> to print a
copy of the in-
formation. The system will open a window in the middle
of your
screen listing output devices. Please see the example below.
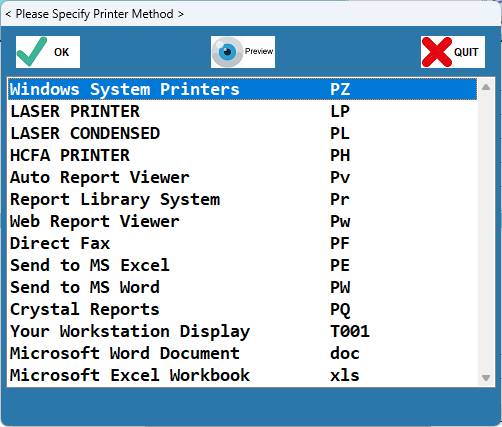
Type
in the number of your selection at the flashing cursor
and press <ENTER KEY>.
You may also use the <Up> and <Down>
Directional Arrow keys to highlight your selection and then
press <ENTER KEY>.
(F)wd: Type F and press
<ENTER KEY> to go forward one trans-
action code.
(B)ck: Type and press <ENTER KEY> to go back one
transaction
code.
(K)opy: If you enter K and press <ENTER KEY>,
the cursor will
move up to the ENTER CODE prompt and allow you to
change
the in-house code.
This will make a copy of the existing
transaction code and allow you to call it up two different
ways. If you have a Siteprompt, K will copy the transaction
code and recorded information to the SiteCODE
you enter. If you
do not enter 0 (zero) to save (done) before using the
K-command, the original code will not be saved.
Up
Directional Arrow Key: Although not
listed in the Action
Line,
at any point when you are in the process of completing
the procedure code screen, you may use the <Up>
Directional
Arrow to return to the previous field. The information
will
be erased and you may re-enter it.
(D)elete: If you want to delete this transaction code
from the
system, enter a D and press <ENTER KEY>. Do not delete a transac-
tion code that has been
assigned.
(V)erify: Displays who added this code and when. Displays who
updated this code and when.
Type V to and press <ENTER KEY>.
Esc=END: To save your entry and
exit to the ENTER CODE prompt
type 0 (zero) and press <ENTER KEY>. You may enter more codes
or type O (zero) and press <ENTER KEY> again to go to
the
Dictionary Menu.
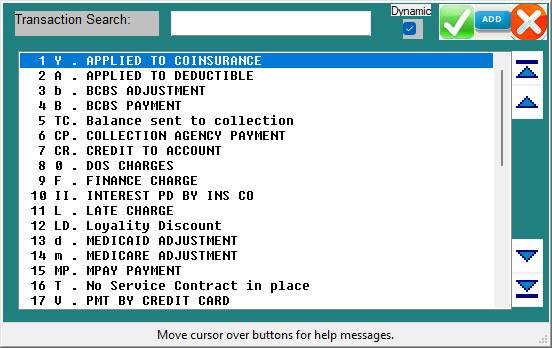
SEARCH: To search for a
transaction code, at the ENTER CODE
prompt, enter a few letters of the transaction and press
<Tab>.
A
window will open up in the middle of the screen listing the
transactions beginning with the letters that you
entered. You
may use the <Up> or <Down> Arrow keys to
highlight your selection
and press <ENTER KEY>. You may also type the number
shown at the far
left of your selection and press <ENTER KEY>.
Below
is an example screen of a transaction code search.
In this
example we have entered MED.
EXAMPLE SCREEN:
<Up>=Last, <Dn>=Next, <R>=NPage, <L>=LPage,
<Tab>=Add
<Up>/<Down> <Right>/<Left> refer to
Directional Arrow keys
To
exit the screen, Escape or type 0 (zero) and press <ENTER KEY>.