DELINQUENT PATIENT LIST
OVERVIEW: This program allows you to set the sort parameters by which you will
print the list of patients’ accounts that have become delinquent.
PROCEDURE: Select Option 3 from the Defined Report Menu (14) and <Enter Key>. The screen
below will be displayed.
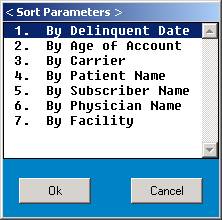
Select the desired sort parameter by typing the number at the cursor or use the <Up>/<Down>
arrow keys to highlight the line and <Enter Key>. Next, you will be asked to enter the jobs for
processing. You may enter specific jobs or type an asterisk for all jobs.
Next, you will set the sort parameters shown in the screen below.
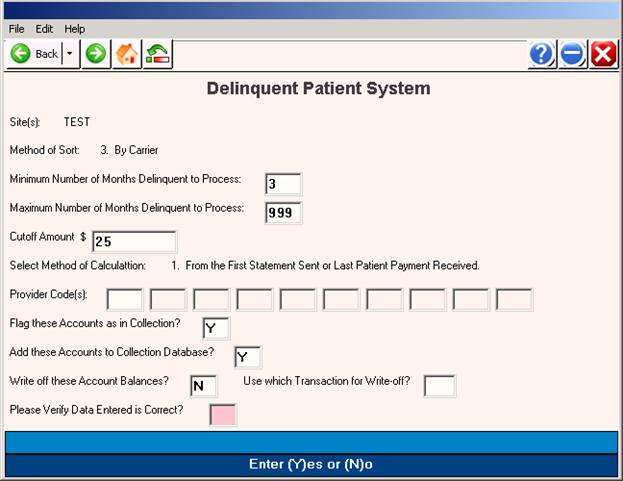
DEFINITION OF PROMPTS
Minimum Number of Months Delinquent to Process:
To change months to days, press <Enter Key>. Enter the minimum number of months/days you wish to process and <Enter Key>.
Maximum Number of Months Delinquent to Process:
To change months to days, press <Enter Key>. Enter the maximum number of months/days you wish to process and <Enter Key>.
Cutoff Amount $ .00:
Enter the minimum amount the Delinquent Patient List should report. Accounts with a delinquent balance less than this amount are not included in this report.
THE NUMBER OF DAYS ARE CALCULATED AS FOLLOWS:
1. From the First Statement Sent or Last Patient Payment Received.
2. From the First Date the Patient Balance was above Zero.
3. From the Last Date of Service.
4. By Exact D/O/S Balance from ledger.
Select Method of Calculation:
The default for this prompt is 1. To select a different method of calculation
simply type over the default number.
Transfer these Accounts to Collection?
The default for this prompt is N. A Yes response will put a “C” in the BILLS
field of Patient Information and the system flags the claim as being in collection.
Add these Accounts to Collection Database?
The default for this prompt is N. A Yes response automatically enters
information on the patient into the database, if you track them in this manner.
Write off these Account Balances?
The default for this prompt is N. A Yes response will have the accounts on this
report automatically written off—this is not suggested. It is suggested you print
and review the list first.
A Yes response displays:
Use which Transaction for Write-off?
(Enter the transaction code and verify it. An N response to the
verify prompt returns you to Write Off prompt.)
If no patients exist for the parameters you have set, the following message will be displayed to your screen: No Patients Exist with the following requirements.
If patients are found, a window will open allowing you to select the appropriate output device.
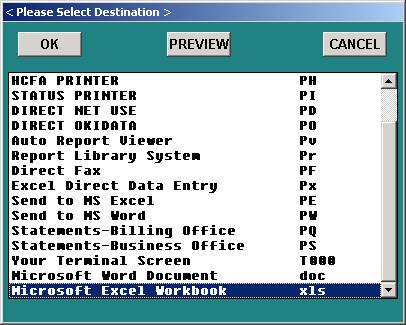
Select the appropriate output device and <Enter Key>. If you select an LP printer, you will be asked if you want condensed print.
After the report has been run, the number of past due accounts will be shown and the total amount of the past due Accounts Receivable. You will be prompted to reprint the report.
If you respond N to the Reprint Report prompt, you will be prompted to view the Call File.
If you respond N to the View Call File prompt, you will be returned to the Defined Report
Menu. If you respond Y to this prompt, the Jobs for Processing window will open.
Enter the jobs for processing and <Enter Key>. The Collection File Manager screen display.
The information displayed is pulled from the Collection Database.
 |
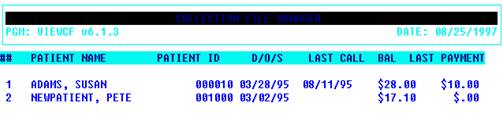
ACTION__ (ENTER # TO DIAL OUT, (P)AGE, (V)IEWLEDGER, (0)=END
Definition of Action Line functions begins on the next page.
ACTION LINE FUNCTIONS
ENTER # TO DIAL OUT: If you have the special equipment, you may enter the line number
of the person you wish the system to dial and <Enter Key>.
(P)AGE: Type P to go to the next page.
(V)IEW LEDGER: To view a ledger, type V and <Enter Key> Enter the line number of
the patient’s ledger you wish to view and <Enter Key>.
0=END: To exit and go to the Defined Report Menu type 0 (zero) and
<Enter Key>.
BATCH A/R LETTER
OVERVIEW: This selection allows you to merge an Accounts Receivable patient
balance with a letter previously written in word processing.
PROCEDURE: Select Option 4 from the Defined Report Menu and <Enter Key>. The screen
below will be displayed.
Enter individual jobs or type an asterisk for all jobs. Next, the system will begin the data base
merge program. The prompts you need to answer to set the parameters for this program are on
the next page.

SINGLE OR BATCH SELECTION
Single, Batch or Table Mode?: You may process one patient account (Single), several accounts to receive the same letter (Batch), or multiple letters to cover multiple date ranges (Table Mode).
Dunning Letter Filename: The name you assigned the letter when you saved it in your word processor. You may <Tab> to have the system open a window listing letters you have created in your word processor. The first line of each letter is displayed.
From this window you may view a letter before selecting it by using the <Up>/<Down> arrow keys to highlight the line and then press <Tab>. To exit the view process, press any key.
To select a letter use the <Up>/<Down> arrow keys to highlight the line and press <Enter Key>. The filename of this letter is inserted at the Dunning Letter Filename prompt.
Starting # of Delinquent Months: Enter the number of months you want the system to begin scanning accounts.
Ending # of Delinquent Months: Enter the number of months at which the system should stop scanning accounts.
Provider List to Process: If you are processing the letters for a specific physician(s), maximum three, enter the doctor number(s) and <Enter Key> To process all physicians just press <Enter Key>.
Scan for Coverage Code: Press <Enter Key> for all coverage codes or enter a specific coverage code and <Enter Key>.
Low End Cutoff Amount: Enter the minimum balance to start with.
Select Method of Calculation: Enter the line number of the method of calculation you want to use and
<Enter Key>.
Please Verify the Above Information (Y/N): If the information is correct, type Y. If you need to start over, type N.
Select Output Device: A window will open allowing you to select the appropriate output device. Make your selection and <Enter Key>. If you select an LP printer, the system will ask if you want condensed print.
After the first printing, the system will ask:
WOULD YOU LIKE TO RUN AGAIN? Y/N:
Y = Reprint
N = Do not run again.
TABLE MODE SELECTION
This selection allows you to create and/or access a table of letters that cover specific date ranges for one or several providers.
CREATING A TABLE:
At the Single, Batch or Table Mode? prompt type T for Table Mode. Next you will be prompted to
ENTER TABLE. Type the code you will assign this table, maximum nine characters. The Batch A/R
Letter Table Setup Master screen will display.
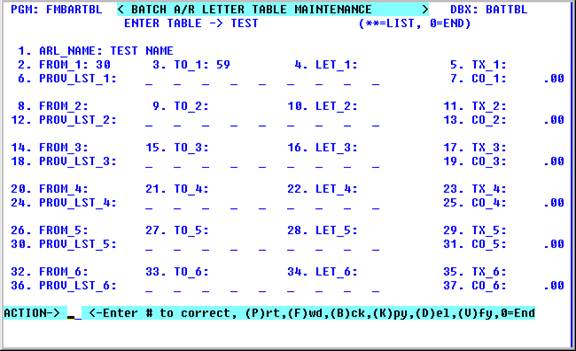
Your cursor will be at field 1. Steps to create a table are as follows:
(Note: Each time you press <Enter Key> the cursor will move to the next field.)
Field 1 Re-enter the code you assigned the table and <Enter Key>.
Field 2 Enter the beginning date range in days and <Enter Key>.
Field 3 Enter the ending date range in days and <Enter Key>.
Field 4 Enter name you assigned this letter when you saved it in your word processor and
<Enter Key>.
Field 5 If this letter pertains to a specific transaction code, enter it here and <Enter Key>.
Field 6 Enter provider code(s) whose patients should receive this letter. Maximum nine.
Field 7 If this letter pertains to delinquent payments, enter the cutoff amount $1 - $999.00
and <Enter Key>. Press <Enter Key> for a zero amount.
To save your work and exit the screen type 0 (zero) and <Enter Key>.
ACTION LINE FUNCTIONS
Action Line Commands/Buttons
Enter # to Correct: Enter the field number to correct and <Enter Key>. The cursor will move to that
field. Press <Home> to return to the Action Line.
(P)rt: Type P and <Enter Key> to print a hard copy of the screen.
(F)wd: Type F and <Enter Key> to go forward one table.
(B)ck: Type B and <Enter Key> to back one table.
(K)py Type K and <Enter Key> copy the information from to this table to another table.
(D)el: To delete this table type D and <Enter Key>.
(V)fy: Typing V displays the initials of whom last updated this table and when.
ACCESSING A TABLE
At the Single, Batch or Table mode? prompt type T for Table Mode. At the ENTER TABLE prompt
type the name of the table, name you assigned when you created it -maximum nine characters, and <Enter Key>. Or you may press <Tab> for a listing of tables on the system. A window will open listing tables you have created.
![]()
![]()
![]()
![]() < Search Function - 0=END >
< Search Function - 0=END >
SELECT OR SEARCH:
01 AA .TABLE I <1
02 AA .TABLE II
03 AA .FLU
<Up>=Last,<Dn>=Next,<R>=Npage,<L>=LPage
From this window select the table you want by either typing the line number at the cursor or use the arrow keys to highlight the line and <Enter Key>. A summary of letters contained within the table you selected will display to your screen.
![]()
![]()
![]()
![]() < Batch A/R Table Key >
< Batch A/R Table Key >
# DAYS LETTER TYPE PROVIDER CUTOFF
1. 30 - 90- LETTER A 001 2.00
2. 0 - 999 MOVING 001,002,003- 0.00
3. 91 -120 LETTER AC 002 2.00
ACTION-> <-(U)se Table, (S)elect New Table, (E)dit Table, (0)=Exit Table
![]()
ACTION LINE FUNCTIONS
BATCH A/R TABLE KEY
(U)se Table: To use this table, type Y and <Enter Key>. You will be prompted to select
a printer.

Select the appropriate output device and <Enter Key>. If you select an LP printer, the system will ask if you want condensed print.
When printing is completed, the following prompt will display.
WOULD YOU LIKE TO RUN AGAIN? Y/N
Y = Will print the report a second time.
N = Returns you to the Batch A/R Letter screen.
(S)elect New Table: If this is not the table you want to use, type S and <Enter Key>. The search screen
will display and you may select a different table.
(E)dit Table: To edit a table, type E and <Enter Key>. The table you selected will display.
(0)=Exit Table: This function takes you to the Batch A/R Letter screen. The cursor will be at the
Single, Batch or Table Mode? prompt.
Example Letter
[DATE]
[PFN] [PLN]
[PTA]
[PTC] [PTZ]
[PT#]
Dear Patient:
Our records indicate that your account, in the amount of [PTBAL2], is currently past due.
If you are experiencing any difficulty in paying this amount, please call the office
immediately so that we may work out a payment schedule.
Sincerely,
George Smith, M. D.
SEE THE FOLLOWING PAGE FOR AVAILABLE MAIL MERGE CODES
MERGE CODES FOR ANY DOCUMENT THAT NEEDS TO BE MAIL MERGED
(Example- BATCH A/R, COLLECTION LETTERS
[AGE] Patient Age Format ###yrs
[AGEB] Patient Age Format ###y ##m ##d
[DATE] System Date Format mm/dd/yy
[DATE2] System Date Format mm/dd/yyyy
[DOS] Date of Service (From Last Patient Claim Date)
or Appointment Date
[DRF] Doctor’s First Name Only
[DRL] Doctor’s Last Name Only
[DR_PHONE] Doctor’s Telephone Number Format (###) ###-####-#########
[DR_STZP] Doctor’s State & Zip Code Format XX. XXXXX-XXXX-XXXXX
[DR#] Doctor’s Code Number Only
[EN#] Next Available Encounter Number
[EM_STZP] Employer’s State & Zip Code Format XX. XXXXX-XXXX-XXXXX
[EM_TELE] Employer’s Telephone Number Format (###) ###-####-#########
[FAMAGE] Aged Family Account Balance
[FAMBAL] Family Balance (Prints Carrier Balance Also)
[FAMBAL2] Family Balance (Only Prints Family Balance)
[FFF] Form Feed Output Device
[FT] “MR” or “MS”
[GFN] Guarantor First Name Only
[GLN] Guarantor Last Name Only
[GRA] Guarantor Address 1 + Space + Address 2
[GR_STZP] Guarantor State & Zip Code Format XX. XXXXX-XXXX-XXXXX
[GR_TELE] Guarantor Telephone Number Format (###) ###-####-#########
[INSBAL] Insurance Balance With Date
[INSBAL2] Insurance Balance
[INSPYM] Insurance Last Payment Amount With Date
[INSPYM2] Insurance Last Payment Amount
[INS_STZP] Insurance State & Zip Code Format XX. XXXXX-XXXX-XXXXX
[INS_TELE] Insurance Telephone Number Format (###) ###-####-#########
[PFN] Patient First Name Only
[PLN] Patient Last Name Only
[PLINS] Subscriber Insurance Data
[PLSTS] Patient Chronic Problem List
[PROC] Procedure Code
[PROV(0-5)] Patient Provider 0-5
(Use Braces {} instead of Brackets [ ] to print the
Description of this Provider Code)
[PROVA] Provider Address 1 + Line Feed + City, State & Zip Code
[PROVN] Provider Clinic Name
[PTA] Patient Address 1 + Space + Address 2
[PTBAL] Patient Balance With Date
MERGE CODES FOR ANY DOCUMENT THAT NEEDS TO BE MERGED WITH THE
MEDICAL SYSTEM (Example- RECALL, BATCH A/R, PROCEDURE LETTERS,
“ROUTE” AND “SIGN” FORMS).
(continued)
[PTBAL2] Patient Balance
[PTPYM] Patient Payment With Date
[PTPYM2] Patient Payment
[PT_STZP] Patient State & Zip Code Format XX. XXXXX-XXXX-XXXXX
[PT_TELE] Patient Telephone Number Format (###) ###-####-#########
[PT#] Patient Account # With Job Code
[PT##] Patient Account # Without Job Code
[SFN] Subscriber’s First Name Only
[SLN] Subscriber’s Last Name Only
[TIME] System Time
or Appointment Time
OTHER MERGE CODES USED:
[BILLS] Patient Bills
[BUDGET] Patient Budget
[CHART] Patient Chart
[CONTRCT] Contract Number
[CV_CODE] Patient Coverage Code
(Use Braces {} instead of Brackets [ ] to print the
Description of this Coverage Code)
[DUNN] Patient Dunning
[FC_CODE] Patient Facility Code
(Use Braces {} instead of Brackets [ ] to print the
Description of this Facility Code)
[GROUPID] Group Number
[INS_CO]:#1 Primary Insurance
[INS_CO]:#2 Secondary Insurance
[INS_CO]:#3 Tertiary Insurance
(For any of the INS_CO fields, Use Braces {} instead
of Brackets [ ] to print the description of this Insurance Code)
[MRN] Patient Medical Record Number
[OPTION1] Option 1
[OPTION2] Option 2
[PRI_DX] Primary Diagnosis Code
[PROB_DX]:#1 Problem Diagnosis #1
[PROB_DX]:#2 Problem Diagnosis #2
MERGE CODES FOR ANY DOCUMENT THAT NEEDS TO BE MERGED WITH THE
MEDICAL SYSTEM (Example- RECALL, BATCH A/R, PROCEDURE LETTERS,
“ROUTE” AND “SIGN” FORMS).
(continued)
[PROB_DX]:#3 Problem Diagnosis #3
[PTC] Patient City (Formats spaces proportional to address automatically.)
[PTZ] Patient State/Zip (Formats spaces proportional to address automatically.)
[PT_ADD1] Patient Address 1
[PT_ADD2] Patient Address 2
[PT_CITY] Patient City
[PT_DOB] Patient Date-of-Birth
[PT_EMPL] Patient’s Employer Name
[PT_NAME] Patient Name
[PT_RELS] Patient Relationship
[PT_SEX] Patient Sex
[REF_BY] Referral Doctor
(Use Braces {} instead of Brackets [ ] to print the
Description of this Referral Code)
[SERVICE] Service Code
[SOC_SEC] Patient Social Security Number
[DR_], [FC_], [INS_], [RF_] After the Underscore, Type Field Label from the Dictionary
to have that specific info printed.
Ex. [RF_PHONE] -- Prints Referral Phone Number
Ex. [DR_SS_NO] -- Prints Doctor’s SSN Number
+ Removes extra spaces, all spaces except one will be removed.: More than one bracket on a line,
type + [ ] or + { }