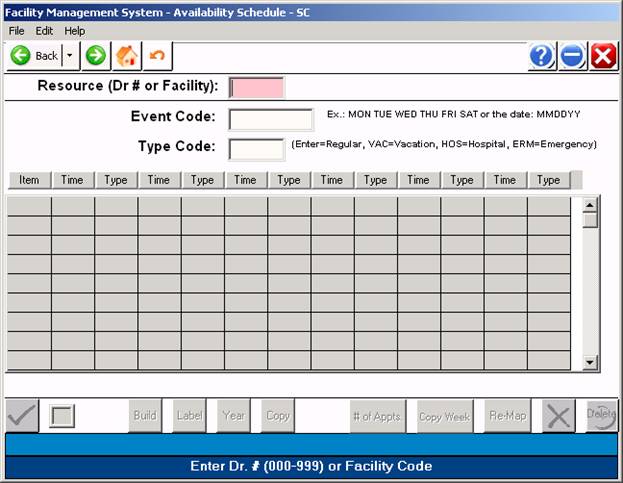
OVERVIEW: This program provides a system or creating, searching, canceling,
listing, and printing appointments. It relates specifically to the
month, day, and time for each provider or resource code in the system.
The Clinical Scheduling System allows for managing the
schedules of patients, health care providers, equipment, rooms,
transportation, or any resource which requires a scheduling process.
PROCEDURE: From the Main Menu select Option 13, Scheduling System,
and <Return>.
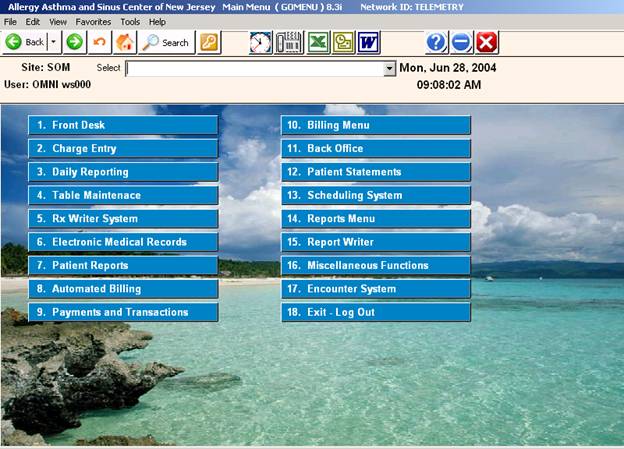
After you select Option 13, the SCHEDULER Menu below will display.
SCHEDULE APPOINTMENT-1
|
OVERVIEW: Schedule Appointment-1 provides a graph-type format for scheduling.
This selection allows:
1. Scheduling of up to four appointments for a single patient with a minimum of
key strokes.
2. Confirming of appointments without printing a hard copy (screen shows patient
name, phone number, and reason for appointment).
3. Scheduling a patient with the option of additional time slots for longer appointment
time.
4. Rescheduling an appointment with one or more time slots.
5. Multiple booking of appointments on a single time slot.
6. Deleting a patient appointment.
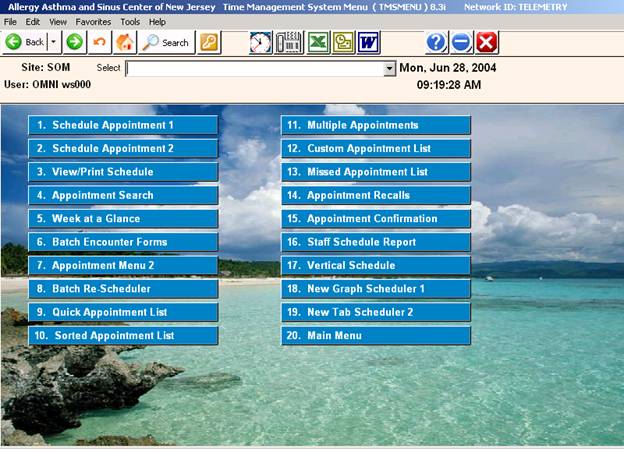
PROCEDURE: Select Option 1 from the SCHEDULER Menu and <Return>. Follow the
procedure below and build the schedule for Schedule Appointment-1.
Process for Build Schedule of Schedule Appointment-1.
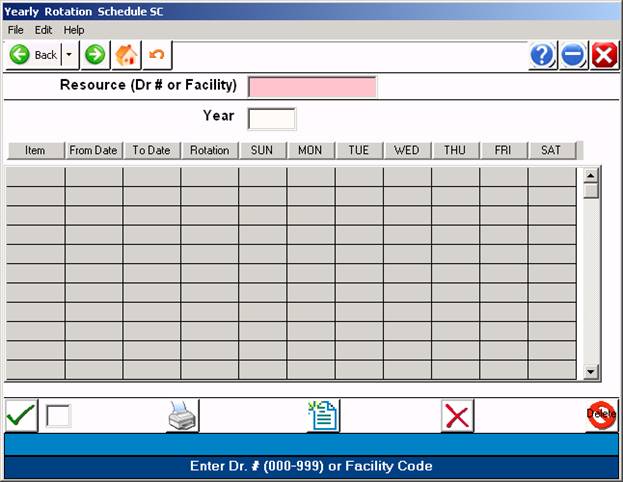
1. Build Yearly Rotation Schedule (Selection 7,SCHEDULER Dictionary Menu, from that Menu select
Option 1, Build Yearly Rotation Schedule).
*2. Define appointment types (Selection 4, Type Definitions, from the SCHEDULER Dictionary Menu).
3. Set up your Master Time Table (Selection 2, SCHEDULER Dictionary Menu).
*4. Define your Date Jump Table if you have this feature (Selection 5, SCHEDULER Dictionary Menu).
*These steps are not required steps. You would only use Type Definitions
if your practice schedules only specific types of appointments.
Once the schedules have been built, you may begin scheduling patients. Instructions for scheduling patients begins on the next page.
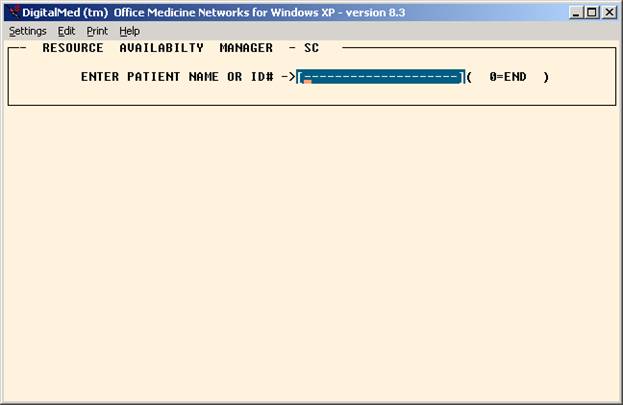
SCHEDULING PATIENTS:
After you select Appointment Schedule-1 from the SCHEDULER Menu and <Return>, the screen below
will display.
![]()
EXISTING PATIENT
ENTER PATIENT NAME OR ID#: Type the patient ID number and <Return>.
Search: If you are unsure of the ID number, type the first few letters of the patient’s last
name and <Return>. From the list displayed make your selection using the <Up>/<Down> arrow keys to highlight the line or type the line number at the cursor and <Return>.
NEW PATIENT
When entering a new patient, you start with the Patient Information program.
(1) Last Name Type the last name of the patient and <Return>. Check to
confirm that the patient is not already on the system.
(2) * <Return> At the SELECT OR ENTER NEW Name prompt type an
asterisk (*) and press <Return>.
(3) Y <Return> The next prompt is “Not on file. Add? (Y=Yes N=No)”. Type
Y and <Return>. The system will assign the next account number.
(4) Fill in Screen Enter the code of the provider you think the patient will have the
appointment with and <Return>. Complete as much of the screen
as you can. Required fields are highlighted. For the coverage code
field, a safe choice would be z (no insurance); all charges are the
patient’s responsibility. You can complete the screen and change
any incorrect fields later.
(5) A <Return> At the Action Line of Patient Information type A and <Return> to
go to Schedule Appointment-1. Example screen on next page.
*Any existing appointments on the patient will show at the bottom of the screen.
**Calendar: To open the calendar window, press <Tab> from any of the following prompts:
STARTING DATE, STARTING TIME, ENDING DATE, ENDING TIME.
***Calculate Days: Enter the number of days at the STARTING DATE prompt and <Return>.
The system will go forward calculating the days, and will insert the date after completing the
calculations.
Program Prompts: The prompts shown in the above screen are defined on the next page.
Prompt Defaults: If the defaults on the screen for each prompt are correct, you may press the
<Home> key to accept them. The scheduling screen will then display.
DEFINITION OF PROMPTS
(Schedule Appointment 1)
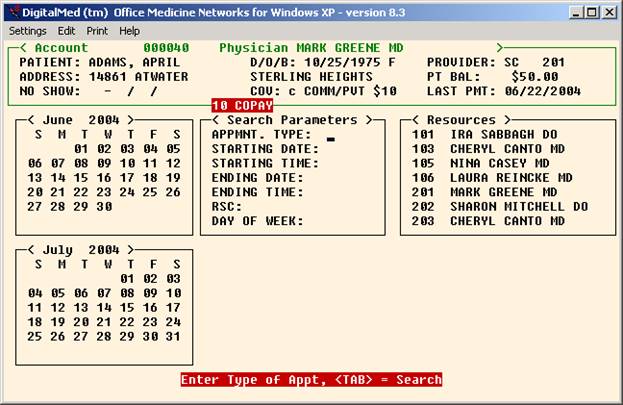
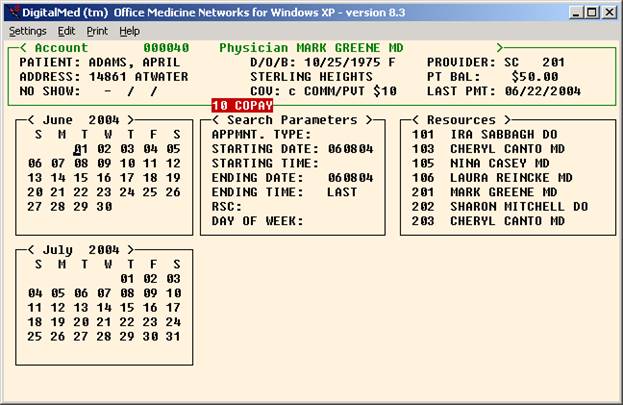
You may schedule an appointment by accepting the program defaults, or you may schedule an appointment independent of program defaults by entering specific information at the prompts.
APPMNT. TYPE: Enter established appointment type (i.e., A=Amino Normal) or <Return> for the default.
Default: All types of appointments is the default.
Delete: To delete an appointment type you entered, <Up> arrow
and space over it. Enter a different one or <Return> for default.
STARTING DATE: Enter a date or <Return> for the default. If you have the Jump Control feature, after you enter a date press <Return> to move to the Code Box. Enter the Jump Control Code that identifies the calculation purpose (i.e., E=Delivery Date). The appropriate date range for that appointment type will be filled in.
Default: The current date is the default.
STARTING TIME: Enter the earliest hour and minute to consider or <Return> for the default time.
Default: The first available appointment is the default.
ENDING DATE: Enter an ending date or press <Return> for the default date. If you entered a Jump Control Code, this date will adjust automatically for that Jump Control Code.
Default: One month from the starting date.
ENDING TIME: Enter the hour and minute to consider or <Return> for the default.
Default: Include last available appointment time.
RESOURCE(S): Enter a resource and <Return>. You may enter up to four resources. A resource may be equipment, rooms, a provider or facility as long as you have defined the resource in either the Provider Codes Dictionary or the Facility Codes Dictionary, and you have built a Master Time Table for it.
For multiple resources, after you pass the DAY OF WEEK prompt, the system will ask:
(C)ONCURRENT, (S)EQUENTIAL? (C/S):
(C) = Scheduling resources for the same time.
(S) = Scheduling resources with one following the other.
DAY OF WEEK: Enter a preferred day of the week or press <Return> for default.
Default: All open days of the week.
Screen #1 to actually set appointment.
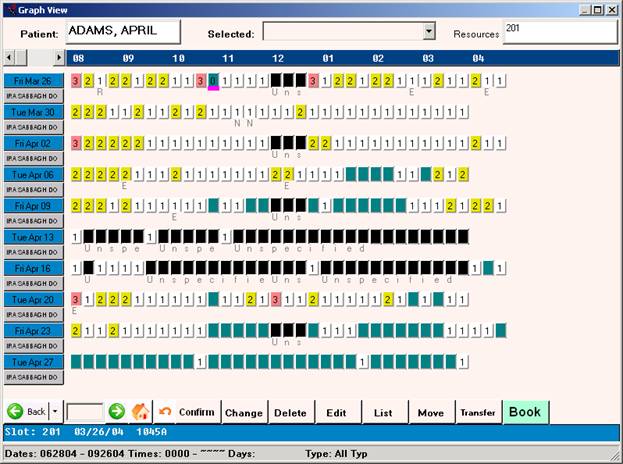
In the above example, we scheduled an appointment for Wednesday, October 22, at 8:30 a.m.
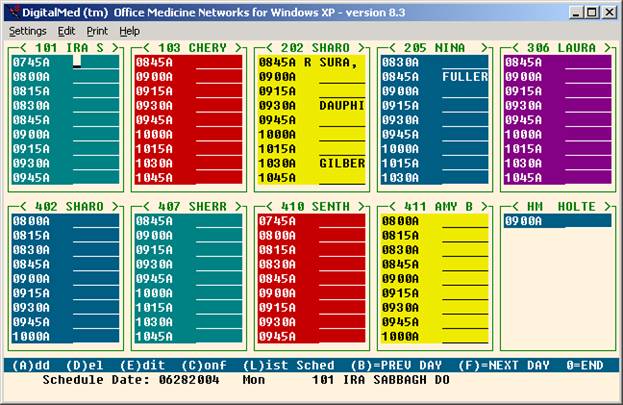
Within This Screen
* An asterisk or BLACK cell indicates blocked time. This is time set aside for an event other than patient appointments. If you entered a reason when you blocked the time, the
reason will also print.
N This is an example of a type code. Only the first character of the type code will
show for each time slot where that type of appointment may be scheduled.
1-9 You may enter from 1 to 9 appointments in a time slot.
A symbol that indicates an open time slot. In the screen above, the symbol
With a green cell, or a '0' indicates an open time slot.
<TIME> The cursor will be on the first available time slot. Use the arrow keys to
move the cursor to a different day or time slot. You may need to use the
<Del> key to move to the left.
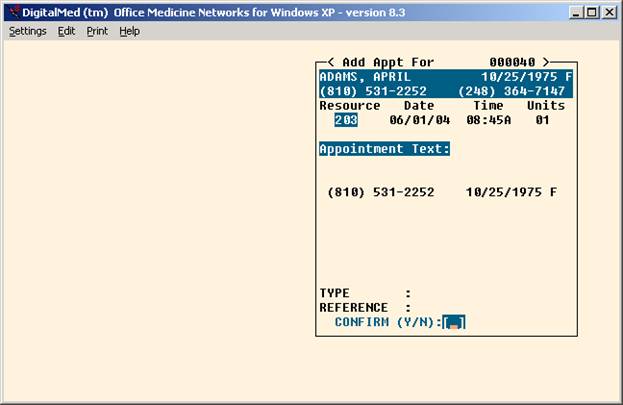
A At the time slot type A to add the appointment. Resource date and time are
echoed in the upper right hand corner.
Units Enter the number of appointment slots needed. Cursor moves to Appointment
Text.
Appointment
Text The patient’s phone number will display. You may enter text or <Return>
through this section and go to the next prompt.
Type Enter a specific appointment type or <Return> to go to the next prompt.
Reference Enter a referring physician or <Return> to confirm the appointment. The screen
will update displaying a confirmation prompt. See example below.
ACTION LINE FUNCTIONS FOR SCREEN #1
(A)dd Place the cursor on the selected appointment and type A to add an appointment.
(B)ack Type B to go back one calendar page.
(C)nfn Type C to confirm the appointment.
(D)el To delete an appointment, place the cursor on the appointment slot and type D.
Confirm the deletion.. This does not give you the option to of noting anything
on the patient’s ledger.
(E)dit Type E to edit the appointment screen. This is useful to change a patient’s phone
number or update the reason for the appointment. To do this, place the cursor on the booked appointment slot, type E and <Return>. Your cursor will move to the
Appointment Text area. Make your changes and <Return> until you are at the
confirmation prompt then type Y to confirm.
(F)wd Type F to go forward one calendar page.
(L)ist Lists to the screen the appointments and any blocked time information for the
date the cursor is on. Example below.
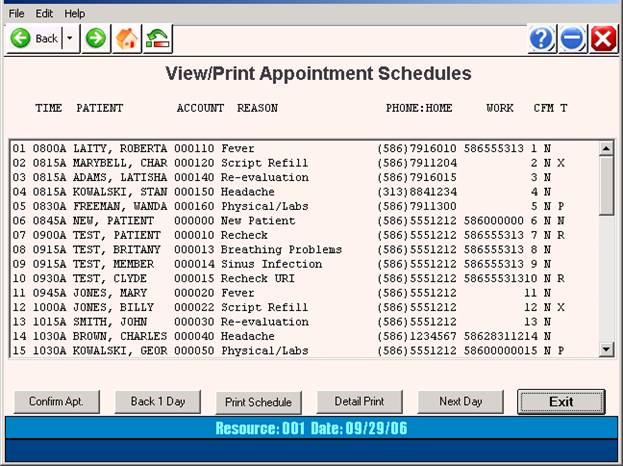
From this screen you may confirm appointments, go back one calendar day, forward
one calendar day, print the screen, return to the appointment scheduler screen.
(M)ove To move an appointment, place cursor on appointment time and type M. Move
cursor to new date and/or time and type T. Update the Units prompt and sub-
sequent prompts. Confirm. If you have two or more time slots for one
appointment, you must place the cursor on the beginning time slot (you will be
prompted to move the cursor if you are not on the first time slot).
(P)rm Takes you back to the Schedule Parameters screen.
<RET>=Appt Pressing <Return> after you type A at a appointment slot sets that appointment.
Once you have scheduled an appointment and returned through the various prompts (Units, Text,
Type, etc.), the Action Line will change and display a Confirmation prompt and a Directions prompt.
Screen #2 showing Confirmation prompt.
![]()
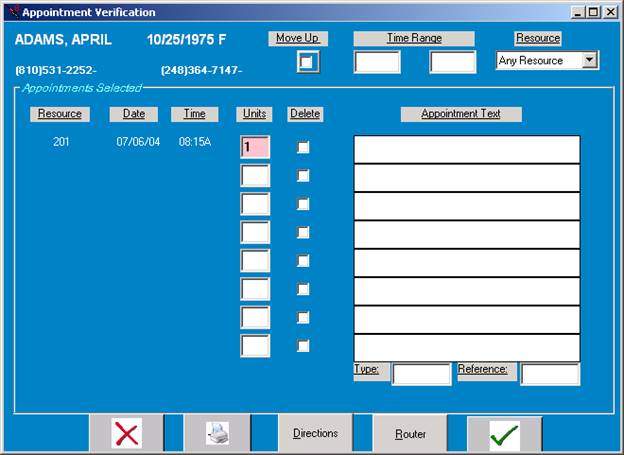
CONFIRM APPOINTMENT? (Y/N/(R)outer or Directions:
Y = (Green Check) Confirms appointment. Appointment will be saved.
N = (Red X) Cancels appointment. Appointment will not be saved.
(D)IRECTIONS: Typing the Directions button opens a window displaying directions if they have been entered in the Site Code Definition Dictionary.
SCHEDULE APPOINTMENT-2
|
OVERVIEW: Schedule Appointment-2 provides a ledger-type format for scheduling,
confirming, deleting and changing appointments. It allows scheduling
a patient with the option of additional time slots for a longer appointment
time.
This appointment scheduler is different from Schedule Appointment-1
in that you cannot delete an appointment from the scheduler itself. You
use the Appointment Search program, selection 4 on the SCHEDULER Menu, and
delete the appointment using that program.
PROCEDURE: Select Option 2 from the SCHEDULER Menu and <Return>. Follow the
procedure below and build the schedule for Schedule Appointment-2.
Process for Build Schedule of Schedule Appointment-1.
1. Build Yearly Rotation Schedule (Selection 7,SCHEDULER Dictionary Menu, from that Menu select Option 1, Build Yearly Rotation Schedule).
*2. Define appointment types (Selection 4, Type Definitions, from the SCHEDULER Dictionary Menu).
3. Set up your Master Time Table (Selection 2, SCHEDULER Dictionary Menu).
Once the schedules have been built, you may begin scheduling patients. Instructions for scheduling patients begins on the next page.
SCHEDULING PATIENTS:
After you select Appointment Schedule-1 from the SCHEDULER Menu and <Return>, the screen below
will display.
![]()
EXISTING PATIENT
ENTER PATIENT NAME OR ID#: Type the patient ID number and <Return>.
Search: If you are unsure of the ID number, type the first few letters of the patient’s last
name and <Return>. From the list displayed make your selection using the <Up>/<Down> arrow keys to highlight the line or type the line number at the cursor and <Return>.
NEW PATIENT
When entering a new patient, you start with the Patient Information program.
(1) Last Name Type the last name of the patient and <Return>. Check to
confirm that the patient is not already on the system.
(2) * <Return> At the SELECT OR ENTER NEW Name prompt type an
asterisk (*) and press <Return>.
(3) Y <Return> The next prompt is “Not on file. Add? (Y=Yes N=No)”. Type
Y and <Return>. The system will assign the next account number.
(4) Fill in Screen Enter the code of the provider you think the patient will have the
appointment with and <Return>. Complete as much of the screen
as you can. Required fields are highlighted. For the coverage code
field, a safe choice would be z (no insurance); all charges are the
patient’s responsibility. You can complete the screen and change
any incorrect fields later.
(5) A <Return> At the Action Line of Patient Information type SCHEDULERAPPT and
<Return> to go to Scheduler Appointment-2.
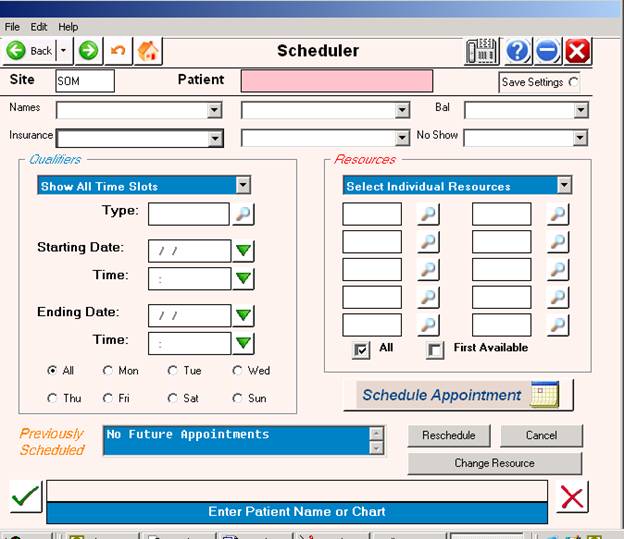
Set Appointment-2 Parameters Screen
Press <HOME> for availability listing: Pressing <HOME> at the STARTING DATE prompt
will display the schedule for the current day. Example below.
<TAB> for Calendar: Pressing <TAB> at the STARTING DATE prompt will display the
current month calendar and patients that have been scheduled. Example below.
SCHEDULING AN APPOINTMENT
You may schedule an appointment by accepting the program defaults, or you may schedule an appointment independent of program defaults by entering specific information at the prompts.