Open Group
Scheduling
Setup Table #1
Overview: This set of scheduling options allows for flexible scheduling of a meeting group where all the appointments are at the same time and there is a limited or fixed number of patients in the group.
Procedure:
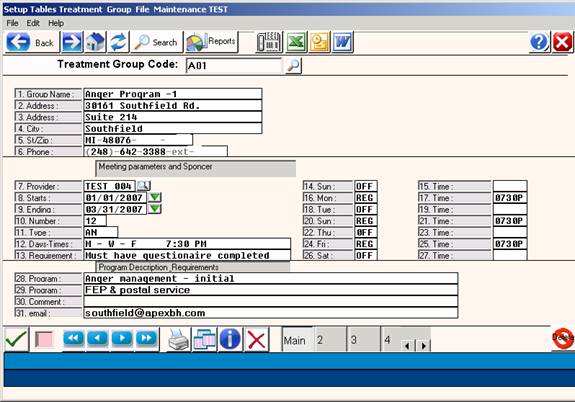
- Setup the group in the Scheduler Treatment Group Code table.
- Select menu items 13>7>8
- Enter a 3 character meeting codes
- Examples and/or Suggested Coding Structure:
Pre-Treatment 1-4 P01, P02, P03, P04 etc
Rehab R01,R02,R03, etc
Didactic
Sex Offender
Initial
Chemical Depend C01, C02, C03, etc
Anger A01, A02, A03, etc
Example Screen
- After the completion of the fields above, click the “OK” (Green Checkmark) and a prompt will read:
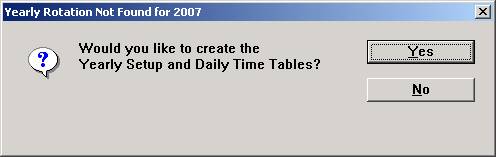
- Responding (Y)es will automatically create the Yearly Setup Tables and the Daily Times tables for the program as described by the entries above.
- Once the Yearly setup has been added, the prompt will discontinue.
- For further enhancements or changes to the yearly setup see the next section.
- Set-up Yearly Schedule in the scheduler setup menu
- Select 13>7>1 Yearly Rotation
- Enter resource code(s) as defined above in the Treatment Group Schedule.
Example Screen:
After you select Option 13, the SCHEDULER Menu below will display.
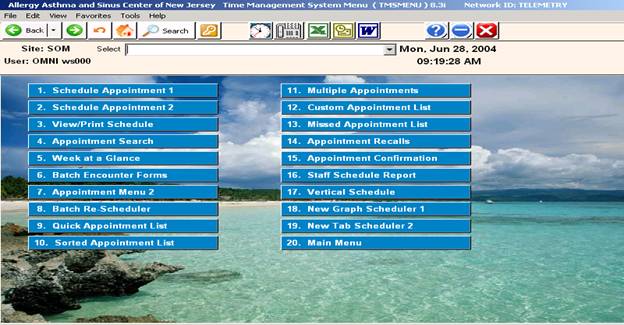
Now select option #7 – then #17 – Treatment Group Table

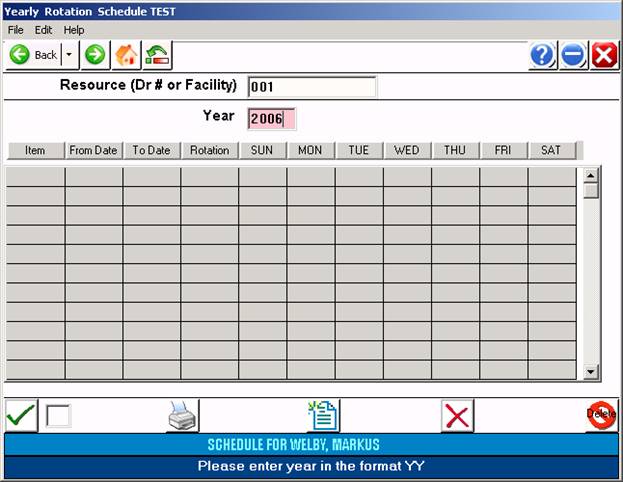
Setup Table #2 - Yearly Rotation
|
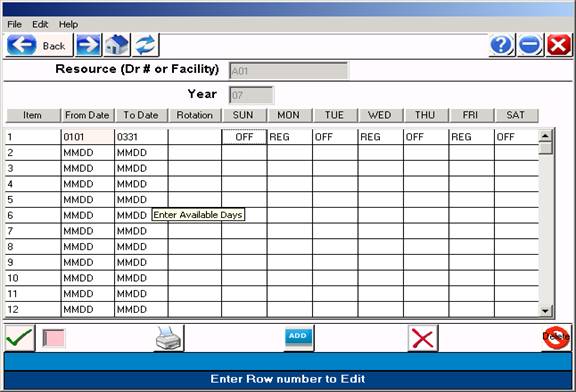
OVERVIEW: The yearly rotation table specifies what days each treatment group or resource is available or NOT available. This may include holidays, vacations, meetings, etc.
PROCEDURE: 1. Enter a Treatment Code, usually starts with a letter. Example I01
 2. Enter the YEAR to specify the available days. Example: 06 or 2006
![]()
DEFINITION OF PROMPTS
(Yearly Rotation Table Setup)
Step 3: From the command line, enter a “1” and <Enter Key> or click on the first From Date – To Date line – Now enter the From – To dates of 01/01 - 12/31 and indicate which days the
The meeting is opened by typing REG under the respective day of the week,
and OFF if the meeting does not convene on this day of the week.
![]()
![]() Note: You MUST
enter the dates of 0101-1231 on the first line to indicate the normal (default)
dates the meeting is held. You can specify on the next line if the meeting
will not start till Jan 5, or example.
Note: You MUST
enter the dates of 0101-1231 on the first line to indicate the normal (default)
dates the meeting is held. You can specify on the next line if the meeting
will not start till Jan 5, or example.
Example: If the meeting is held on MON, type REG under the MON column. If the meeting is not held on SUN, type OFF under SUN. – See example below:
 |
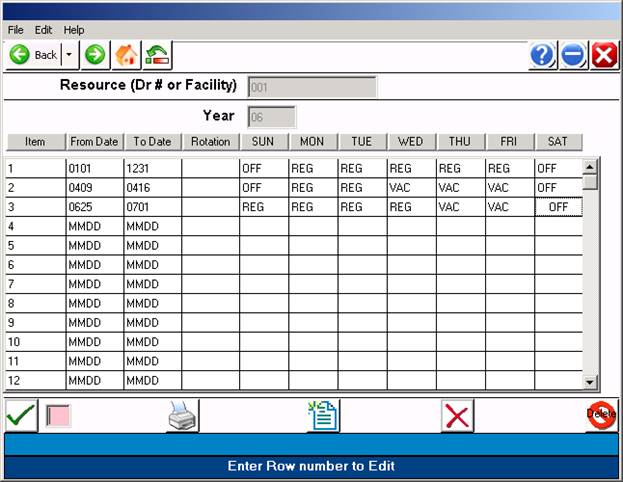
Step4: Now add additional lines indicating exceptions to the rule defined on line #1.
Example: The meeting is only held on April 12,13 & 14 for the Easter Holiday:

Note: The exceptions DO NOT have to be in date order. You may put in an exception at any time. – Please THERE IS NO NEED TO DEFINE ALL 52 weeks of the year unless the resource is held on different days of the week routinely through the year.
Example: The meeting is rotated with the other 3 providers in the practice each week throughout the year. – Every rotation also works different days of the week.
Step5: Now press <Escape> and click the “OK” (green check box) or press Escape> again to save this record.
Step 6: Repeat for each meeting code needed. Example: “P02, R03, D06, etc”.
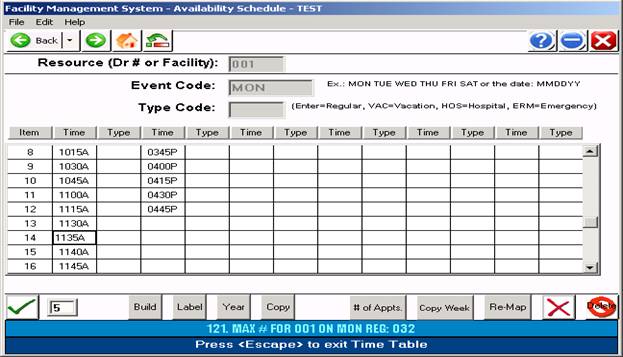
Setup Table #3 – Master Time Tables
|
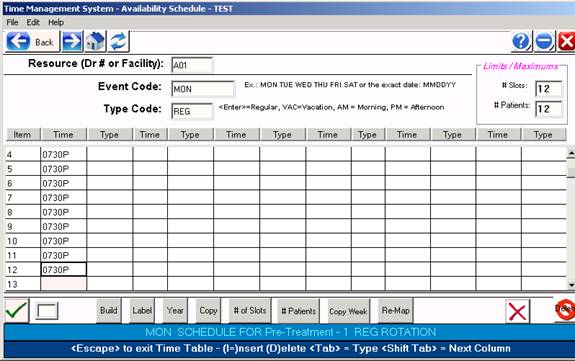
OVERVIEW: The Master Time table allows you to specify the times the resource (Doctor) will be available on the days you have indicted other than “OFF”.
PROCEDURE: 1. Enter a Meeting code usually starts with a letter.
2. Enter the DAY OF THE WEEK – Example MON, TUE, etc.
3. Enter the TYPE CODE, default is “REG” (<Enter Key> for default )
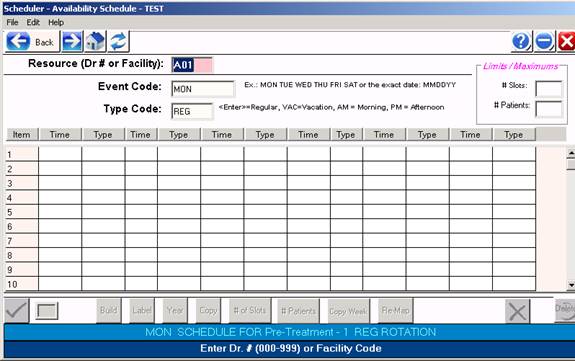
Example showing prompts:
You may now manually edit this screen if needed.
Example: You want to delete one of the time slots and reduce the size of the meeting.
Steps 1. Scroll down with the scroll bar and then click on the time slot that begins the lunch hour.
2. Now enter an upper case “D” and <Enter> to Delete this time slot from the schedule. This action will move all the remaining times up one slot in the list.
3. Repeat for additional unwanted time slots.
4. To add a time slot, click or uses the arrow keys to get to the place you want to insert a time and now type an upper case “I”and <Enter> – This will insert a time slot.
5. To pre-label a time slot for a specific type of appointment, Press the <Tab> key and the cursor will be placed in the “TYPE” column. You may now enter a predefined appointment TYPE for which this time slot will be designated.
Special Time Setup: You may at any time use your arrow keys to move up or down the schedule times. You may overtype and place you own times as needed.
Example of special times:

Once the schedules have been built, you may begin press <Escape> to save the schedule. You may also click “COPY WEEK” button, this function will copy the schedule on the screen to all the other “REG” days.
Once the available times are completed for each day, you may start scheduling patients.
Schedules can be changed after patient are scheduled, however you will be prompted to “REMAP” the existing appointments. The “REMAP” function will re-order the existing appointments to match the time table As defined.
Time tables can be deleted if no appointments were scheduled for the day defined.
Number
of Patients and Number of Slots.
”Limits / Maximums”
These two special fields located at the upper right corner of the screen allow for placing a limitation on the number of patients or slots allowed in a given schedule on a daily basis.
Example: By placing “12” in the Number of Patients field, the scheduler programs will not allow adding to a given day where 12 patients are already present.