Appointment Scheduler
Move Up
Overwiew
The Move Up routine handles the situation when a doctor wants to see a patient as soon as possible but the next available appointment is several weeks or months out.
What You Do
Make the appointment at the next available appointment, several weeks or months out and answer “Yes” at the Move Up prompt when making the appointment.
Then any time an appointment before the date of the one you just made is Cancelled or Moved and Transferred to another time you will be prompted about the appointments you have in Move Up.
Select one of the appointments in Move Up and it well be Move and Transferred to the open time slot that just became available. But before you move it up be sure to phone the patient to make sure the date and time is OK with them.
How To Do It
To add appointments the Move Up just enter Y ( or checkbox ) at the move up prompt.

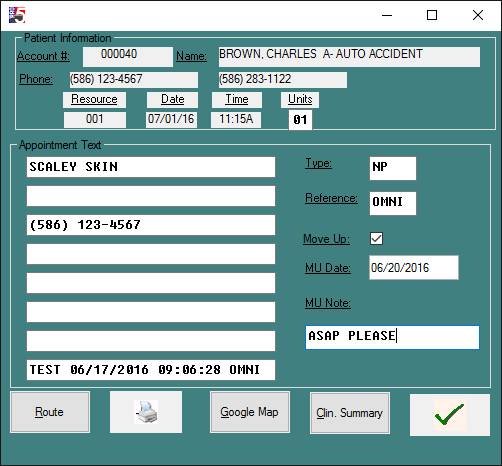
At the MU Date prompt you can press Enter to accept the current date or enter a date (mmddyyyy). This date can be used as a reference for when the appointment should be moved up to.
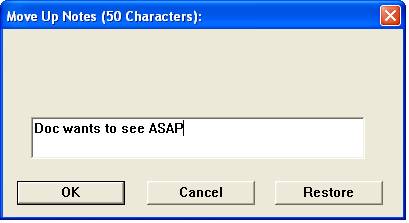
A small Move Up Note screen will come up next allowing you to enter a 50 characters note about this Move Up. This note will appear at the Move Up verification prompt when the appointment is going to be moved up.
Now all you have to do is wait for a current appointment to cancel or be moved to a new time slot so your appointment can be moved up. When an appointment is Cancelled or Move and Transferred the following Move Up screen (or list) will appear.
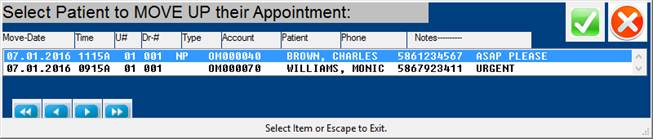
To select an appointment to Move Up arrow up or down to the line you want and click the OK button or you can click on the line you want. Note the number of Units the appointment will take and the Type of appointment. Be sure both of these will be OK in the new time slot. The Patient’s phone number from Patient Information will be listed in the above list so you can phone them to verify the moving of the appointment to a new date and time.
Press the Cancel button to do nothing and return to the appointment screen.
Next you need to verify your selection is OK.
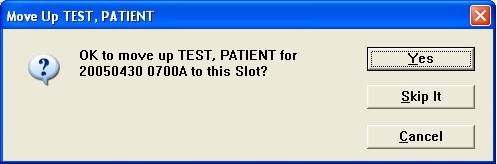
Click the Yes button if it is ok to Move Up this appointment. (Note: Before you do this the patient should be advised so they know about it.) Once you click the Yes button the appointment will be moved to the current time slot and deleted from the Move Up file.
Click the Skip It button to go back to the Move Up screen (or list) to select another appointment to Move UP.
Click the Cancel button to leave Move Up with out moving up any appointments.
Maintaining the Move Up File
What happens to appointments in the Move Up that don’t get moved up? One, is the patients will come in for appointment that was originally scheduled. Two, is that if they don’t get moved up you will accumulate a bunch of data in the Move Up file.
Therefore you need to occasionally clean up (or remove) the old appointments from the Move Up file.
From the main menu enter number 13 “Appointment System”. From the Appointment System menu enter number 7 “Appointment Menu 2”. On this menu enter Move Up File Maint., the menu number may vary from system to system.
Once in the Move Up File Maint. program select a job or Site ID and you should see the following screen.

Once here you can remove old data two ways.
Click the Run Clean Up button to run the Clean Up program. This program will go through the Move Up file and remove any records to be moved up where the appointment date is less than the current date. When the program is done it will return to and refresh this screen.
Select an individual line on the screen and click on the Delete button to remove just this one line. Once you click on the Delete button you will be prompted to verify that you do want to remove this record.
Click Exit to leave this screen and return to the menu.
(Note: If you delete an appointment from the main scheduler and that appointment is in Move Up it will be deleted from Move Up also.)