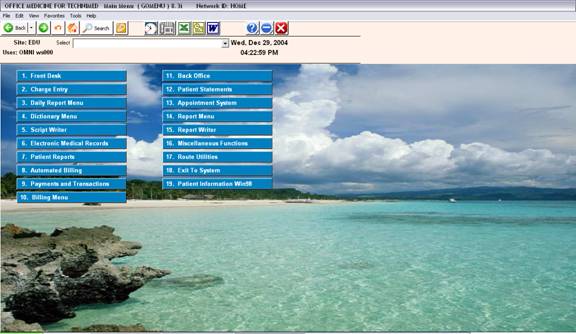
Digital Medicine(tm) for Windows 7
SCRIPT WRITER II
OVERVIEW: The Script Writer program is designed to dispense prescriptions in a printed or electronic format; to keep a chronological drug record per patient; to store information on medications pertaining to their administration, and to store information as maintained by the user that pertains to the history and interaction of certain medications and/or groups of medications.
PROCEDURE: From the Main Menu select Option 6, Script Writer, and press <Enter Key>.
Or Pull up the patient in Patient Demographics and anter “RX” in the action line
Or Pull up the patient in the EMR and click on the “RX” button ion the lower tool bar
Or type “RX” <Enter Key> at any menu.
EXAMPLE MENU:
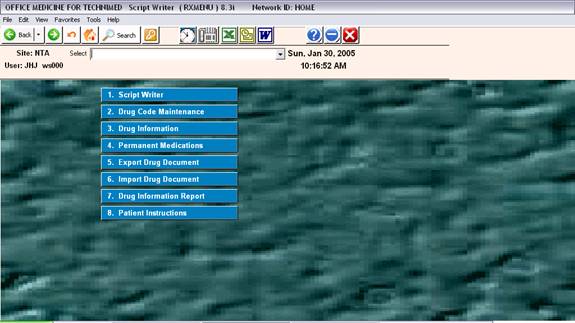
After you select Option 6 from the Main Menu, the Prescription Writer Menu on the following screen will be displayed.
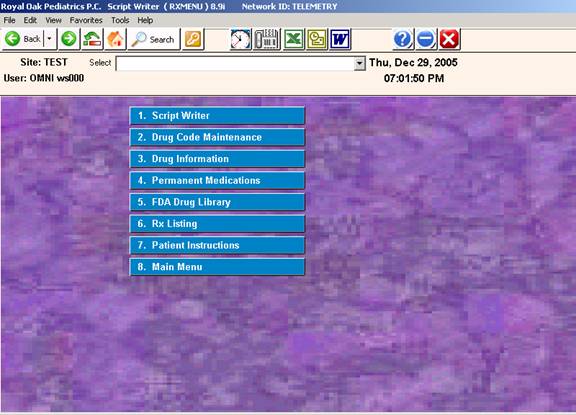
SCRIPT WRITER
OVERVIEW: The Script Writer program is used for dispensing
prescriptions and keeping a permanent medication list and a chronological Rx drug history.
PROCEDURE: To access the Script Writer program, select Option 1
from the Prescription Writer Menu and press <Enter>.
The screen below will be displayed.
EXAMPLE SCREEN:
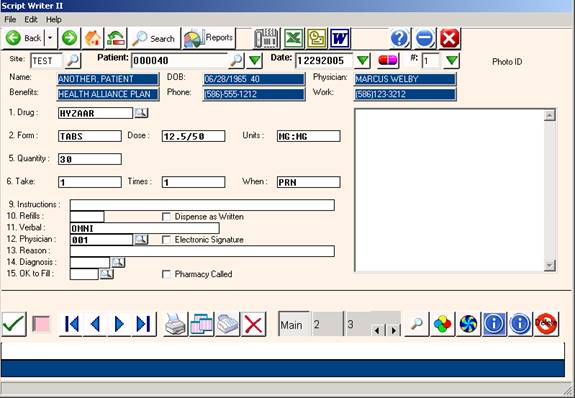
ENTER PATIENT:
Enter the patient's ID or Name number and press <Enter Key>.
( The last patient accessed is displayed by default )
To search for the patient by name, enter a few letters of the
last name and press <Enter>.
The screen will display all patients in your database that match those
parameters.
Select the patient by typing the number to the immediate left of his/her
name and press <Enter Key>, or use the <Up>/<Down> Directional Arrow
keys or mouse to highlight the name and then press <Enter Key> or click.
The system will display the information on the patient you select.
EXAMPLE SCREEN:
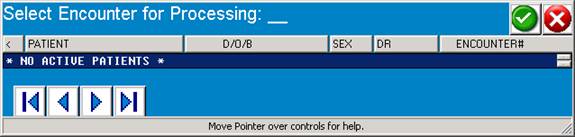
OPEN ENCOUNTER ARROW: Click on the small green drop-down arrow located immediately to the right of the PATIENT search field. This button will show patients whom are waiting for their visit. This list is based on the patient having an appointment scheduled and/or an encounter form generated. Patients can also be added to this list by using the Encounter (E) Command or the Encounter “Button” from the Patient Information Screen.
By using this method, the medical staff will not be burdened with searching for patient by name, however, extreme care must be taken by the reception staff
To be sure the correct patient was added to the encounter list.
DEFINITION OF FIELDS:
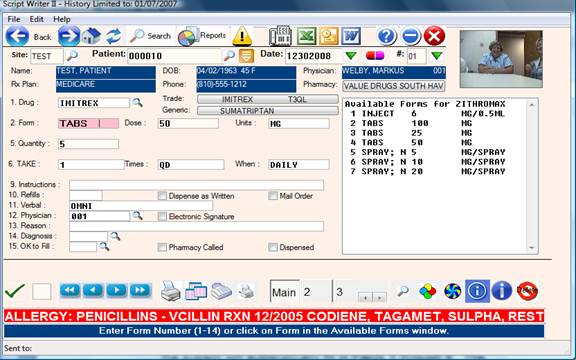
1. DRUG CODE: Type the Drug Code as entered in your Favorites Drug
Dictionary, and press <Enter Key>. The system will automatically
fill in Fields 2 through 4. The system will allow you to type
over the default information as required.
Search: You may search for a drug by pressing the <Tab> key and
entering the Trade or Generic drug name. The system will display
the In-House code of the drug. Select the drug by using the
<Up>/<Down> Directional Arrow keys to highlight the line and
press <Enter Key>.
2. DRUG FORM: If different forms on this drug have been entered
in the Drug Dictionary, they will be displayed in the Available
Forms box shown on your screen. The system will automatically
default to the first Form, Strength and Unit displayed in the
Available Forms box. Should you need different information for
these fields (Fields 2, 3, and 4), simply type over the default
information and press <Enter Key>.
When choices appears in the right hand selection window, you may click
On a selection to auto-fill the script fields.
Example: Clicking on TABS 500 MG will automatically fill out the remaining
Fields for this form of the drug.
3. STRENGTH: Enter the strength of the medication being prescribed
and press <Enter Key>.
4. UNITS: Enter the units for this medication and press <Enter Key>.
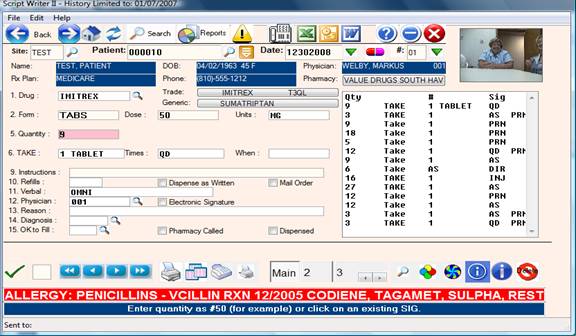
5. QUANTITY: Enter the quantity of the medication and press
<Enter Key>. If you fill in the amount numerically, the system
will convert the number and spell it out on the prescription.
(i.e., 24 = TWENTY FOUR)
If a Sig Schedule on this medication has been entered in the
Drug Dictionary, when your cursor moves to this field, the system
will default to that schedule and Fields 5 through 8 will be filled
in with the default information. The system will allow you to type
over the default information. To the right of your screen the system
will display a Quantity/Sig box which displays any Sig Schedule
entries on this drug.
If a Sig Schedule was entered in the Drug Dictionary, before the
system will allow you to change the quantity displayed, you must
type a # sign and then type the new quantity.
6. SIG:TAKE: This field consists of three sub-sections:
(1) Enter the dosage to be taken and press <Enter Key>.
(2) Enter the number of times per day this dose should be taken
(3) Enter the periodicity (daily, weekly, etc.) of this medication.
A <Enter Key> at this section will insert the default value of
Daily.
If there is a Sig Schedule in the Drug Dictionary on this medication,
Fields 5 through 8 will automatically be filled in with the default
information. The system will allow you to type over the default
information. If there is more than one Sig Schedule on this drug,
they will be displayed in the Quantity/Sig box. The Default = First
Sig Schedule in Drug Dictionary.
9. INSTRUCTIONS: Enter any additional instructions regarding when
or how the medication is to be taken, (up to 24 digits including
spaces may be used) and press <Enter Key>.
DAW: If included in instructions, prints out Dispense As Written
on script.
10. # REFILLS: Enter the number of refills for this prescription
and press <Enter Key>.
(Default) = If you press <Enter Key>, the screen will insert the
default of 0 (zero) and the system will print "NO REFILLS" on
the script.
10A. Check Box: Dispense as Written:
This checkbox will indicate “Dispense as Written” on the printed Rx.
11. VERBAL: Verbal order information field for comment purposes.
12. PHYSICIAN: At this prompt you may enter the provider's
number and/or additional information. (i.e., CALLED IN 2 PM
BY DR 001) This field will hold up to 20 digits including
spaces. (Default)= Physician 001.
This field may be password protected and then associated
with an electronic signature that prints on the script document.
12A. Check Box: Electronic Signature:
This checkbox will cause the words “Electronically Signed” to be
added to the Rx.
13. REASON: This is a comment field used to further explain
management of the patient when reviewing the chart summary.
This is also used when the drug is given as a permanent medication.
Example: “Blood Pressure”
14. DIAGNOSIS: Enter the diagnosis code and press <Enter Key>.
Search: Press the <Tab> key to search for a diagnosis code.
The system will display a list of codes in your system and
their definition. At the flashing cursor, type in the line
number of the diagnosis code you need and press <Enter Key>.
The system will insert the code in Field 11 along with the
definition. When you have completed Field 14, press <Enter Key>.
15. OK to Fill: This field records the operator ID when the checkbox
“Pharmacy Called” is checked.
15A. Checkbox Pharmacy Called: Use as needed – not required.
The purpose could be to track if an OK was given to a calling Pharmacy.
ACTION LINE FUNCTIONS:
# TO CORRECT: Enter/Click Field number if corrections are needed.
(P)RINT: Type P or click on Printer icon to print only the
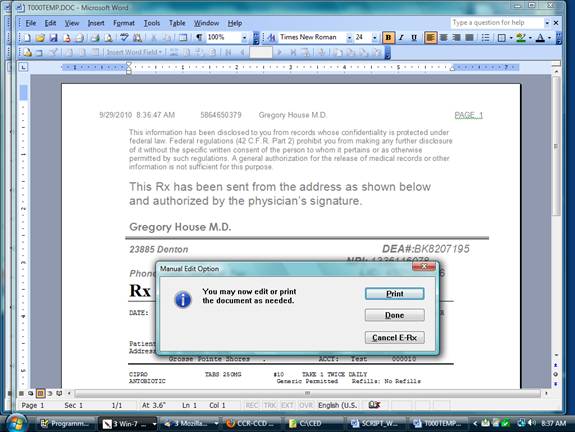
prescription on the screen. The completed Rx is finalized as a Word document and will be presented to the operator for verification per the screen below:
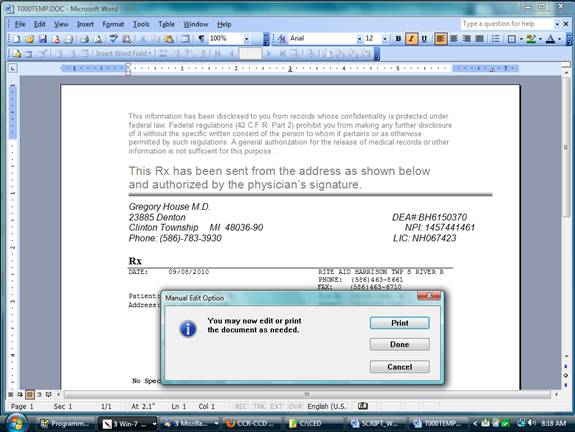
The purpose of this final step is to review the accuracy of the prescription. You may also add incidental information such as a note to the patient or pharmacy.
Changing drug or SIG information should not be done during this step.
After final review and verification of the prescription, click “Print” or type “P”.
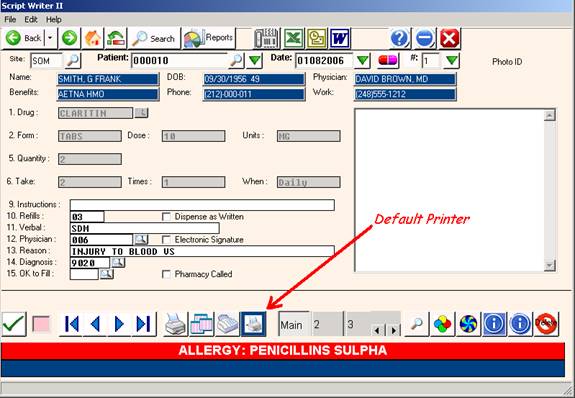
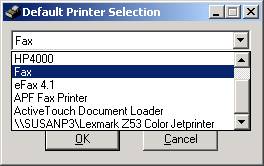
Default Printer ICON
Allows changing of the default printer.
(A)ll: Type A or click on Multiple Documents Icon to print all
prescriptions for this patient on this date.
(D)ELETE: Type D and press <Enter Key> to delete the entry.
(K)OPY: Allows a single script to be copied to another date.
(X)FAX: Send this Rx by Fax or through Rx clearing house
(0)=END: Type 0 (zero) and press <Enter Key> or the ESCAPE key
to exit and save this prescription. The system will prompt:
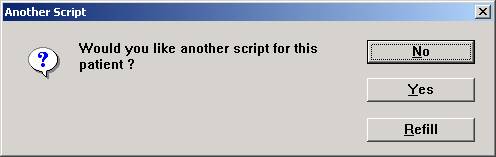
An N response will save the entry and exit you to
the ENTER PATIENT prompt. A Y response will clear
the fields and allow you to enter another Rx
on this patient for this date.
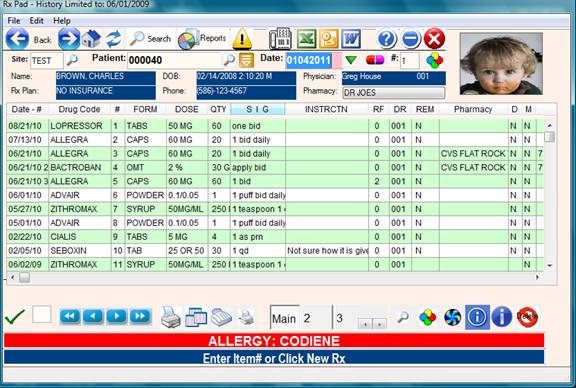
EXPLANATION OF DATA DISPLAY:
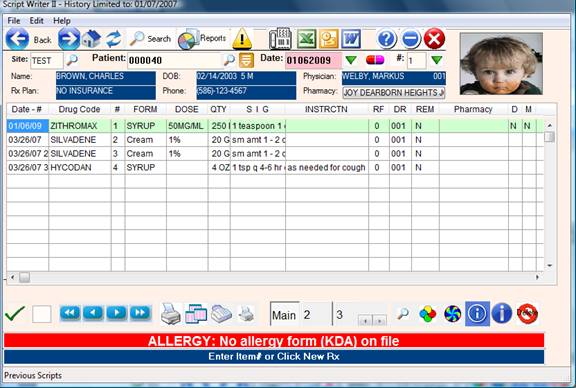
DATE/HISTORY: If the patient is in the database, each time
you enter a prescription for this patient that entry will be
displayed in the Date/History box. This box is located to the
left hand side of the RX screen. This is helpful when monitor-
ing the script activity on this patient. Should you need to
copy a script under another date, referring to this box will
help you locate the script you need to copy.
AVAILABLE FORMS: As mentioned previously, stored choices are
displayed in the right hand pane while entering the script.
If the medication is in the Drug Dictionary, when you enter the
drug in Field 1 and press <Enter Key>, the Available Forms box will
be displayed to the right of the RX screen listing the forms in
which this drug may be prescribed. A <Enter Key> defaults to the
first entry. Fields 2 through 4 will automatically be filled in.
The system will allow you to type over the default information
if required.
 QUANTITY/SIG: When your cursor is at Field 5, this box will be
displayed to the right hand side of your RX screen if the Drug
Dictionary contains a Sig Schedule on this medicine. When
filling in Fields 5 and 6 you may want to refer to those entries.
The first entry is the default setting. If you use the default,
the system will automatically fill in Fields 5 through 8. The
system will allow you to type over the default information of
quantity.
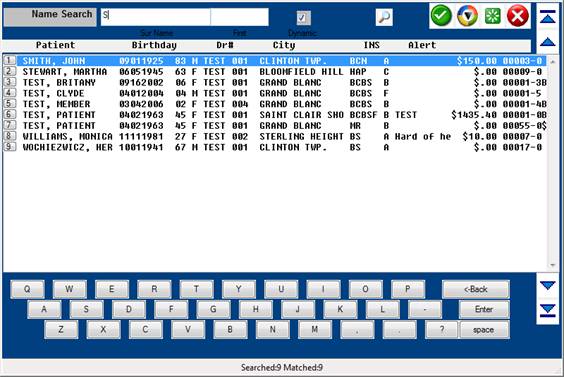
Search: To search for a patient, enter a few letters of their
last name and press <Tab>. The system will open up a Master
Search Window which will allow you to search for a patient using
nine different methods.
Enter Patient: After you enter the patient's ID number, because
they are already in the system, the database on that patient will
be displayed to your screen. The system gives you an overview of that
patient’s prescription history. While the cursor is at the DATE field, you may
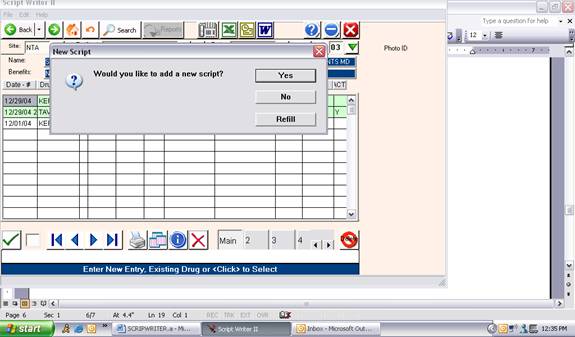
add a script using the current date by pressing <Enter Key>. The system
will prompt:
Type/Click Y for yes. A blank RX screen will be
displayed for this new script. If you decide not to write a
script for this date, type an N . The
cursor will return to the ENTER PATIENT prompt.
Should you need to edit or view an existing script, you have
the option to enter a date shown in the Date/History box and
that script will be displayed to your screen.
EXPLANATION OF PROMPTS:
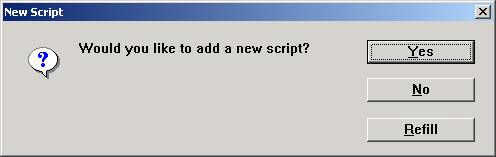
Y = Add this patient to the Script Writer Database. An example
RX screen is on the next page.
N = Do not add this patient to the Database.
R = Refill from existing Rx history for this patient (repeat any
prescriptions) and print all of them on one script.
The system will prompt you to Click on DRUGS TO REFILL
Adjust or Discontinue (D/C).

Example Refill Screen
EXAMPLE RX SCREEN: 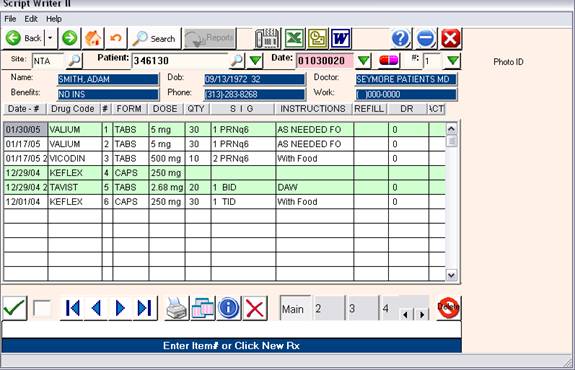
By clicking on any of the date fields on this screen, the respective information regarding the prescription for that date will display.
EXAMPLE SCREEN – PREVIOUS SCRIPT:
By referring to the previous screen, you will see that the patient originally received a prescription for Valium on 1/17/05. The prescription was refilled on
1/30/05.
SENDING Rx using E-Prescibe
Click on the Fax Icon or enter “X” at the command line and the Select Pharmacy
Screen will appear.
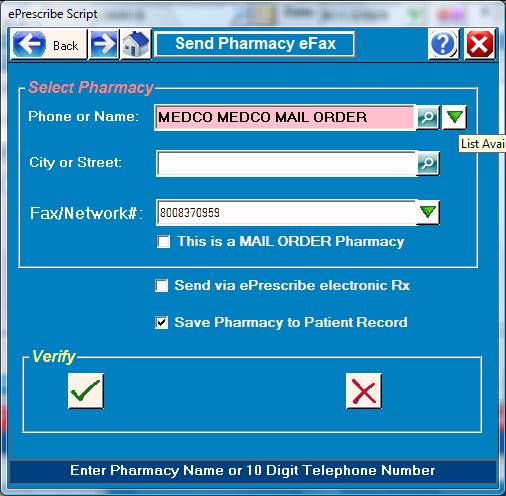
Select the pharmacy by typing the 10 digit voice telephone number or by searching by name in the “Phone or Name” field. You may also search by any component of the address by entering the search info into the “City or Street” field. Example: City, Zip-code or Street.
Also by clicking the green down arrow icon to the right of the “Phone or Name” field, a list of all pharmacies used for this patient in the past can be selected.
Now click the click check box or <Enter Key> and the fax will be generated and sent.
The code “MEDCO” or CAREMARK can also be typed in the name field w/o searching.
When selection of the pharmacy is complete, click the Green OK Check Mark in the lower left corner and a prompt for sending will appear:
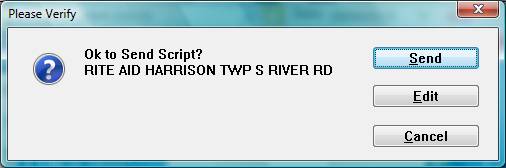
The completed Rx is finalized as a Word document and will be presented to the operator for verification per the screen below:
The purpose of this final step is to review the accuracy of the prescription. You may also add incidental information such as a note to the patient or pharmacy.
Changing drug or SIG information should not be done during this step.
After final review and verification of the prescription, click “Print”, “Done” or type “P” or “D”. You may also cancel this action.
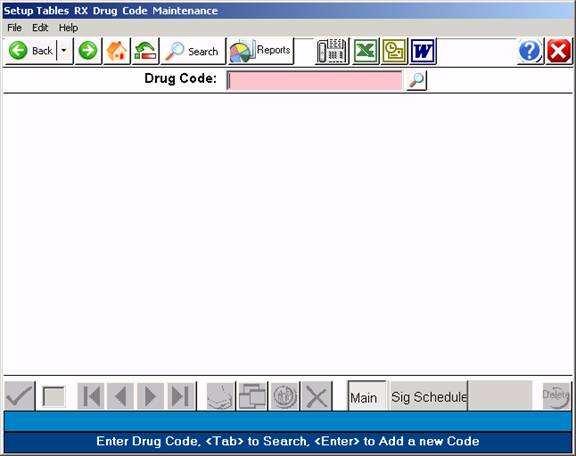
DRUG CODE MAINTENANCE
OVERVIEW: The Drug Code Maintenance program allows you to
create and maintain a Dictionary of all medications
the and other orders for diagnostic testing or
over-the-counter drugs. This module will contain
the trade name, generic name, common name, warnings,
form available, dosage, units, total allowable dosage
per day, prescription classification, and maximum
refills. When writing a script, this program verifies
the maximum total dosage allowed and will flash a
warning if the script exceeds it.
PROCEDURE: To access the Drug Code Maintenance program, select
Option 2 from the Prescription Writer Menu and press
<Enter Key>. The screen below will be displayed.
EXAMPLE SCREEN:
The following screen will then be displayed:
TAB=SEARCH: Press <Tab> and the system will prompt you to
enter the Trade or Generic name of the drug you are searching
for. Enter the drug name and press <Enter Key>. The system will
display to your screen all drugs on the system that begin with
the letters you entered.
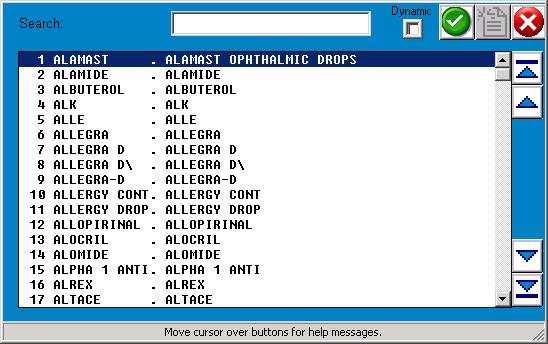
To select a drug, you may type the line number shown to the
immediate left of the drug name and press <Enter Key>. You may
also use the <Up>/<Down> Directional Arrow keys or mouse to highlight
the line and then press <Enter Key>.
0=MENU: Type 0 (zero) and press <Enter Key> to go to the
Prescription Writer Menu.
Report Icon: To have an alphabetical list of medications in the
system displayed to your screen, click the report icon or type **
and press <Enter Key>.
ENTER CODE OR NAME: Enter the NAME OF THE MEDICATION or the
CODE NAME you will use to add this medication to the Dictionary
and press <Enter Key>. If the medication is already entered, the
information will be displayed to your screen. If the medication
is not in the system, the program will respond with
NOT ON FILE, ADD? _ (Y=ES, N=NO)
Y = Type or Click Y to add a SINGLE DRUG to the Dictionary.
N = Type N and press <Enter Key> to exit without making an entry
to the this Dictionary.
EXAMPLE SCREEN
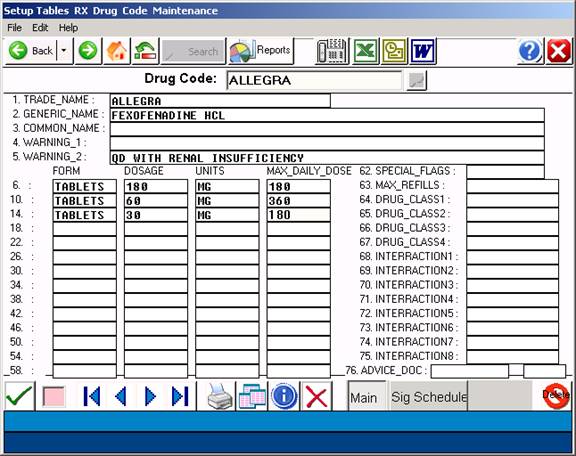
DEFINITION OF FIELDS:
1. TRADE NAME: Enter the trade name for the medication and
press <Enter Key>. (e.g., Name of Manufacture)
2. GENERIC NAME: Enter the generic name for the medication and
press <Enter Key>. (e.g., Chemical Name) If this field is left
blank, it will not print on prescription.
3. COMMON NAME: Enter the common Name for the medication and
press <Enter Key>. Press <Enter Key> to skip this field.
4. WARNING #1: If this medication is always ordered with a
special warning, enter the warning (up to 60 characters) and
press <Enter Key>.
THE WARNING WILL PRINT ON ALL PRESCRIPTIONS
WRITTEN FOR THIS MEDICATION.
5. WARNING #2: If an additional warning is necessary, enter the
warning (up to 60 characters) and press <Enter Key>. Press <Enter Key>
to skip. If the Special Flags for this option is set to Y (yes),
this warning will print.
6. FORM: Enter the form in which this medication may be ordered
(i.e., CAPS, TABS, etc.) and press <Enter Key>. This field will
hold up to 8 characters.
7. DOSAGE: Enter the dosage (i.e., 250, 500) for the form and
press <Enter Key>. This field will hold up to 8 characters.
8. UNITS: Enter the units (i.e., mg, cc) for the form and press
<Enter Key>. This field will hold up to 8 characters.
9. MAXIMUM DAILY DOSE: Enter the total maximum daily dosage for
the medication and press <Enter Key>. This field will hold up to 8
characters.
Fields 6 through 61 are available to you for the entry of different
forms, dosages, units, and daily maximum totals for the medication.
Press <Enter Key> after each entry or press <Enter Key> to skip fields.
<HOME>: Press <Home> to move cursor to line 62,
Special Flags.
62. SPECIAL FLAGS: When you are finished working in Fields 6 through
61, Click on Field #62 to access the Special Flags field. Indicate
Y (yes) or N (no) for each of the following:
1=Print Warnings - Warning 2
* 2=Print Patient Advice
3=Print Common name
4=Print Substitutes Allowed (DAW)
63. MAX # REFILLS: Enter the maximum number of refills for this
medication and press <Enter Key>. This field will allow up to 999
refills.
64. DRUG CLASS 1: Enter the PRIMARY DRUG CLASSIFICATION for
this medication (i.e., CNSDEPRESS) .This field will hold
up to 12 characters.
65. DRUG CLASS 2: Enter the SECONDARY DRUG CLASSIFICATION
for this medication and press <Enter Key>. This field will hold up to
12 characters. Press <Enter Key> to skip.
66. DRUG CLASS 3: Enter a THIRD DRUG CLASSIFICATION for this
this medication and press <Enter Key>. This field will hold up to
12 characters. Press <Enter Key> to skip.
67. DRUG CLASS 4: Enter a FOURTH DRUG CLASSIFICATION for this
this medication and press <Enter Key>. This field will hold up to
12 characters. Press <Enter Key> to skip.
68. INTERACTION 1 - 8: List one drug or drug class per line that will
interact with this drug. Each field will hold up to 12 characters. Press
<Enter Key> to skip.
* 76. ADVICE DOC #: List the Drug Reference Subject as listed in
the Drug Information section. Press <Enter Key>.
* 77. SECTION #: Enter the section number of the information you
wish to print with the prescription.
0001 = Indication, Administration, Dosage
0002 = Adverse Effects
0003 = Drug Interactions
0004 = Contraindications
0005 = Actions
0006 = Pharmacokinetics
0007 = Patient Advice for Prescription
* These items only apply if you have the Electronic Drug
Reference (PDR) Database.
ACTION LINE FUNCTIONS:
ACTION->__(Field #1-76 or (D)elete,(K)opy,(N)ext,(S)ig Schedule,(0)=END)
Field #1-76: Enter the Field number which needs correcting and
press <Enter Key>.
(D)elete: To delete this entry from the Dictionary, type D
and press <Enter Key>.
(K)opy: To copy this entry and assign it a different drug
code or name, type K and press <Enter Key>. The
system will prompt: ENTER CODE OR NAME. Type the
new name or code and press <Enter Key>.
(N)ext: To go to the next alphabetically listed drug, type
N and press <Enter Key>.
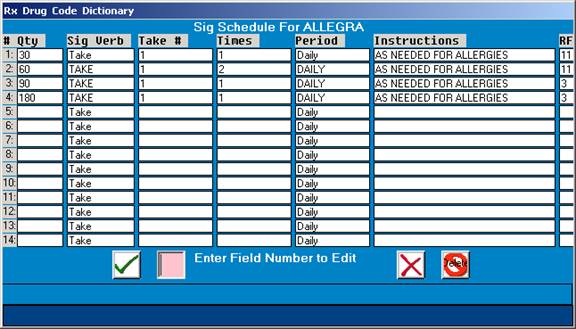
(S)ig Schedule: To go to the Sig Schedule for the drug you are
working with, type S and press <Enter Key>. To
return to the Drug Code Maintenance screen, press
the <Home> key to access the Action Line. Then
type F and press <Enter Key>.
Example SIG Schedule:
(O)=END: To exit and save your entry, type 0 (zero) and press
<Enter Key>.
PERMANENT MEDICATIONS
OVERVIEW: The Permanent Medications program is a database
of medications that a patient may be taking on
a continuing basis. The Script Writer program
automatically writes to this database.
PROCEDURE: To access the Permanent Medications program,
select Option 4 from the Prescription Writer
Menu and press <Enter Key>.
The screen ABOVE will be displayed.
Search: To search for a drug press the <Tab> key. The system
will open a window showing a list of drugs on the system. To
select a drug, type the line number of the drug at the flashing
cursor and press <Enter Key>. You may also use the <Up>/<Down>
Directional Arrow keys to highlight the line and press <Enter Key>.
If the drug you enter is not shown on the summary screen for
this patient, the system will prompt:
NOT ON FILE, ADD: _ (Y=YES, N=NO)
Y = If you answer Y for yes, the program will automatically
fill in a permanent database screen for this medication
pulling the information from the Script Writer program.
An example of a permanent medication database screen is shown
below.
EXAMPLE:
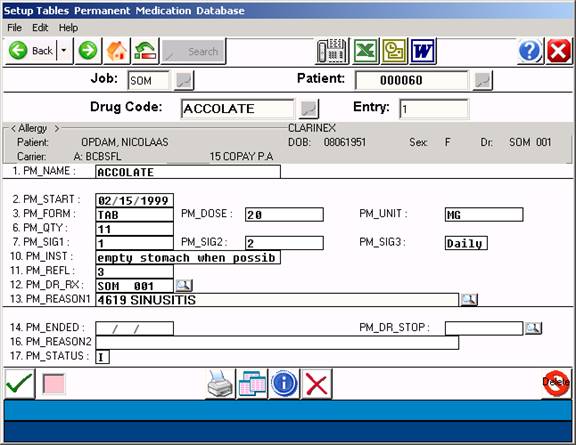
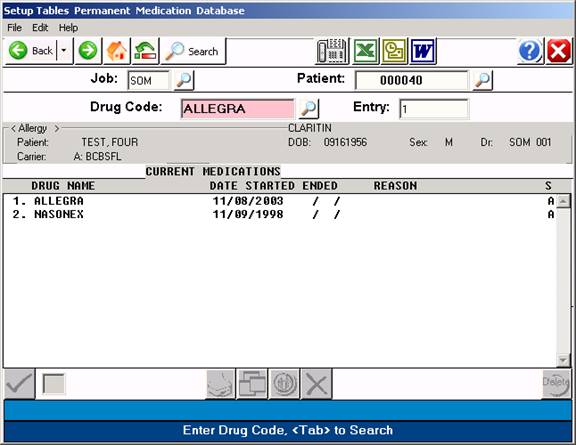
DEFINITION OF FIELDS:
1. PM NAME: Displays the name of the medication.
2. PM START: Displays the date the medication was prescribed.
3. PM FORM: Displays the form of the drug.
4. PM DOSE: Displays the prescribed dosage.
5. PM UNIT: Displays the units for this medication.
6. PM QTY: Displays the quantity of the drug prescribed.
7.- 9. PM SIG1-3: Displays the Sig Schedule for this drug.
10. PM INST: Displays any special instructions if entered in
Script Writer.
11. PM REFL: Displays quantity of refills.
12. PM DR RX: Displays the SiteCode and Dr. number.
13. PM REASON1: Displays reason for medication (diagnosis) if
a reason has been entered in Script Writer.
14. PM ENDED: Enter date medication was discontinued.
15. PM DR STOP: Enter the ID number of the physician that
had the patient stop taking this medication.
16. PM REASON2: Enter the physician's reason for stopping use
of this medication.
To access the Action Line from any field, press the <Home> key.
ACTION LINE FUNCTIONS:
ACTION-> (ENTER # TO CORRECT, (D)ELETE, (P)RINT, (0)=END)
ENTER # TO CORRECT: Enter the field number to correct and
press <Enter Key>.
(D)ELETE: Should you wish to delete this entry,
type D and press <Enter Key>.
(P)RINT: To print a hardcopy of this entry, type
P and press <Enter Key>. The system will
open a window allowing you to select an
output device. Select a printer and
press <Enter Key>.
(O)=END: To exit and save the information, type a
O (zero) and press <Enter Key>. You will
return to the PATIENT prompt.
To exit to the Prescription Writer Menu,
type O (zero) again and press <Enter Key>.
FDA DRUG LIBRARY
Overview: This database contains all the FDA approved drugs as supplied by the FDA Download page on the FDA website. By searching/selected a drug here, you can copy the drug into the Script Writer drug dictionary.
Procedure:
1. Search the drug by Trade or Generic name by entering a few letters
Of the name and clicking the search icon or pressing the <Tab> key.
Example Search:
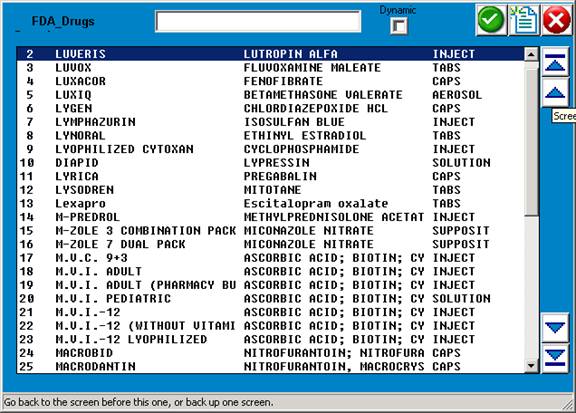
2. Select a drug by click or entering the row number from the left side of the display.
The following screen will display the record for the drug selected
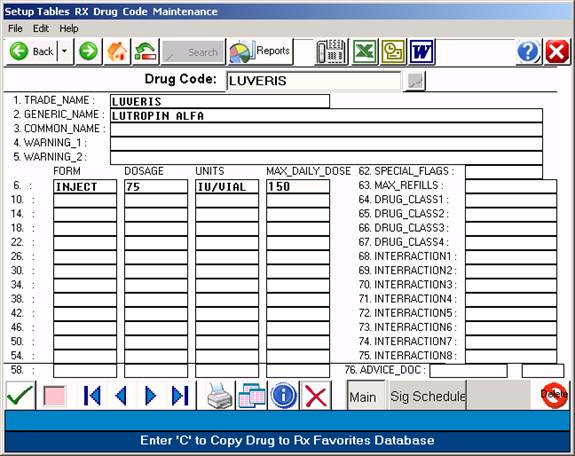
- Now enter the letter “C” or click on the Copy icon.
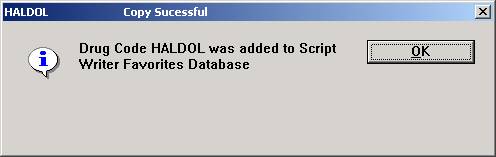
- You have now copied this drug for use in the script writer favorites database.