PATIENT REPORT WRITER version 14
OVERVIEW: The Report Writer Menu allows you to access the
database fields and have the ability to sort, select,
merge and display all patient demographic information based on service date or the entire database.
PROCEDURE: From the Main Menu select Option 15, Query Reports. (Report
Writer Menu)
EXAMPLE MENU:
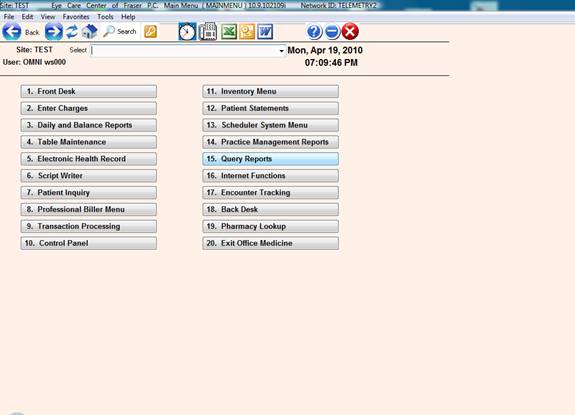
After you select Option 15, then select #1.
EXAMPLE SCREEN:
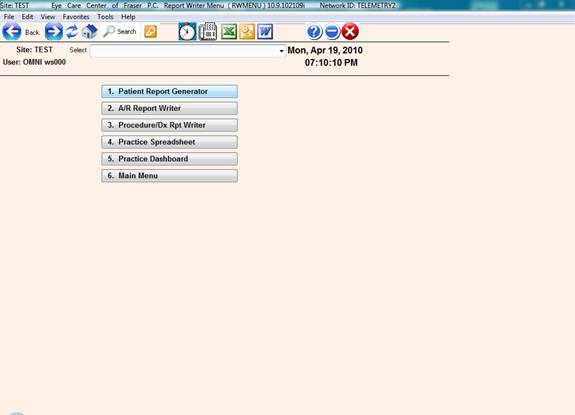
PATIENT REPORT GENERATOR
OVERVIEW: This program allows you to merge data from Patient
Information and balances from Accounts Receivable
based on specific statistics desired.
For example: All males in a specific city that
have a diagnosis of congestive heart failure, between
the ages of 42 and 80 can be made into a report, mailing labels or
an email message.
PROCEDURE: Select Option 1 from the Report Writer Menu and
press <Enter Key>. The screen below will be displayed.
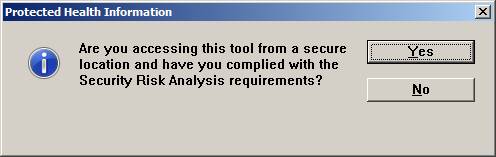
Note: Due to HIPAA safety restrictions, do not run this report if you are accessing the system over the internet ( e.g. from home) or in a non-secure area ( e.g. The front desk ), or you do not have up to date virus software.
EXAMPLE PROMPT FOR SITES SCREEN:

Double Click specific site code(s) required for report and click “OK”
Multiple Sites are allowed.
Now the report destination screen below will be displayed.
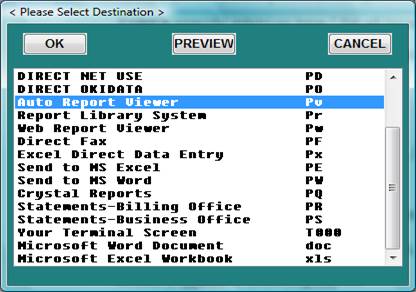
Select a normal printer for a printed report,
Select “Microsoft Word Document” for mailing labels or excel.
For “Research” lists – please use “Microsoft Word Document” This option will automatically create the research marketing lists in the default folder location of: G:\ MailingLabels\”TODAYS DATE” e.g. 04-01-2014
NEXT STEP - EXAMPLE SCREEN:
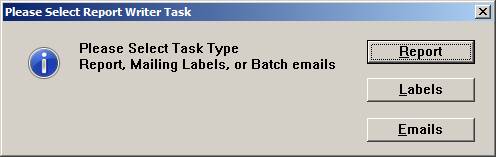
“REPORT” - REPORTING BY FIELD;
Click “Report” or Type R to create a printable report that can be exported to Excel or printed normally.
“LABELS” - FOR MAILING LABELS or RESEARCH LISTS:
Click “Labels” or Type L to create Mailing Labels. You will be
prompted to answer the following questions about your labels:
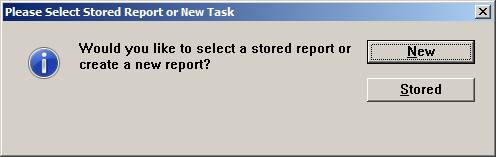
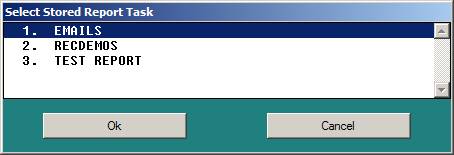
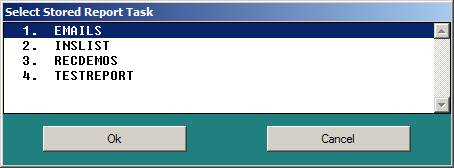
Selection “Stored” will present the list of stored reports:
Selecting “New” will prompt for the name of the report to be stored for later use

Type the name of the report to be saved and accessed at a later date or leave as “Untitled” if you do not want to save the report. After the report is generated, another prompt for saving the report will be presented.
If mailing labels are selected ( Also for Research Lists ) the following two prompts will appear:
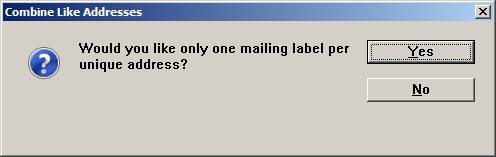
The system will print one label for the whole family addressed
to the primary member if you respond with Y.
A label will be printed for each family member
if you respond with N ( NO).
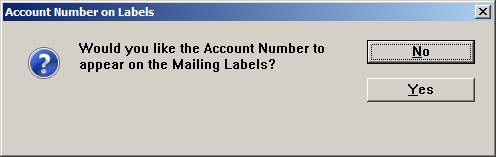
This options can include the patient’s account number on the label for easy reference.
Please note: If you are using Microsoft Word to generate labels, please select “Send to Microsoft Word .doc “ as the destination device in the printer selection window, then the label setup and formatting comes from the preformatted document located in C:\om8\wp\bd-labels.doc. If you are not using MS Word, then the following prompt will appear for formatting of the labels:
HOW MANY LABELS ACROSS (1-4)? You may have up
to 4 labels across. If you press return, it
defaults to 2 labels across.
WIDTH OF ONE LABEL (INCLUDE GAP)? This is
measured in inches. You can enter your in-
formation in a decimal form (l.5) or in a
fraction form (3 5/8). Press <Enter Key> for
the default of 3 5/8 inch.
HEIGHT OF ONE LABEL (INCLUDE GAP)? This is also
measured in inches. You can enter your informa-
tion in a decimal form (l.5) or in a fraction
form (3 5/8). Press <Enter Key> for the default of
1 inch.
PRINT ACCOUNT NUMBER ON LABELS? Y/N If you
would like to have the account number printed
on the labels type a Y. If not, type an N.
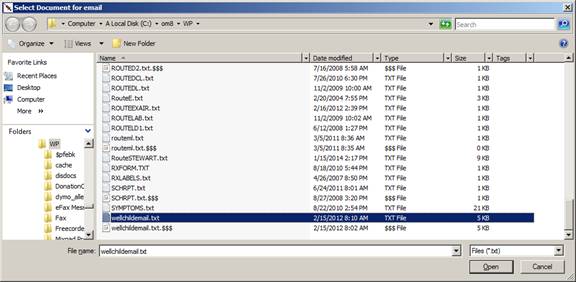
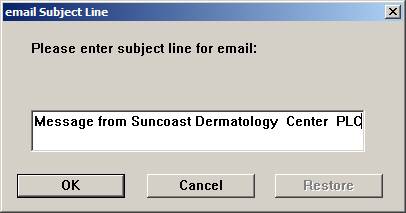
When Email is selected “Email Engine”:
Click “Email” or Type E
You will be prompted for the email text document and subject of the email to be sent to all patients matching the report query
Example Screen:
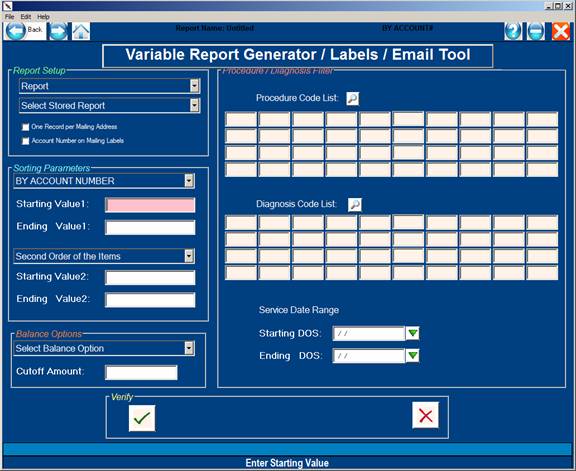
Once you have answered the prompts above,
sort selections will be displayed
PRIMARY: Choose the Primary Sort field as defined in the
Click Down the "Sorting Parameters / Primary Sort " field
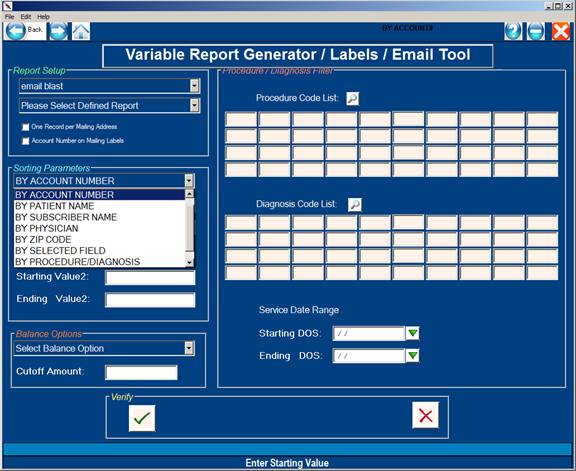
Next you will be prompted for a STARTING and ENDING value
If all the patient records are required, just press <Enter> for the starting and Ending Prompt.
Note: Sorting by procedure/diagnosis will allow selecting a range of service dates. For Research Lists always select “PROCEDURE/DIAGNOSIS”
SECONDARY: Choose the Secondary Sort field if needed by Clicking down the "Second Sort Mode" Ignore this field for Research Lists.
EXPLANATION OF SORT SELECTIONS:
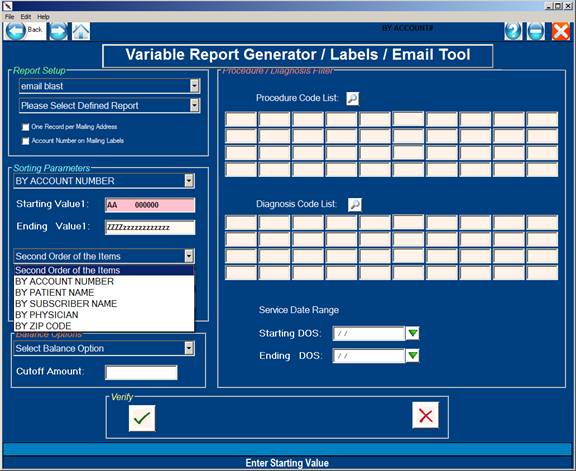
ACCOUNT NUMBER: Choosing "By Account Number" will list
the report or letter in numeric order
according to the patients' account number.
STARTING ACCOUNT#: AA 000000 ( The First Account )
ENDING ACCOUNT#: ZZZZ ZZZZZZ
PATIENT NAME: Choosing "By Patient Name" will list the
report or letter in alphabetic order
according to the patients' name.
ENDING PT. NAME: ZZZZZZZZZ, ZZZZZZZ
Note: The ending name is where printing will
stop. That name will not be included in the
report. Example: A to G, actually prints
A through F.
SUBSCRIBER NAME: Choosing "By Subscriber Name" will list
the report or letter in alphabetic order
according to the subscriber's name.
ENDING SUB NAME: ZZZZZZZZZ, ZZZZZZZ
PHYSICIAN: Choosing "By Physician" will list the
report or letter in numeric order by
provider ID numbers.
STARTING DR. #: 00
ENDING DR. #: 99
ZIP CODE: Choosing "By Zip Code" will list the
report or letter in numeric order by zip code.
STARTING ZIP CODE: 00000
ENDING ZIP CODE: 99999
SELECTED FIELDS: Choosing to sort by "Selected Fields" will
allow you to sort by a field label from Patient Information.
After you select sort option 6 and press <Enter Key>, a screen
similar to the one below will be displayed.
EXAMPLE SCREEN:
Select Sort Fields List
FIELD:_____________
PT_NAME PT_DOB PT_SEX
SOC_SEC PT_TELE PT_ADD1
PT_ADD2 PT_CITY PT-STZP
PT_EMAIL PROV1 PROV2
PROV3 PROV4 PROV5
PAT_EMPL INS CV_CODE
BILLS DUNN BUDGET
CHART MRN PRI_DX
REF_BY FC_CODE ADD_DATE
ADD_ID UPD_DATE UPD_ID
PT_EMPL EM_ADD1 EM_ADD2
EM_CITY EM_STZP EM_TELE
OPTION1 OPTION2 GR_NAME
GR_RLTN GR_TELE GR_SSNO
GR_ADD1 GR_ADD2 GR_CITY
GR_STZP INS_CO SB_EMP
SB_NAME PT_RELS SB_DOB
GROUPID CONTRCT SERVICE
EF_DATE SB_ADD1 SB_CITY
Use the <Up>/<Down> arrow keys or click to select the field you wish
to sort by. After you select the sort field, press <Enter Key>
to have the system display the prompts which allow you to set
the sorting range for that field.
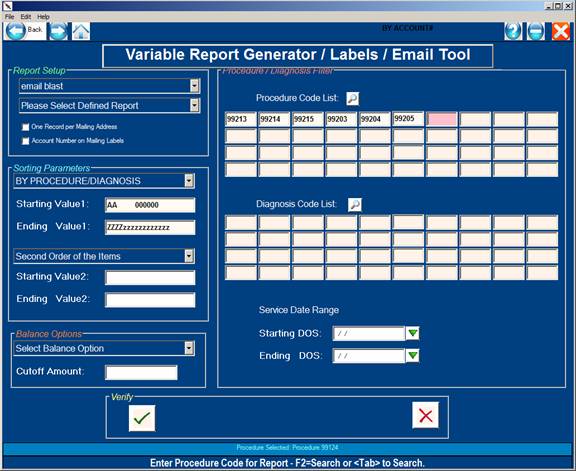
Selecting Sort by Procedure Diagnosis
( Most commonly used for Used for “Research Lists” )
PROCEDURE/DIAGNOSIS: This option allows selection of procedures and/or diagnosis and a service date range to be included in the report query.
Example of Procedure/Diagnosis option selection:
After selection of the primary and secondary sorting parameters, the optional balance parameter will be displayed.
To process patients with certain balances, choose the appropriate option.
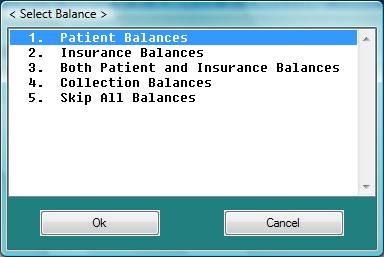
Select #5 Skip All Balances to process every patient without concern of the balance. For Research Lists always select #5.
After the initial sorting and balance parameter setup, all the fields in the system will be presented for selection or query if needed.
Below is an example of Report Generator Field Selection Parameters Screen #1.
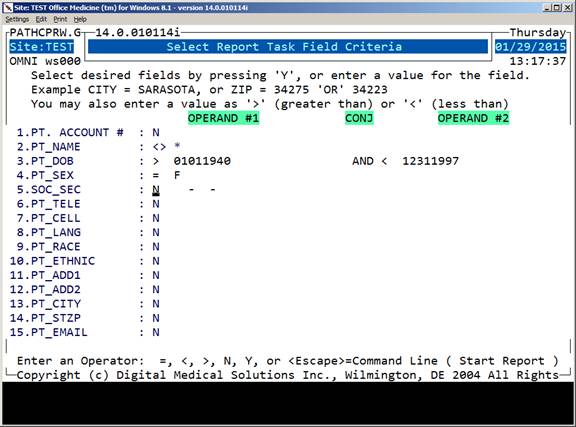
Each report generator screen contains up to 15 labeled fields.
The field labels are found in the PTDATA database files.
THE LABEL FIELDS HAVE BEEN NUMBERED
TO CORRESPOND WITH THE FOUR (7)
DEMOGRAPHIC FILES:
Labeled Fields
(1) PATIENT DEMOGRAPHICS (01-45)
(2) GUARANTOR INFORMATION (46-60)
(3) SUBSCRIBER INFORMATION (61-76)
(4) USER DEFINED (77-154)
(5) PROBLEM LIST (155-175)
(6) MEDICATION LIST (176-192)
(7) HIPPA FIELDS (193-228)
Please Note: The above ranges are for version 14.
The Report Generator program allows you to set the fields to be
considered in the screening process.
Your cursor will be flashing in Field #2. The defaults for each
field are N (NO). You may change a field from N to Y or use the
valid operators. You may press <Enter Key> through a field to go to
the next field without changing the default. To go to the Action
Line shown below press the <Escape> key.
ENTER NUMBER FOR CORRECTION: (2-15,'N' NEXT PAGE,'0' WHEN DONE)
2-15: Enter the number of the line you need to change (changing
an N to a Y or using a valid operator) and press <Enter Key>. Your
cursor will move to that line. Press the <Escape> key to return to
the Action Line.
VALID OPERATORS: Change the N to one of the following valid
operations to have this field considered in the screening.
= If you wish a field to be equal to something
(a word or number), type = and the word or
value and then press <Enter Key>. For example,
if you only wanted to consider patients living
in Miami, you would type =MIAMI <Enter Key>
at the field labeled PT_CITY (Patient City).
<> If you wish a field to be not equal to some-
thing (a word or number), type <> and the word
or value and then press <Enter Key>. For example,
if you wanted to consider all patients except
those living in Detroit, you would type <>DETROIT
<Enter Key> at the field labeled PT_CITY (Patient
City).
< If you wish a field to be less than something
(number or letter), type < and the number or
letter and then press <Enter Key>. For example
if you wanted to consider only patients born
before 1934, you would type <34 <Enter Key> at
the field labeled PT_DOB (date of birth).
<= If you wish a field to be less than or equal to
something (number or letter), type <= and the
number or letter and then press <Enter Key>. For
example, if you wanted to consider only patients
born on or before 1934, you would type <=34
<Enter Key> at the field labeled PT_DOB (date of
birth).
>= If you wish a field to be greater than or equal
to something (number or letter), type >= and the
number or letter and then press <Enter Key>. For
example, if you wanted to consider only patients
born on or after 1934, type >=34 <Enter Key> at the
field labeled PT_DOB (date of birth).
> If you wish a field to be greater than something
(number or letter), type > and the number or
letter and then press <Enter Key>. For example, if
you wanted to consider only patients born after
1934, you would type >34 <Enter Key> at the field
labeled PT_DOB (date of birth).
Y If you wish the information for a field to be
listed on your report, type Y <Enter Key>.
N If you do not wish the information for a field
to be listed on your report, or considered in
the sort, type N <Enter Key>.
AND
If you wish to use two valid operators within
one field, you may connect them with "AND".
For example, if you wanted a list of all patients
with a zip code greater than 48045 but less than
48100, you would type >48045 <Enter Key> AND <Enter Key>
<48100 <Enter Key> at the field labeled PT_STZP
(Patient Zip Code).
OR
If you wish to use one or two valid operators
within one field, you may connect them with "OR".
For example, if you wanted a list of all patients
with a coverage code of either A or F, you would
type A <Enter Key> OR <Enter Key> F <Enter Key> at the
field labeled CV_CODE (Coverage Code).
'N' NEXT PAGE: To access subsequent pages (next Report Generator
screen), type a capital N and press <Enter Key>.
“Escape” or '0' WHEN DONE: You may page through all Report Generator Screens
or exit a screen at any time by typing 0 and pressing <Enter Key>.
In either case, a mock label of X's will print as a test. The
following prompt will be displayed:
"Print Another Line-up (Y/N)".
YES: If the printout is not lined up correctly, adjust the paper
in the printer and answer the prompt with a Y (yes) answer. The
system will print another mock label of X's.
NO: Answer the prompt with an N and press <Enter Key> if the test
printout is lined up correctly. The system will then print the
labels.
REPORT:
Type R and press <Enter Key> to create a report. You will need to
answer the following prompts.
For a New Report:
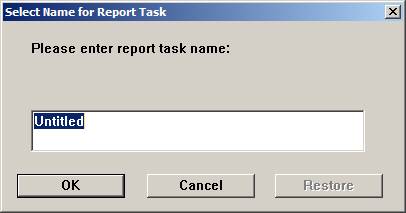
NAME FOR REPORT: Type in the heading you would like
printed at the top of the report (maximum 25 characters)
and press <Enter Key> or click OK.
For an Existing Report:
To merge your report with a letter you have created in
the word processor, type in the word processing file
name (name you have given your letter) and press
<Enter Key>. The system will automatically add an
asterisk next to the file name. Example: FILENAME*
(Please see the section Merging A Report.)
This letter would be generated for only those patients matching
the parameters set in the report writer task.
CREATING A LETTER
From the Word Processing Menu, select Option 1, Office Medicine(tm) for Windows
(this will tie your letter to the merge function). Using the
word processor, create a new file. You may use up to fifty
letters when naming your letter.
Set your margins as in any other word processing file.
Decide what information you would like pulled from the Patient
Information screen. ( Demographics )
Set the codes for the information you want merged into the letter.
Putting the Field Label in square brackets is how you set the code.
in that field label of Patient Information.
It is helpful to print a hard copy of your Patient Information
screen to use as a guide.
In addition to the Patient Information fields, you may use
the following:
Be sure to leave enough space to the right of the coded brackets
for the information to be filled in.
ANY PRINT EFFECTS (e.g.: bold, underscore text)
THE SQUARE BRACKETS EXCEPT WITH THE CODES to pull
information from the Patient Information screen.
ANY PRINT TIME OR DOT COMMANDS (e.g.: .PA .SP2)
Type your document exactly how you would like it to print out.
If you double space between lines, it will print out that way.
When you have finished typing, delete any ruler lines you may
have placed in the document.
MERGING DATABASE INFORMATION
To merge database information with a letter you have created
in the word processor, type in the word processing file name
(name you have given your letter) and press <Enter Key>. The
system will automatically add an asterisk next to the file
name.
Example: REPORT NAME: SAMPLE REPORT*
Complete your sort and screening parameters. Below is an
example letter.
Example Word Processing Letter
January 4, 2014
Dear Patient,
Our records indicate that your primary insurance carrier
is [INS_CO].
Because of policy changes now being enforced by your
insurance company, this office is no longer participating
with this carrier. As a courtesy, my office staff will
continue to submit claims to the carrier for you and payment
by the carrier will be sent directly to you. However, you
will be responsible for all charges.
If you have any questions please contact the office
manager, Ms. Jane Doe, at (888) 555-1212.
Sincerely,
Greg House, M.D.
PROCEDURE/DX REPORT WRITER
OVERVIEW: This program will allow you to cross reference
Procedure Codes, Diagnosis Codes, Provider
Information, Patient information, and obtain
a listing and total by Date of Service. Both
patient and insurance payments may also be
listed.
PROCEDURE: Select Option 4 from the Report Writer Menu and
press <Enter Key>. The screen below will be displayed.
EXAMPLE SCREEN:
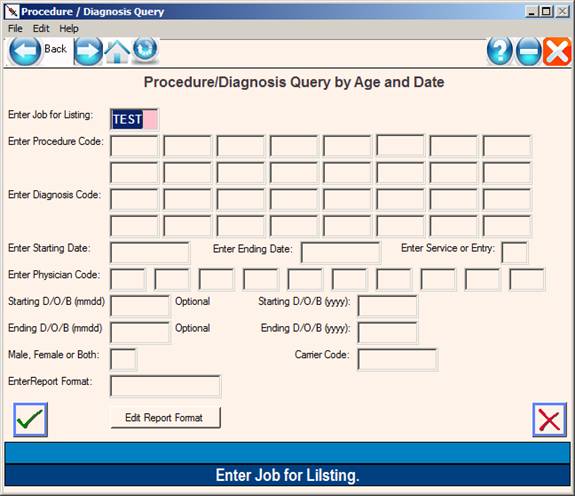
PLEASE VERIFY THE ABOVE INFORMATION (Y/N): Y
PLEASE ENTER PROCEDURE CODE LIST BELOW: Type an * for all procedure
codes or list individual codes pressing <Enter Key> after each one.
The definition of each procedure code will be displayed to the
bottom of your screen after you enter it.
PLEASE ENTER DIAGNOSIS CODE LIST BELOW: Type an * for all diagnosis
codes or list individual codes pressing <Enter Key> after each one. The
code definition will be displayed to the bottom of your screen.
STARTING DATE: Enter the date to initiate the search and press
<Enter Key> or press <Enter Key> to use the system date.
ENDING DATE: Enter the date with which to end the search and
press <Enter Key> or just <Enter Key> to use the current date.
PHYSICIAN LIST TO PROCESS: Press <Enter Key> to include all physicians
on your system or list individual physician ID number pressing
<Enter Key> after each one.
ENTER STARTING D/O/B FOR SEARCH: Enter a starting Date of Birth
(month and day) and press <Enter Key> or press <Enter Key> twice to
include all dates of birth. To skip month and day press
<Enter Key>. Enter a year (2 digit) and press <Enter Key>.
MALE, FEMALE OR BOTH (M/F/B): Enter M for only Male patients, F
for only Female patients, or for Both male and female patients,
and press <Enter Key>. Press <Enter Key> for the default of B.
REPORT FORMAT: Enter the CRF file name that you have created in
the word processor. This file name must be in UPPER CASE LETTERS.
Maximum 8 characters. Press <Enter Key> for the default CRF format.
PLEASE VERIFY THE ABOVE INFORMATION (Y/N): Type N if information
is not correct. The screen will redraw and you may begin again.
Type Y if information is correct.
SELECT DESTINATION: Once you verify the information, the system
will open a window asking you to select an DESTINATION. Example
below.
Select the appropriate DESTINATION and press <Enter Key>.
