DAILY REPORT MENU
OVERVIEW:
The Daily Report Menu program allows you to print
out
a daily journal showing all the transactions,
corrections,
patient charges and credits that
occurred
on a specific date or during a specific
time
period.
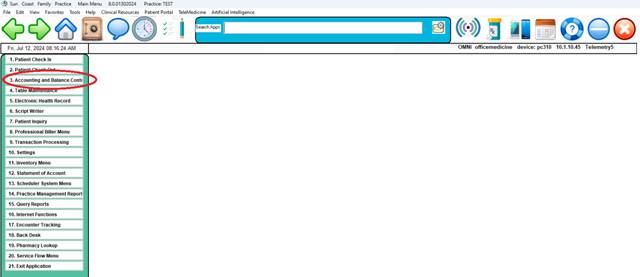
PROCEDURE: From the Main Menu select Option
3, Daily Report
Menu,
and press <Enter>.
EXAMPLE MENU:
After you select No. 3 from the Main
Menu, the following
Daily Report Menu will be
displayed.
EXAMPLE MENU:
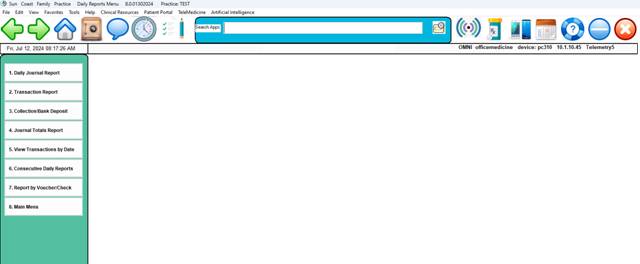
The following pages contain
documentation for each of
the above listed programs.
DAILY BALANCE
REPORT
OVERVIEW: This is the report to run to store totals
for
the
Monthly Financial Report.
This report must be generated
daily to calculate
totals
for your month end reports.
PROCEDURE: From the Daily Report Menu, select Option
1,
Daily Balance Report and
press <Enter>.
After selecting Number 1, the system
will open a window in
middle of
your screen listing the available output devices.
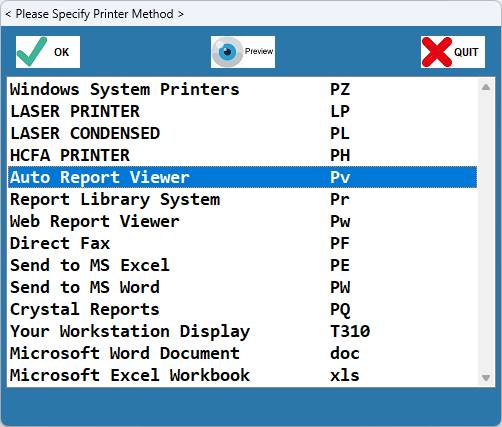
Select the appropriate output device
and press <Enter>. The
system will
then ask you to enter sites for processing.
EXAMPLE SCREEN:
<*> for All= Multiple sites
running in the daily log
will now
perform multiple close(s) and multiple
combined
totals for all sites selected.
NOTE:
If your practice does not have more than
one location, the
system will
not ask you to list the sites for processing.
The screen on the next page will be
displayed.
EXAMPLE SCREEN:
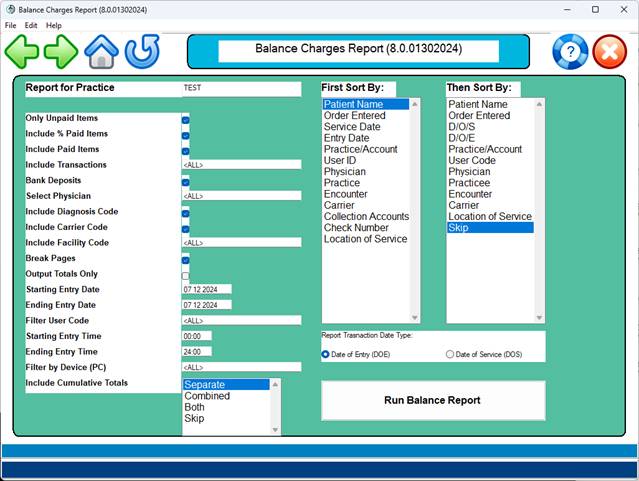
ENTER PARAMETER: The cursor will be flashing at the ENTER
PARAMETER 1-17
prompt. You have eighteen options
to choose
from that
will appear on your Daily Balance Report. You may
list all
items that are unpaid; items that have been partially
paid; items
that have been paid; all transactions for a given
period of
time; and the amount of money generated by a certain
facility
and/or insurance carrier.
TO CHANGE DEFAULTS: If you need to change any of the
defaults,
simply enter
the line number at the flashing cursor and press
<Enter>. A Y (yes) will change to an N (no) except for
Line #6
which
requires that all physicians print or you need to enter a
specific
physician. Line #14 has an N default,
but you may enter
a specific
operator's ID if you wish. Line #17 has
a default of
ALL, but you may enter a specific
terminal.
Once the appropriate parameters have
been entered at the ENTER
PARAMETER 1-17
prompt, press <Enter>.
1. LIST OPEN ITEMS: This option will list the claims which
still have a balance remaining. This
billing log can be printed at a later
date, listing only open items.
2. LIST PART ITEMS: This option will provide you with a
listing of claims which have had a
PARTIAL INSURANCE
PAYMENT: e.g. Medicare
has made payment and no payment received
from the supplemental carrier.
3. LIST PAID ITEMS: This option will list the claims that
have been paid: e.g. office visits that
were paid by the patient because the
service was not covered by the insurer.
4. TRANSACTIONS: ALL= A printout of all payments,
adjustments,
corrections and transfers on all accounts.
If you want this
printout for specific trans-
actions, type 4 at the Action Line and press
<Enter>. Your cursor will
move to that
field. Now type in the specific transaction
codes.
5. BANK DEPOSITS: This option will list the bank deposit
totals or collection report totals for
each physician and for the clinic as a
whole.
6. SELECT DR # : The Daily Balance Report is normally
printed for all physicians in the
practice. If you desire
to print a
report for a specific physician, type in
the provider code number in Field 6 and
press <Enter>.
PROVIDER
BREAKOUT PROMPT:
When selecting
multiple providers, the system will
prompt for Separate or Combined reports.
This option works
with single or multiple sites.
NOTE: If you print the Daily Balance Report
for
selected physicians, you must print the
report for the entire practice last in order
to save totals for MTD/YTD.
7. DIAGNOSIS: If you desire to have a specific
diagnosis appear on the report, keep
the default Y in Field 7.
This
information is obtained from Patient
Checkout
8. LIST CARRIERS: Listing carriers will print the
patient's primary insurance carrier on
the report: e.g. BS, MR, MD, and all
private
insurances.
9. LIST FACILITY: Listing the facility will print the
facility abbreviation on each claim
service line that was performed outside
of
the office.
10. PAGE BREAKS: The Daily Balance Report may be
printed
with each heading starting on a new page.
11. TOTALS ONLY: If you desire to have totals only. This
field should be changed to Y. The default
is No.
12. STARTING D/O/E: The starting and ending D/O/E defaults
13. ENDING D/O/E: to the current system date. This report
should be printed on a daily basis. If
you do not print this report at the end
of the day, it can be printed the
following day. You
must change the
starting and ending D/O/E to the date
required.
14. SELECT OP ID: This allows you to balance out a
selected
operator at the end of his/her shift. An N
in this field will print all input activity
for the date you specified.
To change the
default of No, type 14 and press <Enter>.
The following prompt will be
displayed:
SELECT BY
OPERATOR OR COMPANY (O/C)?
O=Will ask you
to enter Operator ID.
C=Will ask you
to enter Company ID.
(The company
code you enter here is
found in field #4 of the Operator ID
dictionary.)
15. STARTING TIME The default starting time will be 0000
16. ENDING TIME: and the ending default time will be
2400. Hours are calculated in military
time. Normally, there
is no reason to
change the default times, unless you are
trying to balance a specified operator
for a certain time period.
17. WORKSTATION ID: The default for Workstation ID is to
print
for all
terminals. Again, in most
situations there is no need to change
this default, unless you are trying to
balance out a specific terminal. The
terminal
ID's are identified as T0, T1,
T2, T3, etc.
SORT PARAMETERS: The sort parameters menu will appear on
the
right hand
side of your screen. Choose the order in which you
would like
the Daily Balance Report to print and press <Enter>.
DEFINITION OF SORT PARAMETERS:
1. PATIENT NAME: This option of sorting entered claims
will
print the patients in alphabetical order.
The date of service
and date of entry are
ignored when this type of sort is performed.
2. ORDER ENTERED: This option of sorting claims will
print
the claims in the exact order in which
they were entered into the system.
3. D/O/S - NAME: This option will sort patients
alphabetically
for each date of service requested.
4. D/O/E - NAME: This will sort patients alphabetically
for
each date of entry requested (if a log is
printed for more than one date of entry).
5. D/O/E-ACCOUNT#: Patients will be printed by their
account
number by each date of entry.
6. ENCOUNTER NUMBER: Patients will be
printed by their Encounter
Number.
EXPLANATION OF
REPORTS
ENCOUNTER SCHEDULE: The first page of the Daily Balance
Report
is called the
Encounter Schedule. The total for each
encounter
now prints on
the charges report on a per patient basis.
The
Encounter Schedule will list all patients
with claim line items
entered on
the specified date of entry. This part of the log will
print all no
check-out entries. These are patient's that had a
route slip
printed for them, but no claim was entered.
The report will contain these
headings: Patient Name and Account
Number, Date of Entry and Date of
Service, User ID, Dr. #,
Procedure Code and Description,
Diagnosis Code, Insurance Type,
Facility, Assignment, Patient Amount,
Insurance Amount, and
Original Charge.
ENCOUNTER SUMMARY: The Encounter Summary portion of the
Daily
Balance Report will summarize the
totals from the Encounter
Schedule.
TRANSACTION REPORT: The Transaction Report portion of the
Daily
Balance Report lists all of the items
recorded in Patient Check-
out, Define
Transactions, and Line Item.
The report headings are: Patient Name,
Account Number, Date of
Entry, Date of Service, User ID, Dr.
#, Procedure Code,
Description, Patient
Amount, and Insurance Amount.
TRANSACTION SUMMARY: The summary
transaction totals for each
physician(s)
on the specified date of entry.
COLLECTION REPORT: The Collection Report will list
accounts
which had
payments posted. These payments will be listed in
three
columns: Patient Cash, Patient Checks, and Insurance Checks.
The column in which a payment appears
is determined by the
Transaction
Definition Dictionary.
COLLECTION TOTALS REPORT: The Collections Totals Report will
give you a
total of the various types of payments received
per physician
and a total for the entire practice.
TRANSACTION REPORT
OVERVIEW: The Transaction Report program will allow
you
to
print a report listing all entries from
Patient Checkout, Define
Transactions, and Line
Item.
PROCEDURE: From the Daily Report Menu select Option
2,
Transaction Report, and press <Enter>.
After selecting Number 2, the system
will open a window in
middle of
your screen listing the available output devices.
Select the appropriate output device
and press <Enter>. The
system will
then ask you to enter sites for processing.
EXAMPLE SCREEN:
NOTE:
If your practice does not have more
than one location, the
system will
not ask you to list the sites for processing.
The screen on the next page will be
displayed.
EXAMPLE SCREEN:
ENTER PARAMETER: The cursor will be flashing at the ENTER
PARAMETER 1-10
prompt. You have ten options to
choose
from that
will appear on your Transaction Report.
TO CHANGE DEFAULTS: If you need to change any of the
defaults,
simply enter
the line number at the flashing cursor and press
<Enter>. A Y (yes) will change to an N (no) except for
Line #2
which
requires that all physicians print or you need to enter a
specific
physician. Line #7 has an N default, but
you may enter
a specific
operator's ID if you wish. Line #10 has
a default of
ALL, but you may enter a specific
terminal.
Once the appropriate parameters have
been entered at the ENTER
PARAMETER 1-10
prompt, press <Enter>.
1. TRANSACTIONS: Listing transactions will provide you
with a printout of all payments,
adjustments, corrections and transfers
on each account.
2. SELECT DR # : The Transaction Report is normally
printed
for all physicians in the practice. If you
desire to print a report for a specific
physician, type in the provider code number
in
Field 2 and press <Enter>.
NOTE: If you print the Transaction
Report for
selected physicians, you must print the
report for the entire practice last.
3. PAGE BREAKS: The Transaction Report may be
printed
with each heading starting on a new page.
4. TOTALS ONLY: If you desire to have totals only. This
field should be changed to Y. The default
is No.
5. STARTING D/O/E: The starting and ending D/O/E defaults
6. ENDING D/O/E:
to the current system date. This
report
should be printed on a daily basis. If
you do not print this report at the end
of the day, it can be printed the
following day. You
must change the
starting and
ending D/O/E to the date
required.
7. SELECT OP ID: A no response in Select OP ID will
print
all input activity for the date you have
specified. If you wish to balance out a
selected operator at the end of her shift,
select No. 7 and press <Enter>. This
will move the cursor to the SELECT OP ID
prompt. Enter the initials (ID) of the
selected operator.
8. STARTING TIME The default starting time will be
0000
9. ENDING TIME: and the ending default time will be
2400. Hours are calculated in military
time. Normally, there
is no reason to
change the default times, unless you are
trying to balance a specified operator
for a certain time period.
10. Workstation ID: The default for Workstation ID is to
print
for ALL workstations.
Again, in most
situations there
is no need to change
this default, unless you are trying to
balance for a specific workstation. The
workstation ID's are identified as T00, T01,
T02, T03, etc.
SORT PARAMETERS: The sort parameters menu will appear on the
right
hand side of
your screen. Choose the order in which you would like
the
Transaction Report to print and press <Enter>.
1. PATIENT NAME: This option of sorting entered claims
will
print the patients in alphabetical order.
The date of
service and date of entry are
ignored when this type of sort is performed.
2. ORDER ENTERED: This option of sorting claims will
print
the claims in the exact order in which
they were entered into the system.
3. D/O/S - NAME: This option will sort patients
alphabetically
for each date of service requested.
4. D/O/E - NAME: This will sort patients alphabetically
for
each date of entry requested (if a log is
printed for more than one date of entry).
5. D/O/E-ACCOUNT#: Patients will be printed by their
account
number by each date of entry.
6. ENCOUNTER NUMBER: Patients will be
printed by their Encounter
Number.
DEPOSIT
REPORT
OVERVIEW: The Deposit Report program will allow you to
run
a
report that indicates all deposits (including
capitation
payments) made to the clinic's account
by
all, some, or one operator.
PROCEDURE: From the Daily Report Menu, select Option
3,
Deposit Report, and press
<Enter>.
After selecting Number 3, the system
will open a window in
middle of
your screen listing the available output devices.
Select the appropriate output device
and press <Enter>. The
system will
then ask you to enter sites for processing.
EXAMPLE SCREEN:
NOTE:
If your practice does not have more
than one location, the
system will
not ask you to list the sites for processing.
The screen on the next page will be
displayed.
ENTER PARAMETER: The cursor will be flashing at the ENTER
PARAMETER 1-10
prompt. You have ten options to
choose
from that
will appear on your Deposit Report.
TO CHANGE DEFAULTS: If you need to change any of the
defaults,
simply enter
the line number at the flashing cursor and press
<Enter>. A Y (yes) will change to an N (no) except for
Line #2
which
requires that all physicians print or you need to enter a
specific
physician. Line #7 has an N default, but
you may enter
a specific
operator's ID if you wish. Line #10 has
a default of
ALL, but you may enter a specific
terminal.
Once the appropriate parameters have
been entered at the ENTER
PARAMETER 1-10
prompt, press <Enter>.
1. BANK DEPOSITS: This option will list the bank deposit
totals or collection report totals for
each physician and for the clinic as a
whole.
2. SELECT DR # : The Deposit Report is normally printed
for
all physicians in the practice. If you
desire to print a report for a specific
physician, type in the provider code number
in Field 2 and press <Enter>.
NOTE: If you print the Deposit Report
for selected
physicians,
you must print the report for
the entire practice last.
3. PAGE BREAKS: The Deposit Report may be printed with
each
heading starting on a new page.
4. TOTALS ONLY: If you desire to have totals only. This
field should be changed to Y. The default
is No.
5. STARTING D/O/E: The starting and ending D/O/E defaults
6. ENDING D/O/E:
to the current system date. This
report
should be printed on a daily basis. If
you do not print this report at the end
of the day, it can be printed the following
day. You must change
the starting and ending
D/O/E to the date
required.
7. SELECT OP ID: This allows you to balance out a
selected
operator at
the end of his/her shift. An N
in this field will print all input activity
for the date you specified.
To change the
default of No, type 14 and press <Enter>.
The following
prompt will be displayed:
SELECT BY
OPERATOR OR COMPANY (O/C)?
O=Will ask you
to enter Operator ID.
C=Will ask you to enter Company ID.
(The company
code you enter here is
found in field #4 of the Operator ID
dictionary.)
8. STARTING TIME The
default starting time will be 0000 and
9. ENDING TIME: the ending default time will be
2400. Hours
are calculated in military time. Normally,
there is no reason to change the default times,
unless you are trying to balance a specified
operator for a certain time period.
10. TERMINAL ID: The default for Terminal ID is to
print
for ALL
terminals. Again, in most
situations there is no need to change
this default, unless you are trying to
balance out a specific terminal. The
terminal
ID's are identified as T0, T1,
T2, T3, etc.
SORT PARAMETERS: The sort parameters menu will appear on the
right
hand side of
your screen. Choose the order in which you would like
the report to
print and press <Enter>.
DEFINITION OF SORT PARAMETERS:
1. PATIENT NAME: This option of sorting entered claims
will
print the patients in alphabetical order.
The date of service and
date of entry are
ignored when this type of sort is performed.
2. ORDER ENTERED: This option of sorting claims will
print
the claims in the exact order in which
they were entered into the system.
3. D/O/S - NAME: This option will sort patients
alphabetically
for each date of service requested.
4. D/O/E - NAME: This will sort patients alphabetically
for
each date of entry requested (if a log is
printed for more than one date of entry).
5. D/O/E-ACCOUNT#: Patients will be printed by their
account
number by each date of entry.
6. ENCOUNTER NUMBER: Patients will be
printed by their Encounter
Number.
OMNI
Office Medicine(tm) for Windows XP
DAILY FINANCIAL REPORT
(FDR
#) v8.4
GRAND TOTALS
REPORT
OVERVIEW: The Grand Totals Report program allows you
to
print
a daily journal showing all charges,
payments,
etc. for a specified time frame.
It looks very similar to a
Monthly Financial
Report.
PROCEDURE: From the Daily Report Menu, select Option
4,
Grand Totals Report, and press <Enter>.
After selecting Number 4, the system
will open a window in
middle of
your screen listing the available output devices.
EXAMPLE SCREEN:
1. Okidata
393 (LP) <O
2. Okidata
320 (P1)
3. HP Laser III (P2)
4. Your Terminal Screen (TE)
5. ---> EXIT <---
Select the appropriate output device
and press <Enter>. The
system will
then ask you to enter sites for processing.
EXAMPLE SCREEN:
NOTE:
If your practice does not have more
than one location, the
system will
not ask you to list the sites for processing.
The screen on the next page will be
displayed.
ENTER PARAMETER: The cursor will be flashing at the ENTER
PARAMETER 1-17 prompt. You have seventeen options to choose
from that
will appear on your Grand Totals Report. You may
list all
items that are unpaid; items that have been partially
paid; items
that have been paid; all transactions for a given
period of
time; and the amount of money generated by a certain
facility
and/or insurance carrier.
TO CHANGE DEFAULTS: If you need to change any of the
defaults,
simply enter
the line number at the flashing cursor and press
<Enter>. A Y (yes) will change to an N (no) except for
Line #6
which
requires that all physicians print or you need to enter a
specific
physician. Line #14 has an N default,
but you may enter
a specific
operator's ID if you wish. Line #17 has
a default of
ALL, but you may enter a specific
terminal.
Once the appropriate parameters have
been entered at the ENTER
PARAMETER 1-17
prompt, press <Enter>.
1. LIST OPEN ITEMS: This option will list the claims which
still have a balance remaining. This
billing log can be printed at a later
date, listing only open items.
2. LIST PART ITEMS: This option will provide you with a
listing of claims which have had a
PARTIAL INSURANCE
PAYMENT: e.g. Medicare
has made payment and no payment received
from the supplemental carrier.
3. LIST PAID ITEMS: This option will list the claims that
have been paid: e.g. office visits that
were paid by the patient because the
service was not covered by the insurer.
4. TRANSACTIONS: ALL= A printout of all payments,
adjustments,
corrections and transfers on all accounts.
If you want this printout for
specific trans-
actions, type 4 at the Action Line and press
<Enter>. Your cursor will
move to that
field. Now type in the specific transaction
codes.
5. BANK DEPOSITS: This option will list the bank deposit
totals or collection report totals for
each physician and for the clinic as a
whole.
6. SELECT DR # : The Grand Totals Report is normally
printed for all physicians in the
practice. If you
desire to print a
report
for a specific physician, type in
the provider code number in Field 6 and
press <Enter>.
NOTE: If you print the Grand Totals
Report for
selected
physicians, you must print the
report for the entire practice last.
7. DIAGNOSIS: If you desire to have a specific
diagnosis appear on the report, keep
the default Y in Field 7.
This
information is obtained from Patient
Checkout
8. LIST CARRIERS: Listing carriers will print the
patient's
primary insurance carrier on
the report: e.g. BS, MR, MD, and all
private insurances.
9. LIST FACILITY: Listing the facility will print the
facility
abbreviation on each claim
service line that was performed outside
of the office.
10. PAGE BREAKS: The Grand Totals Report may be
printed
with each
heading starting on a new page.
11. TOTALS ONLY: If you desire to have totals only. This
field should be changed to Y. The default
is No.
12. STARTING D/O/E: The starting and ending D/O/E defaults
13. ENDING D/O/E: to the current system date. This report
should be printed on a daily basis. If
you do not print this report at the end
of the day, it can be printed the
following day. You
must change the
starting and ending D/O/E to the date
required.
14. SELECT OP ID: This allows you to balance out a
selected
operator at the end of his/her shift. An N
in this field will print all input activity
for the date you specified.
To change the
default of No, type 14 and press <Enter>.
The following
prompt will be displayed:
SELECT BY
OPERATOR OR COMPANY (O/C)?
O=Will ask you to enter
Operator ID.
C=Will ask you
to enter Company ID.
(The company
code you enter here is
found in field #4 of the Operator ID
dictionary.)
15. STARTING TIME The default starting time will be
0000
16. ENDING TIME: and the ending default time will be
2400. Hours are calculated in military
time. Normally, there
is no reason to
change the default times, unless you are
trying to balance a specified operator
for a certain time period.
17. TERMINAL ID: The default for Terminal ID is to
print
for all terminals.
Again, in most
situations there is no need to change
this default,
unless you are trying to
balance out a specific terminal. The
terminal ID's are identified as T0, T1,
T2, T3, etc.
SORT PARAMETERS: The sort parameters menu will appear on
the right
hand side of your screen. Choose the order in
which you
would like the report to print and press <Enter>.
Daily Totals WILL be
saved for the Monthly Reports.
DEFINITION OF SORT PARAMETERS:
1. PATIENT NAME: This option of sorting entered claims
will
print the patients in alphabetical order.
The date of
service and date of entry are
ignored when this type of sort is performed.
2. ORDER ENTERED: This option of sorting claims will
print
the claims in the exact order in which
they were entered into the system.
3. D/O/S - NAME: This option will sort patients
alphabetically
for each date of service requested.
4. D/O/E - NAME: This will sort patients alphabetically
for
each
date of entry requested (if a log is
printed for more than one date of entry).
5. D/O/E-ACCOUNT#: Patients will be printed by their
account
number by each date of entry.
6. ENCOUNTER NUMBER: Patients will be
printed by their Encounter
Number.
OMNI
Office Medicine(tm) for Windows XP
VIEW DAILY TRANSACTIONS
(FDR #) v8.4
VIEW DAILY
TRANSACTIONS
OVERVIEW: The View Daily Transactions program
allows
the
user to view a daily journal showing all
the
transactions, corrections, patient charges
and
credits that occurred on one specific date.
PROCEDURE: From the Daily Report Menu select Option
5,
View Daily Transactions,
and press <Enter>.
The screen below will be
displayed.
EXAMPLE SCREEN:
ENTER STARTING DATE: MMDDYY ENDING DATE:
MMDDYY (Esc=END)B
STARTING DATE: Press <Enter> and the system will default
to the
current date. If you want to view daily
transactions
for a prior
date, simply enter the date in MMDDYY format and
press
<Enter>.
ENDING DATE: Enter the ending date of daily
transactions
you want to
view in MMDDYY format and press
<Enter>.
The system will display the message:
ENTER TRANSACTION CODE
<CR> = ALL : O.
(Enter the Specific Transaction Code
to list. <Tab> to Search.)
Press <Tab> to have all the transaction
codes on the system
displayed
to your screen along with their definition.
At
the
flashing cursor type the line number of the code you wish
to view or
use the arrow keys to highlight the line and press
<Enter>.
If you want to view one or more
transactions codes, but not all,
simply
enter the transaction code(s) and press <Enter>.
OMNI
Office Medicine(tm) for Windows XP
DATE OF SERVICE REPORT
(FDR
#) v8.4
DATE OF SERVICE
REPORT
OVERVIEW: This will print a report by date of
service.
Please note: This is not the report to run to
store
accurate totals for the Monthly Financial
Report. The report which stores totals is the
Daily
Balance Report.
PROCEDURE: From the Daily Report Menu select Option
6,
Date of Service Report, and
press <Enter>.
After selecting Number 6, the system
will open a window in
middle of
your screen listing the available output devices.
Select the appropriate output device and
press <Enter>. The
system will
then ask you to enter sites for processing.
EXAMPLE SCREEN:
NOTE:
If your practice does not have more
than one location, the
system will
not ask you to list the sites for processing.
The screen on the next page will be
displayed.
ENTER PARAMETER: The cursor will be flashing at the ENTER
PARAMETER 1-18
prompt. You have eighteen options
to choose
from that
will appear on your Date of Service Report. You may
list all
items that are unpaid; items that have been partially
paid; items
that have been paid; all transactions for a given
period of
time; and the amount of money generated by a certain
facility
and/or insurance carrier.
TO CHANGE DEFAULTS: If you need to change any of the
defaults,
simply enter
the line number at the flashing cursor and press
<Enter>. A Y (yes) will change to an N (no) except for
Line #6
which
requires that all physicians print or you need to enter a
specific
physician. Line #15 has an N default,
but you may enter
a specific
operator's ID if you wish. Line #18 has
a default of
ALL, but you may enter a specific
terminal.
Once the appropriate parameters have
been entered at the ENTER
PARAMETER 1-18
prompt, press <Enter>.
1. LIST OPEN ITEMS: This option will list the claims which
still have a balance remaining. This
billing log can be printed at a later
date, listing only open items.
2. LIST PART ITEMS: This option will provide you with a
listing of claims which have had a
PARTIAL INSURANCE
PAYMENT: e.g. Medicare
has made payment and no payment received
from the supplemental carrier.
3. LIST PAID ITEMS: This option will list the claims that
have been paid: e.g. office visits that
were paid by the patient because the
service was
not covered by the insurer.
4. TRANSACTIONS: Listing transactions will provide you
with a printout of all payments,
adjustments, corrections and transfers
on
each account.
5. BANK DEPOSITS: This option will list the bank deposit
totals or collection report totals for
each physician and for the clinic as a
whole.
6. SELECT DR # : The Date of Service Report is
normally
printed for all physicians in the
practice. If you
desire to print a
report for a
specific physician, type in
the provider code number in Field 6 and
press <Enter>.
NOTE: If you print the Date of
Service Report
for selected
physicians, you must print
the report for the entire practice last.
7. DIAGNOSIS: If you desire to have a specific
diagnosis appear on the report, keep
the
default Y in Field 7. This
information is obtained from Patient
Checkout.
8. LIST CARRIERS: Listing carriers will print the
patient's
primary
insurance carrier on the report:
e.g. BS, MR, MD, and all private insurances.
9. LIST FACILITY: Listing the facility will print the
facility
abbreviation on each claim service line that
was performed outside of the office.
10. PAGE BREAKS: The Date of Service Report may be
printed
with each heading starting on a new page.
11. CONDENSED PRINT: If you desire to condense your report
(applies
to dot matrix printers only) from 120 columns
to and 8 1/2 by 11 inch page then enter in a
Y in Field 11 and press <Enter>.
12. STORE TOTALS: Your Date of Service Report will store
total
amounts for your Monthly Financial Report.
13. STARTING D/O/E: The starting and ending D/O/E defaults
to
14. ENDING D/O/E: the current system date. This report should
be printed on a daily basis.
If you do not
print this report at the end of the day, it
can be printed the following day. You must
change the starting and ending D/O/E to the
date required.
15. SELECT OP ID: This allows you to balance out a
selected
operator at the end
of his/her shift. An N
in this field will print all input activity
for the date you specified.
To change the
default of No, type 14 and press <Enter>.
The following
prompt will be displayed:
SELECT BY
OPERATOR OR COMPANY (O/C)?
O=Will ask you
to enter Operator ID.
C=Will ask you
to enter Company ID.
(The company
code you enter here is
found in field #4 of the Operator ID
dictionary.)
16. STARTING TIME The default starting time will be
0000
17. ENDING TIME: and the ending default time will be
2400. Hours are calculated in military
time. Normally, there
is no reason to
change
the default times, unless you are
trying to balance a specified operator
for a certain time period.
18. TERMINAL ID: The default for Terminal ID is to print
for
all terminals. Again,
in most situations
there is no need to change this default,
unless you are trying to balance out a
specific terminal.
The terminal ID's are
identified as T0, T1, T2, T3, etc.
SORT PARAMETERS: The sort parameters menu will appear on
the right
hand side of your screen. Choose the order in
which you
would like the Date of Service Report to print
and press
<Enter>.
DEFINTION OF SORT PARAMETERS:
1. PATIENT NAME: This option of sorting entered claims
will
print the patients in alphabetical order.
The date of
service and date of entry are
ignored when this type of sort is performed.
2. ORDER ENTERED: This option of sorting claims will
print
the claims in the exact order in which
they were entered into the system.
3. D/O/S - NAME: This option will sort patients
alphabetically
for each date of service requested.
4. D/O/E - NAME: This will sort patients alphabetically
for
each date of entry requested (if a log is
printed for more than one date of entry).
5. D/O/E-ACCOUNT#: Patients will be printed by their
account
number by each date of entry.
6. ENCOUNTER NUMBER: Patients will be
printed by their Encounter
Number.
OMNI
Office Medicine(tm) for Windows XP
RUN MULTIPLE LOGS
(FDR
#) v8.4
RUN MULTIPLE
LOGS
OVERVIEW: This will automatically run the logs from
the
start
and ending dates you enter so that month-
to-date
totals will be stored properly. You also
have
the option to print the Multiple Logs.
PROCEDURE: From the Daily Report Menu, select Option
7,
Run Multiple Logs and press
<Enter>. The
screen
below will be displayed.
EXAMPLE SCREEN:
NOTE:
If your practice does not have more
than one location, the
system will not ask you to list the sites for processing.
After you enter the sites for
processing, the screen on the
next page
will be displayed.
ENTER PARAMETER 1-18 -> O <cr> = DONE
ENTER PARAMETER: The cursor will be flashing at the ENTER
PARAMETER 1-18
prompt. You have seventeen
options to choose
from that
will appear on this report. You may list
all items
that are
unpaid; items that have been partially paid; items
that have
been paid; all transactions for a given period of
time; and the
amount of money generated by a certain facility
and/or
insurance carrier.
TO CHANGE DEFAULTS: If you need to change any of the
defaults,
simply enter
the line number at the flashing cursor and press
<Enter>. A Y (yes) will change to an N (no) except for
Line #6
which
requires that all physicians print or you need to enter a
specific
physician. Line #14 has an N default,
but you may enter
a specific
operator's ID if you wish. Line #17 has
a default of
ALL, but you may enter a specific
terminal. Line #18 has a default
of Combined
which you may change by typing 18 and pressing <Enter>.
Once the appropriate parameters have
been entered at the ENTER
PARAMETER 1-18
prompt, press <Enter>.
1. LIST OPEN ITEMS: This option will list the claims which
still have a balance remaining. This
billing log can be printed at a later
date, listing only open items.
2. LIST PART ITEMS: This option will provide you with a
listing of claims which have had a
PARTIAL INSURANCE
PAYMENT: e.g. Medicare
has made payment and no payment received
from the supplemental carrier.
3. LIST PAID ITEMS: This option will list the claims that
have been paid: e.g. office visits that
were paid by the patient because the
service was not
covered by the insurer.
4. TRANSACTIONS: ALL= A printout of all payments,
adjustments,
corrections and transfers on all accounts.
If you want this
printout for specific trans-
actions, type 4 at the Action Line and press
<Enter>. Your cursor will
move to that
field. Now type in the specific transaction
codes.
5. BANK DEPOSITS: This option will list the bank deposit
totals or collection report totals for
each physician and for the clinic as a
whole.
6. SELECT DR # : This report is normally printed for
all physicians in the practice. If
you desire to print a report for a
specific physician, type in the
provider code number in Field 6 and
press <Enter>.
NOTE: If you print this report for
selected
physicians, you must print the report
for the entire practice last.
7. DIAGNOSIS: If you desire to have a specific
diagnosis appear on the report, keep
the default Y in Field 7.
This
information is obtained from Patient
Checkout
8. LIST CARRIERS: Listing carriers will print the
patient's primary insurance carrier on
the
report: e.g. BS, MR, MD, and all
private insurances.
9. LIST FACILITY: Listing the facility will print the
facility abbreviation on each claim
service
line that was performed outside
of the office.
10. PAGE BREAKS: This report may be printed with each
heading starting on a new page.
11. TOTALS ONLY: If you desire to have totals only. This
field should be changed to Y. The default
is No.
12. STARTING D/O/E: The starting and ending D/O/E defaults
13. ENDING D/O/E: to the current system date. This report
should be printed on a daily basis. If
you do not print this report at the end
of the day, it can be printed the
following
day. You must change the
starting and ending D/O/E to the date
required.
14. SELECT OP ID: This allows you to balance out a
selected
operator
at the end of his/her shift. An N
in this field will print all input activity
for the date you specified.
To change the
default of No, type 14 and press <Enter>.
The following
prompt will be displayed:
SELECT BY
OPERATOR OR COMPANY (O/C)?
O=Will ask you
to Enter Operator ID.
C=Will ask you to enter Company
ID.
(The company
code you enter here is
found in field #4 of the Operator ID
dictionary.)
15. STARTING TIME The default starting time will be
0000
16. ENDING TIME: and the ending default time will be
2400. Hours are calculated in military
time. Normally, there
is no reason to
change the default times, unless you are
trying to balance a specified operator
for a certain time period.
17. TERMINAL ID: The default for Terminal ID is to
print
for all terminals.
Again, in most
situations there is no need to change
this default, unless you are trying to
balance out a specific terminal. The
terminal ID's are identified as T0, T1,
T2, T3, etc.
18. GRAND TOTALS: The default for Grand Totals is
COMBINED.
This field allows
you to choose how you
would like to have the Grand Totals page
appear:
COMBINED= All
grand totals per transaction
CCCCCCCC
added together- 1 page.
SEPARATE=
Separate grand totals page for
CCCCCCCC
each site.
BOTH= Separate
reports and a combined report.
CCCC
NONE= No grand
totals page.
CCCC
SORT PARAMETERS: The sort parameters menu will appear on
the
right hand
side of your screen. Choose the order in which you
would like
the Multiple Logs program to print and press <Enter>.
Daily Totals WILL be
saved for the Monthly Reports.
DEFINITION OF SORT PARAMETERS:
1. PATIENT NAME: This option of sorting entered claims
will
print the patients in alphabetical order.
The date of
service and date of entry are
ignored when this type of sort is performed.
2. ORDER ENTERED: This option of sorting claims will
print
the claims in the
exact order in which
they were entered into the system.
3. D/O/S - NAME: This option will sort patients
alphabetically
for each date of service requested.
4. D/O/E - NAME: This will sort patients alphabetically
for
each date of entry requested (if a log is
printed for more than one date of entry).
5. D/O/E-ACCOUNT#: Patients will be printed by their
account
number by each date of entry.
6. ENCOUNTER NUMBER: Patients will be
printed by their Encounter
Number.
PRODUCE OUTPUT REPORT: The following prompt will be displayed
to your
screen:
PRODUCE OUTPUT REPORT
(Y/N):
An N (NO) response will return you to
the Daily Report Menu.
A Y (YES) response will open a window
allowing you to select
an output
device.
Select the appropriate output device
and press <Enter>.