PASSWORD MAINTENANCE
OVERVIEW: The Password Maintenance program allows you to control and/or change the password(s) for access to programs
in the Office Medicine System.
If a Password has been defined for entry into this program, you will need to enter it before you can view the screen shown below. If a Password has not been set, just press < Enter > and the screen will be displayed.
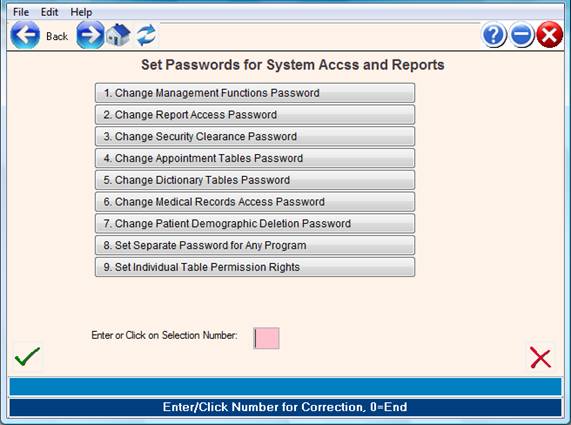
PROCEDURE: Select Option 5 from the Management Functions Menu
and press < Enter >. The screen below will be
displayed.
EXAMPLE SCREEN:
**CHANGE SECURITY UTILITY PASSWORD: This option is different than
the others in that it is utilized to set a password for the
removal of a patient in the Patient Information program as well
as allowing access to the Password Maintenance program.
CHANGE PASSWORD: To change a password, type in the number of
the desired password option at the flashing cursor and press
< Enter >. The system will display the following prompt.
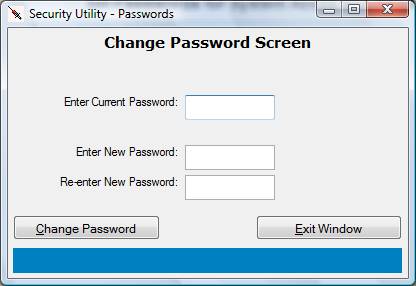
ENTER CURRENT PASSWORD:
If you do not have a password yet, just press < Enter >.
If there is already password, and you wish to change it, enter the current password now and press <Enter>. The next prompt will be:
ENTER NEW PASSWORD:
Enter the new password for the choice selected and press < Enter >.
The system will ask you to verify the password you entered by
displaying the prompt below.
RE-ENTER NEW PASSWORD:
Reenter the password exactly as you typed it the first time.
MATCHED PASSWORDS: If your entry and verification of the new
password is correct, the system will respond with:
NEW PASSWORD ACCEPTED
NOTE: It is important that you notify SDM each time you
change your system password. Document the password
and store it in a safe place.
PASSWORDS DO NOT MATCH: The system will ask you to verify a new
password by displaying
(REENTER PASSWORD)
If you do not reenter the password exactly as you typed it the
first time, the following message will be displayed.
PASSWORDS DO NOT MATCH - CHANGE NOT MADE
Press < Enter > and repeat the steps to CHANGE PASSWORD.
0=END: To exit the System Security screen, type 0 (zero) and
press < Enter >.
9. Set individual table permission rights: This selection may not
be shown on your System Security Utility screen. This program
allows you to set dictionary access levels. It then lists the
dictionaries, one by one, prompting for an acess code for that
user level: N= no access at all, R= read only, W= they can read
that dictionary and write to it (change it), D= they can delete
(besides being allowed to read and write).
To access this option type 9 at the ENTER NUMBER FOR CORRECTION
OR 0=END prompt. After you enter 9 and press < Enter >, the screen
below will be displayed.