Patient Ledgers:
Purpose: This section explains the patient ledger workbench tool.
This ledger can be accessed from the main screen by going into #1 Patient Information, entering the first few letters of the patient’s last name, and <TAB> to search for the desired patient. Arrow down, press <ENTER> when the desired patients’ name is highlighted. This takes you to the main Patient Information screen for this patient. At the bottom of the screen, click on the grey “Ledger” tab. You may also access the ledger by entering “PTLEDGER.GML” at the action line of the main screen.
You can search for a patient by entering the first few letters of the patient name, and pressing the <TAB> key.
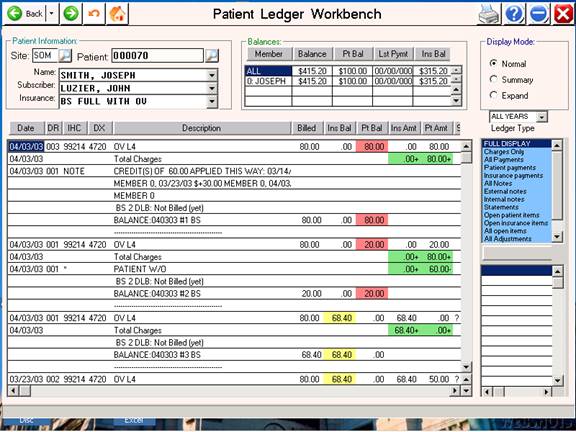
The tri-color views make it easier to view patient and insurance balances. The right side of the screen has screen has options for you to choose the information that you want to view.
In the following examples, you will see the affects of various choices on the type of information that will be displayed.
This example displays charges only.
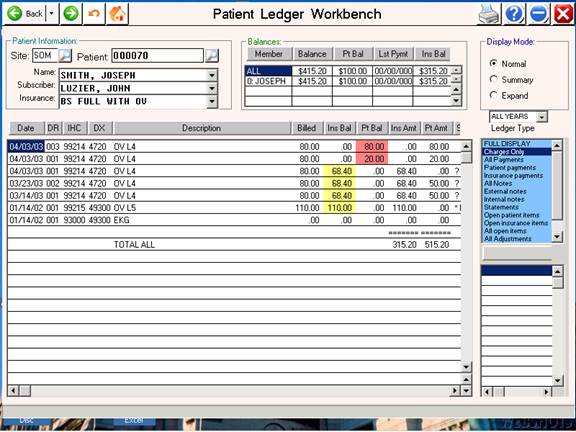
This screen displays open insurance balances only. To print this information, simply click on the printer icon on the task bar, and select a printer when prompted to do so.
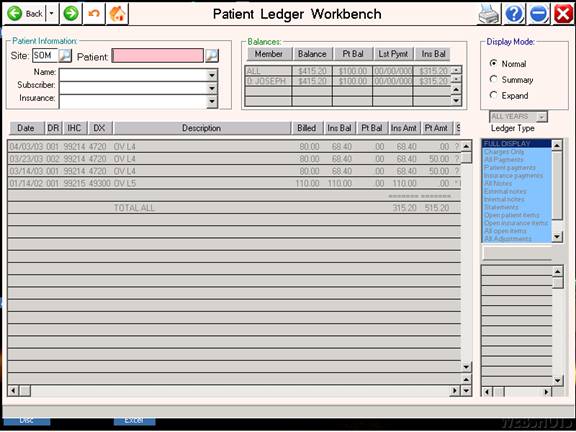
An example of the printed patient ledger follows.
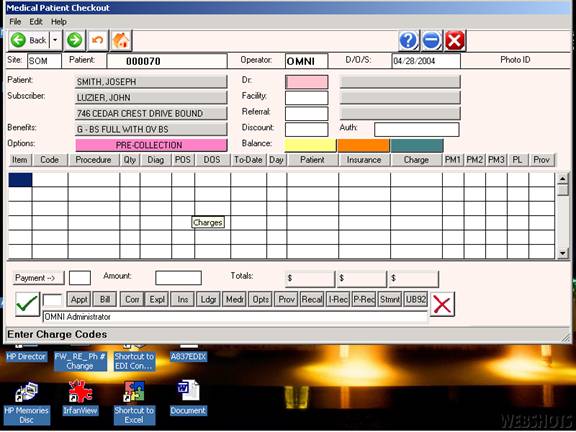
This is the charge entry screen. It can be reached from the main menu by choosing # 1. Patient Information, searching for the patient, or entering the patient account number if you have it. After you bring up the patient, click on the “CHG” tab at the bottom of the screen.
At this point, you will be in the “Charge Entry” or “Patient Checkout” page. The patient information at the top of the page will have been filled in for you. You will be in the “Operator ID” field. You should see your initials there. Press enter, and it will go to the “Dr.” field. In all of these fields, you can use the <TAB> key to highlight the information that you want to select for that box. You simply arrow down to highlight your selection. Press <ENTER> and the box will be filled in for you. Proceed in the same manner through the “Facility” and “Referral” fields.
This takes you to the charge entry area of the screen. The “item” which is the claim line number fills in automatically. Under code, enter the charge code, and the information that you have loaded in your dictionary will populate the fields. Next you will enter the quantity (if applicable.) You may <TAB> search in the DX, POS, DOS fields, or enter the information manually. If there is more than one line of service on the claim, just enter down to the next line and proceed. After entering the last charges, enter “V” to verify. You will then have the opportunity to process a patient payment, print a bill or receipt, schedule an appointment, or enter the patient into the recall database.

In the example above, the patient has been billed for an EKG, and an office visit. On line 3, I pressed “0” and <Enter> to indicate that the charges for this patient were finished. I entered a $ 0.00 payment. By entering “V” to verify, I am ready to move on to the next patient, or exit the charge entry area of the program.
If you have comments or suggestions regarding the display or content of this information, please contact Jeff, at 888-712-0091.