Front
Desk – Patient Information Module
Overview: The Front Desk (Patient Profile)
program allows the operator to enter all necessary
Demographic
information and
insurance
for each patient in the practice. This program is also referred to as “Patient
Information”.
This
information is used throughout the database each time an appointment, medical
record or service is entered for a patient.
The
database may be combined with the "Microsoft Word" or “Google Docs”
to create patient specific forms such as
Encounter
forms, financial policy, HIPAA forms or reports.
Procedure:
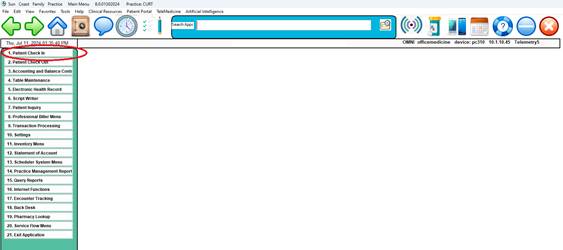
From the Main
Menu click on Option 1, Front Desk or type the number 1 and <Enter>.
Note: The Function Key F5 will also go
directly to the Patient Profile from another program or module and then return
to the same place upon completion.
QUICK START SYSTEM INSTRUCTIONS
Follow these steps to quickly enter a new patient.
Step 1: While the cursor is in the “Enter Patient:” field , press the
<Enter> key
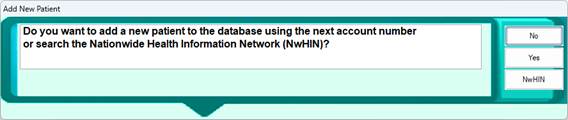
Step 2: Click Yes or press “Y” to to the “Add a
New Patient” prompt
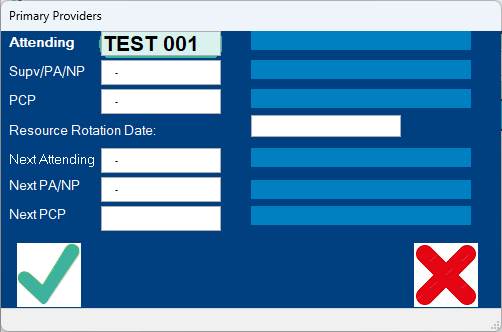
Step 3: Click the Green Check Mark for the Primary Providers Screen
Step 4: Now enter the Patient’s names as it appears on the insurance card
(preferred ) or the Drivers License.
( Example: Mary L.
Jones )
Step 5: Proceed to fill in all the applicable fields. E.g. DOB, Home
Phone, Address, etc.
Step 6: Enter the Insurance Information
Step 7: Click the “SAVE” button located in the lower right corner.
Detailed
Steps with Front Desk – Patient Demographics
Searching for an existing patient:
Step 1:
While the cursor is in the Patient field ( shown below) type a few letters of
the last name. Example: Kowal and press <enter>
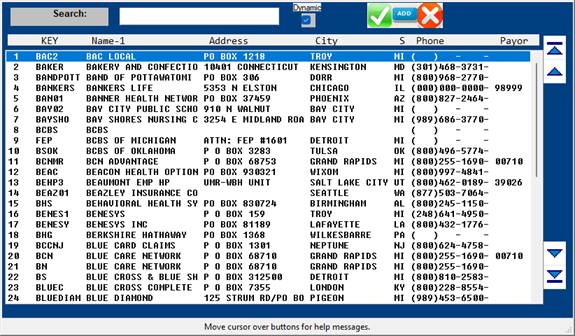
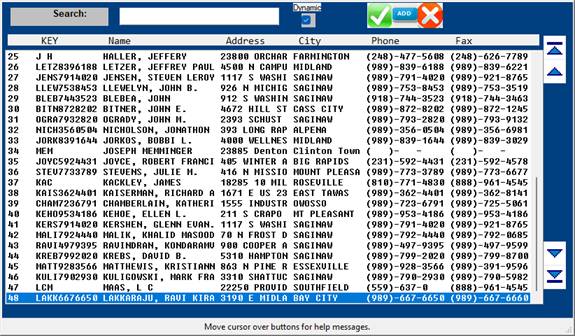
Step 2: The
search screen below will appear:
Select the
desired patient by clicking on the name. If the patient is not in the list and
is a new patient, click the + icon to add a new patient.
If you are
unsure if the patient is a new patient, or you are unsure about the spelling of
the name, enter the patients 8 digit DOB and click the multi colored search
icon circle and select search by DOB.
Note: There is also a special function
to list Patients whom have recently self registered on the Patient Portal. When
the cursor is in the “Patient:” field, press the F12 ( Function Key 12 ) for
this list.
ASSIGNING NUMBERS:
There are many different ways to assign patient numbers. You have the option of entering your own
existing numbers or using auto assign.
If your
practice is a solo practice, you may want to start at 00001-0 and use the
numbers in consecutive order. If you try
to use a number that is currently assigned to a patient, your system will bring
up that patient’s information.
To check
for any missed numbers, select the Report Writer Menu and run a report sorting
by patient account number.
The
application program is designed to work by using up to a twelve-digit account
number for each family and/or group in the system. You will assign an account to each
family. The last digit will identify
each particular member of the family.
EXAMPLES: 00001-0 = INSURED OR SUBSCRIBER
(“zero” account)
00001-1 =
SPOUSE
00001-2 =
CHILD/DEPENDENT
00001-3 =
CHILD OR ADDITIONAL DEPENDENT(S)
00001-4
through 9, A through Z = ADDITIONAL DEPENDENT(S)
The purpose
of assigning family numbers is to allow a single statement or account to be
produced for a family.
It also
enables the EMR to view Family History from other family members.
Tip:
If you have a family account number 00165-1, you only need to enter
165-1; the system will supply the zeros.
Adding the next family member or Dependent:
Starting
from the Patient Information Screen:
1.
Enter the account number of the family with an asterisk as the last digit of
the account number:
Examples:
000010
enter as 1*
000540
enter as 54*
414870
enter as 41487*
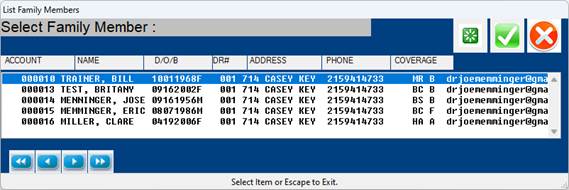
2.
A list of all the accounts in the family will display.
3. Click on the "ADD" icon, or enter
the letter "A" or a plus sign "+" or an asterisk "*"
(what ever is more convenient for the operator for typing
purposes)
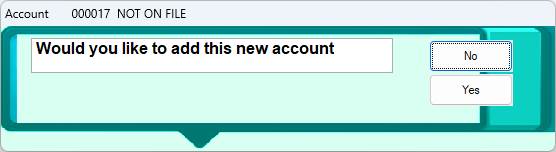
4. The "SYSTEM" will select the next
highest family account and prompt about adding the account.
Click "Yes" or enter "Y"
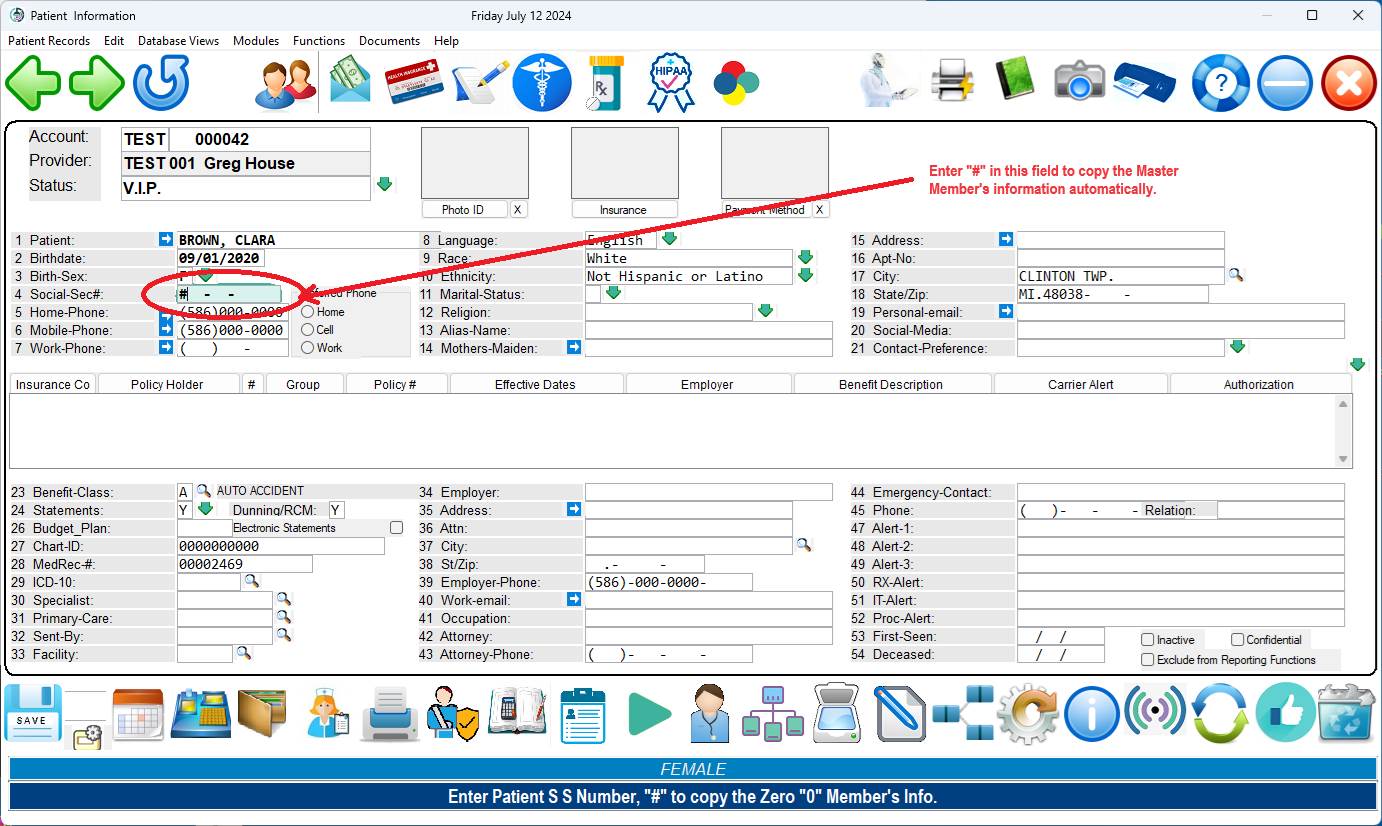
5. Enter the Name, DOB and Sex.
6. Use the "#" in the SOCSEC field
to copy the remainder of the demographics.
( Entering
a “#”<Enter> as the Social
Security Number will copy the remainder of the demographics from the first
family account.)
PATIENT
MEDICAL RECORD NUMBER (MRN): When you assign an account number, the system
optionally can assign a Medical Record Number.
(Ask your
PHCI support person or See Software Toggles and Switches to learn more about
assigning the MRN)
Upon
exiting Patient Information, the system checks for Medical Record Number
duplication. It will alert you if that
condition occurs.
Entering a
medical record number will also protect the Patient Date of Birth, Sex and
Social Security number from unauthorized changes.
“Master”
ACCOUNT OR WHO RECEIVES THE STATEMENT: It is important to keep in mind that, if you
want a combined family statement, the patient account number using the “zero”
account should be assigned to the insured (responsible party), who will receive
the monthly statement. A common family
and/or group number will produce a common statement, as well as a common ledger
card, with up-to-date balances. You may
also enter a guarantor (responsible party—not necessarily the person who has
the insurance) for the “zero” member.
The statement will then be addressed to the “zero” member guarantor for
combined family statements.
The
training staff recommends that a “zero” member be established. If a “zero” account is not set up, the common
statement will be sent to the family member that has the lowest least digit in
their account number.
LAST
DIGIT: You may assign the last digit using these
suggestions.
0 = INSURED OR SUBSCRIBER
1 = SPOUSE
2 through 9 = DEPENDENTS/CHILDREN
A through Z = ADDITIONAL
DEPENDENTS/CHILDREN
Example: FIRST CHILD ACCOUNT # -> 000012
PRACTICE
OR CODE:
This designates the institution or identifies a specific Practice
location.
This
optional feature will be displayed on the screen if you have multiple
locations. Example is PRACTICE:AA
= all account numbers for that location will be preceded by AA.
To access
the a specific PRACTICE or PRACTICE field, press the <Up> arrow when your
cursor is at the PATIENT NAME/ID# prompt or click the Practice field.
Pressing
the <Up> arrow moves your cursor to the PRACTICE prompt without having to
use the mouse pointer.
At this
prompt you may :
-Simply
enter a different PRACTICE Code and <Enter>.
-PRACTICE
Code <Tab> Search: Press the
<Tab> key and a window opens listing PRACTICE Codes and their
corresponding locations. Make your
selection by highlighting a line using the <Up>/<Down>
arrow keys
or type a line number at the cursor and press <Enter>.
If you have
numerous Practices and you are not sure which one to select, Press the -<Up> from the Pratice
Field arrow to locate a Practice by zip code.
The system will prompt ENTER ZIP CODE. Enter the patient’s zip code and
<Enter>. The system automatically
inserts the PRACTICE Code for the location nearest the zip code you entered.
-Zip Code
<Tab> Search: At the ENTER ZIP
CODE prompt, press <Tab> and a window opens listing zip codes and their
corresponding locations. This is useful
when a patient does not know their zip code.
Make your selection by highlighting a line using the <Up>/<Down>
arrow keys or type a line number at the cursor and press <Enter> The
PRACTICE Code will automatically be inserted at the PRACTICE prompt.
To go back
to the PATIENT NAME/ID# prompt, press <Enter>.
If your
Practice only has a single location, skip to the Searching for Patients -
Special Functions section below
PRACTICE
CODE-MULTIPLE LOCATIONS: If you are in a group practice and/or have
multiple locations, you may wish to use the Master Patient Index (MPI)
feature. This feature is explained on
the next page.
MASTER PATIENT INDEX
(MPI
Method for Multiple Shared Practices)
Before
adding a new patient to the system, you must first check the Master Patient
Index (MPI) of all practices. Steps to
do that areas follows:
1
From
the Main Menu choose 1, Patient Information.
2
Enter
the Patient’s name. Last Name, First Name. Example: Jones, Mary
3
Now
Press <Tab> and <Enter> to do a global search across all practices
to be sure the patient is not already in the MPI.
When you
press <Tab>, the Master Search window will open. Select 1, Search by PT_NAME.

All patients (for all PRACTICEs) on the
system with the name you entered will be displayed to your screen.
4
If
the patient is already in the MPI or another PRACTICE, you will need to copy
that patient to your PRACTICE.
Steps to do this are:
1
Select
that patient from the Search screen..
2
When
the patient information screen is displayed, at the Action
Line type J. The system will ask you to confirm the
PRACTICE you
want this patient copied to.
3
Next,
the Provider window will open. Assign the
provider. This completes the copy
process.
5
If
the patient is not already in the system, Click the “+” icon to add as a new
Patient.
HELPFUL HINTS
<F2>
or <Tab> search will allow you to search for patients throughout all
PRACTICES including the MPI.
<Enter>
search will only search for a patient in the PRACTICE you are currently working
with.
When using the <Tab> search,
instead of typing in the first few letters of the last name,
you may wish to type in the whole name
to speed the search. Please double check
your
spelling.
MASTER PATIENT INDEX
(PRACTICE-to-PRACTICE
Method)
This will
copy the patient’s demographic (Patient Information) screens to al PRACTICEs
when updating the MPI. To do this, the
following toggles must be set to Y (yes) and the current PRACTICE must
have the WRITE_MPI field set to Y (yes).
PRACTICETOPRACTICE=Y MPI=Y
If any of
the above are set to N (no), then it will not happen.
MASTER PATIENT INDEX
(PRACTICE
Code Method)
The MPI can
be utilized fully without having to remember to change PRACTICE codes to
the blank PRACTICE and perform the PRACTICE copy command etc., if the following
procedures are followed.
1
Set
the WRITE_MPI field under the specific PRACTICE database to be “Y” (yes). This will allow an entry made in the local
PRACTICE code to pass back to the MPI under certain conditions outlined
below. Set the READ_MPI field to yes
also. The PRACTICE Code database is on
the Dictionary Menu.
2
Using
FMCONTROL for the PTINFO program, set MPI=YES, MRN=HBO. This
sets up all the MPI error checking and the unique enterprise-wide
numbering system.
3
When
adding a NEW patient, search using the MASTER search. As before, to be sure the
patient is not already in the MPI or another allowed PRACTICE. A PRACTICE copy may be performed from either
the MPI or any other allowed PRACTICE.
It is not necessary to change the PRACTICE code to the blank PRACTICE when
performing the search.
4
The
social security number and date of birth fields must be completed in order that
duplicate checking can be accurate.
5
Do
not edit or blank out the MRN (medical record number) generated during the ADD
NEW PATIENT session. This number is used
to link accounts across PRACTICEs when desirable. Linking across PRACTICEs allows the
production of common statements and ledgers. Payment posting may be done across
clinics when appropriate.
Following
the above rules, a new patient added to a local PRACTICE will also be added to
the MPI automatically. Updated patients
will also be updated back to the MPI.
Additionally, when the actual MPI record is changed, all the patients
across all PRACTICE codes will be updated on a record-by-record basis.
When the
MPI=YES switch is used, the following messages will be encountered:
1
When
a new patient is added which is already in the MPI (based on social security
number + date of birth), the system will prompt to use the MPI patient instead
and cancel the ADD.
2
When
another patient is on the system that has the same MRN (and the MRN is 6 or
more digits), the system will prompt that a duplicate MRN exists. This patient will be flagged and placed in
the MPI problem queue for correction.
The problem queue also displays the reason for placement into the queue.
3
When
the same patient has different medical record numbers, a similar prompting and
queue placement will occur.
4
When
an attempt to PRACTICE COPY from the MPI to the local PRACTICE occurs, and the
patient is already in the local PRACTICE, the system will discontinue the operation
and display the existing record.
The
definition of same patient and different patient, as used above, are in
reference to the SS# + DOB combination.
The name of the patient is not used for checking. The actual MPI number is the SS#+DOB.
Searching for Patients - Special Functions
Example
#1: I know the patient’s last name
starts with SM, and the first name is MARY.
ENTER PATIENT NAME/ID: SM, MARY
This search
will find all patients with last names that start with SM and have MARY as part
of the first name.
Example
#2: The patient’s last name starts with
A, and the first name is JOE.
ENTER PATIENT NAME/ID: A, JOE
This search
will find all patients with a surname (last name) beginning with the letter A
and the first name contains JOE.
Example
#3: the patient’s name sounds like
SERNEWSKE.
ENTER PATIENT NAME/ID: SERNEWSKI?
(Terminate name with a Question Mark)
This search
will perform a sounds like function in order to find the patient.
Example #4:
The Patient’s DOB is 09161970
ENTER
PATIENT NAME/ID: 09161970 then press the <TAB> or <F2>
key. Now select search by DOB
AUTOMATIC
ASSIGNMENT OF ACCOUNT NUMBERS: At the PATIENT NAME/ID prompt, press
<Enter> to have the system enter the next “zero” (master/base) account
number. The upper left hand corner of
the screen displays the last account number used. To add family members to the “zero” account
number, type in the zero account number, a dash, and then the number that
identifies the family relationship (Example: 00002-1). Our example below shows a “zero” account
number being entered.
Type Y
at the NOT ON FILE ADD? prompt to enter this patient into the system.
Type N
at the NOT ON FILE ADD? prompt to abort adding this patient. The cursor will go to the PATIENT NAME/ID
prompt.
ASSIGNING
A PROVIDER: Once the patient is assigned an
account number, the system opens a window so you can assign a provider.
To
exit the provider window press the <Escape> key.
At the
Provider window you may do one of three things:
1
Accept/select
a provider shown by pressing <Enter>.
2)
Enter a provider not shown by typing in his provider number. But if you enter a provider that has not been
defined in the Provider Dictionary the following message will be displayed.
**PROVIDER
NOT DEFINED**
<Tab>=Search <Escape>=End
3)
Search for a provider by pressing the <Tab> key at the PROV
prompt.
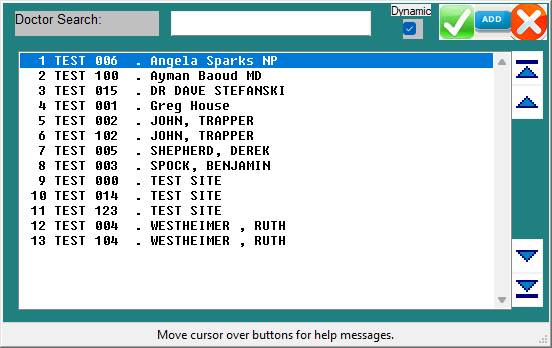
Example
Provider Search Screen:

To select a
provider from the search screen, use the arrow keys to highlight the line of
the provider you want or type the line number at the cursor and <Enter>.
To add a
provider to the Provider Dictionary from this screen, press <Tab>.
Once a
provider is assigned, that physician’s name and ID number will be displayed on
the Patient Information screen.
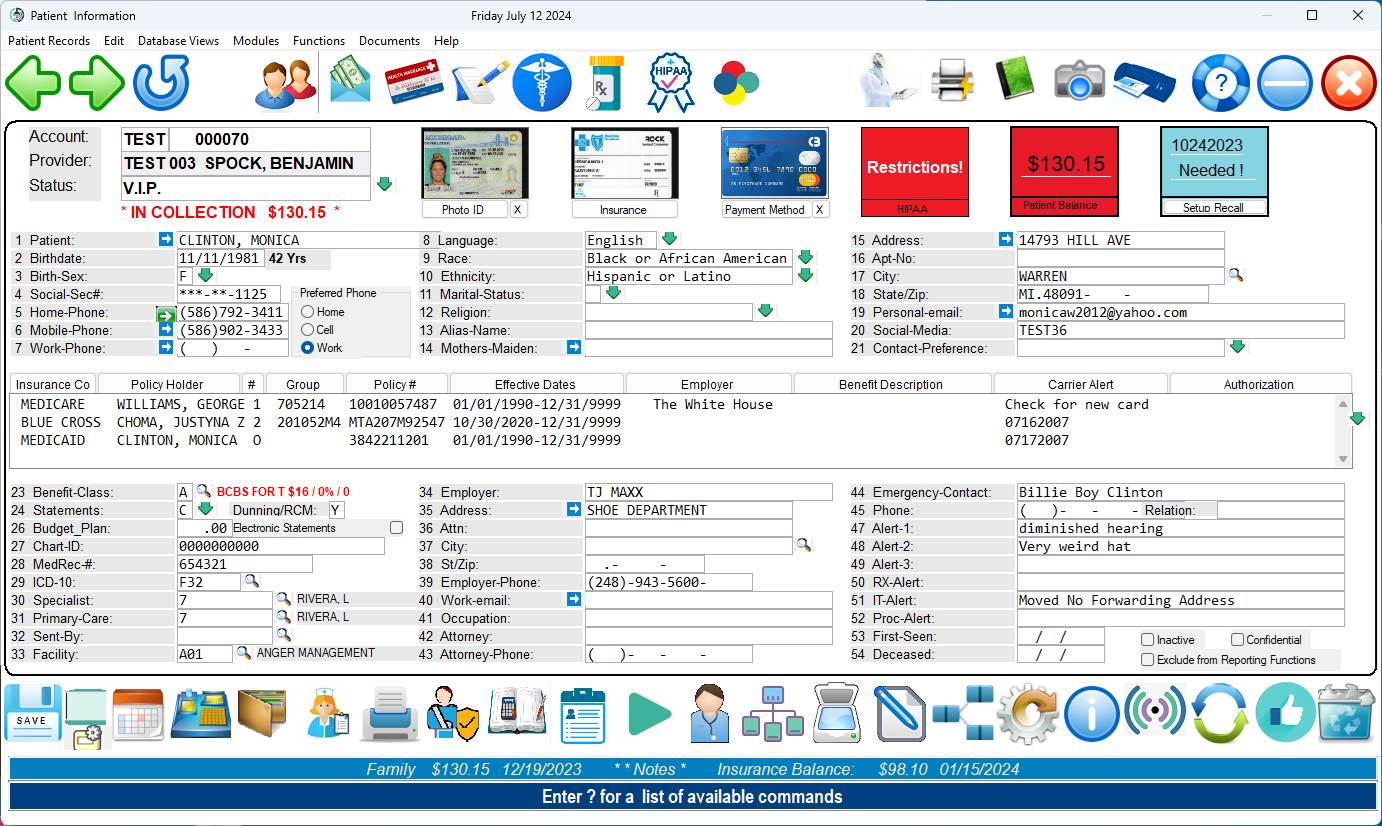
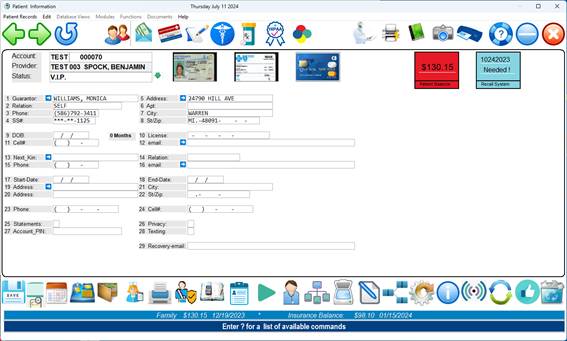
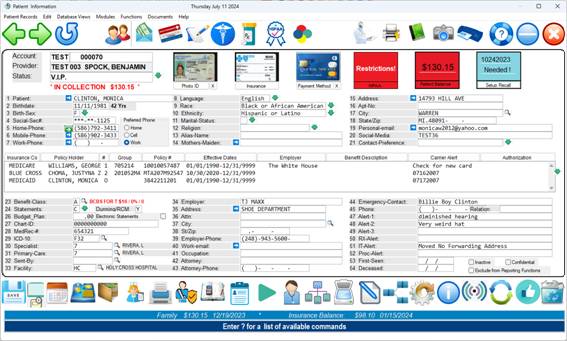
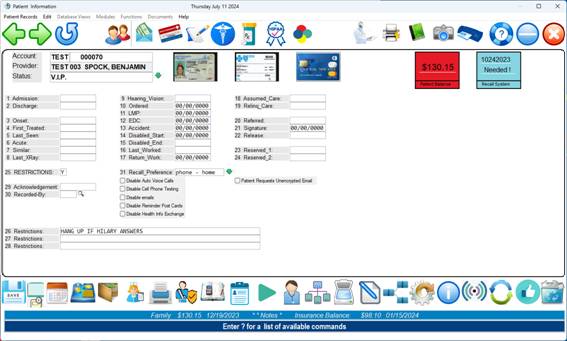
PATIENT INFORMATION SCREEN
<-Use Arrow Keys for Screen Edit-> <Escape>=Action Line or click the “?” icon for Help
·
Mandatory fields are highlighted/underscored.
·
To go to subsequent pages, type the page number at the
Action Line
and press the <Down> arrow.
·
When the word NOTE is shown at the bottom of the screen
it means
information on this
patient has been entered on the operator-defined page
(page 4) of Patient
Information. You may access this page in
one of three
ways:
At the Action Line
type N and <Enter>.
At the Action Line
type 4 and press the <Down> arrow. ( Speed
At the Action Line
type N4 and <Enter>.
If you
entered an account number in error, when the patient information screen
displays, press the <Escape> key to access the Action Line and then type
zero and press <Enter>. The system
will ask:
Abandon Entry for New Patient? (Y/N):
Y = Returns you
to the PATIENT NAME/ID prompt and discards the current record.
N = Leaves the
cursor at the Action Line.
COMPLETING THE PATIENT INFORMATION SCREEN
UPPER
CASE LETTERS: Complete the screen using upper case
letters. Field 11, Benefits Code, may be
in lower case letters.
1
PT
NAME: Type the patient’s legal name in the
following manner.
LASTNAME
<COMMA> <SPACE> FIRST NAME <SPACE> MIDDLE INITIAL
<PERIOD>
LASTNAME,
FIRSTNAME M.
SMITH,
SUSAN A.
LASTNAME,
FIRSTNAME
SMITH,
SUSAN
Alternatively,
you may type the name directly into the name field
EXACTLY AS IT APPEARS ON THE CARD. The program
will automatically reformat the name correctly.
If the
patient does not have a middle initial, it may be left off. Do not use nicknames. Nicknames can be entered in the “Alias Name:
field. Below are some examples.
Patient’s Name Enter
Name Using This Format
Mary Kay A. Jones JONES,
MARYKAY A.
Frank M. O’Neil ONEIL,
FRANK M.
Sam H. McDonald MCDONALD,
SAM H.
John H. Smith III SMITHIII,
JOHN H.
A
A.
Reynolds REYNOLDS,
A A.
Mary
R. Smith-Ray SMITHRAY,
MARY R.
Fred
B. Connor Jr. CONNOR
JR, FRED B.
2
PT
DOB: Enter the patient’s date of birth in the
following format. Two digits for the
month and day. Four digits for the year. Example: 09061996 – Slashes are not necessary, but
will be displayed.
You need
not add slashes as the program automatically inserts them. After entering the patient’s date of birth,
the program will automatically calculate the age of the patient.
3
Birth
Sex: Enter the sex of the patient using the legend
below. There are only certain answers
that are applicable for this field.
Press <F2> or <Tab> to have the valid choices displayed to
your screen and select the appropriate answer.
This field must be completed.
The AI database will attempt to guess the gender based on the Patients first
name.
1
F ( FEMALE )
2
M
( MALE )
3
U ( UNKNOWN )
By clicking
the dropdown arrow next to the Patient Sex field, a special gender identify
screen can record the gender preferences if needed. ( See below )

4
SOC
SEC#: Enter the patient’s Social Security number
(nine digits). The system automatically
inserts dashes between the numbers. The
Social Security number prints on private insurance claims forms. It is used to help identify the subscriber.
Note:
During normal display, only the last 4 digits of the SS# will display.
The SS#
will completely display when the cursor is placed within the field.
DUPLICATE
SS#: If a Social Security has already been
entered, the system will respond with
“WARNING: SS# 123456789 IS ALREADY ON FILE
WITH LASTNAME, FIRSTNAME M. 000010”
ENTERING
FAMILY MEMBERS: You can add family members to a “zero”
account number. To do this, enter the
base account number, type a dash, then type the number that identifies the
family relationship. In the example
below, 102 is the base account number.
Example: Father is base/zero account 001020
Adding spouse would be typed 00102-1
When adding
a family member, the system prompts NOT ON FILE ADD?. Answer Y (yes). The
Patient Information screen will then be displayed. Fill in fields 1 through 3. At field 4 (SOC_SEC), type the # sign and
<Enter>. The information from the
zero account will be pulled over and fields 4 through 27 will be completed
along with the insurance screen. (Be
sure that field 4 has the patient’s social security number.) Family members added with the last digit of
one will be assigned a relationship code of 2 (spouse) and all others a
relationship code of 3 (dependent) for all insurances, whether primary or
supplemental.
5
Home-Phone:
Enter the patient’s home telephone number and press <Enter>. The area code goes within the brackets. The system automatically inserts the dashes.
6
Mobile-Phone:
Enter the patient’s mobile telephone number and press
<Enter>. The area code goes within
the brackets. The system automatically
inserts the dashes.
7
Work-Phone:
Enter the patient’s work telephone number (if any) and press
<Enter>. The area code goes within
the brackets. The system automatically
inserts the dashes.
NO
PHONE: If the patient does not have a phone,
<Enter> after entering an area code or three zeros. The system will automatically enter
(000)000-0000 where the phone number should be.
Do Not Use Spaces or Type “No Phone”.
DEFAULT
AREA CODE: The default area code, if entered in the
Provider Codes Dictionary, will automatically be filled in by the system.
Note:
Fields 8-14 are optional
15. Address:
Enter the
patient’s street address and <Enter>. Do Not Use lower case letters as “5th”. The street
address should appear as follows: 1325 5TH AVE.
Do Not Use Punctuation.
16. Apt-No:
If the patient’s address contains an apartment number, enter the
apartment number here. Do Not Use any Punctuation or a #
to indicate an apartment. An example
format would be APT 102.
DEFAULT
ADDRESS: The default address, if entered in the
Provider Codes Dictionary, will automatically be filled in. this address can be used if you have patients
in nursing homes who all have the same address.
17. CITY:
Enter the patient’s city and <Enter> or type the zip code in this
field, ( Example 48045 ) and press <Enter> the city and state information
will appear in their respective fields.
For an alphabetical listing of cities press <Tab> or <F2>.
DEFAULT CITY: If a default city
is entered in the Provider Codes Dictionary, it will automatically be filled
in. The default city can be over written with the correct city.
18. STATE/ZIP:
Enter the patient’s state (two-digit postal abbreviation). Enter the zip code (this field will hold up
to 13 numbers). You need not add dashes as the program will automatically
insert them. Press <Enter> to go
to the next line.
19.
Personal-email:
Optional but highly recommended.
20.
Optional
21.
Optional
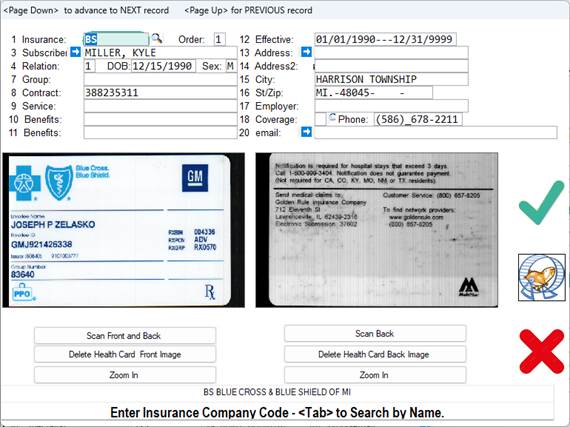
22. INSURANCE CENTER SECTION: This
is the screen you will need to fill out for each insurance the patient has.
Insurance
Information Screen:
To exit this window press the <Escape> key.
Once the
insurance information has been entered, when you pull up a patient a summary
screen listing all their insurances will be displayed. To access the Insurance
Summary Screen, at the Action Line either type I or 10 (field 10)
and <Enter>. Use the arrow keys to
highlight the insurance line you wish to view and <Enter>. Example below.
Summary
Screen of Insurances:
The number
of insurances over three is displayed in upper right-hand corner of the window
<Enter>=Edit: Select the insurance you want to edit and
<Enter>.
(A)DD New Insurance: At the cursor type A and
<Enter>. A blank Insurance
Information screen will display.
(D)ELETE Insurance: Select the insurance to delete. At the cursor type D and
<Enter>. Confirm deletion.
Completing the Insurance Information Screen
Insurance
Information Screen:

22-1. INSCO: Enter the
insurance abbreviation (maximum ten characters) of the insurance company and
<Enter>. You may <Tab>
search at this field.
REQUIRED:
You must complete this field.
Insurance company names and addresses should be entered in the Carrier
Library of the Dictionary prior to entering patients.
COMMONLY USED ABBREVIATIONS:
BS =
BLUE SHIELD BSBCN BLUE CARE NETWORK
MR =
MEDICARE HAP HEALTH
MD =
MEDICAID PPOM PPOM OF
NONE =
NO INSURANCE HPM HEALTH PLAN IF MICHIGAN
ASSIGNMENT
OF BENEFITS CODE: The following prompt will be displayed if it
has been activated in the CONTROL PANEL program. ASSIGN NEW BENEFITS CODE _? (Y/N):
This is
asking should all patients with this insurance get this benefits code, as
defined in the Benefits Definitions Dictionary.
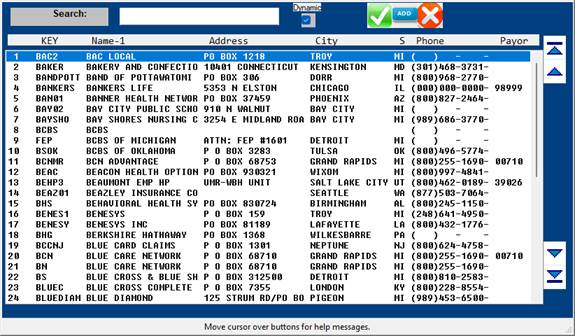
SEARCH:
To find the abbreviation of an insurance company, type the first few
letters of the company name in CAPITAL letters and press <Tab>. The system will open a window displaying the
insurances on the system. Example
search screen on the next page.
Use arrow
keys to highlight your selection or type the line number at the cursor and
<Enter>.
To add a
carrier from the Search window, press the <Tab> key. The system will take you into the Dictionary
Carrier Library. When you have completed
adding the carrier, type 0 (zero) and <Enter> to save your
entry. The cursor will move to the ENTER
CODE prompt. Type 0 (zero) and
<Enter> a second time to go back to the Search window. The carrier you added will display, select
that carrier, and it will be inserted into field 10-1.
DEFAULT
INSURANCE: The default insurance, if entered in the
Provider Codes Dictionary, will automatically be filled in. This is not recommended, but is an option.
10-2. ORDER: If you
want the insurance companies to be billed in a particular order, this is where
you list that order.
10-3. SB NAME: Enter the
subscriber’s name for the patient’s primary insurance contract and press
<Enter>. If the subscriber and the
patient are the same person, press <Enter> twice and the system will fill
in the whole name. If the first name is
different but the last name is the same, press <Enter> once and then type
the subscriber’s first name and middle initial in capital letters. Press <Enter> to continue. FORMAT FOR ENTERING NAMES: LAST, FIRST M.
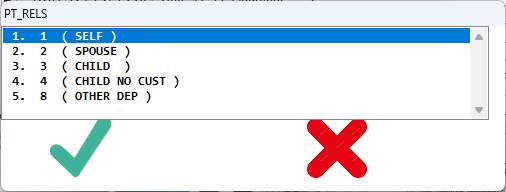
10-4. PT RELS:
Enter the
code which defines the relationship between the patient and the subscriber.
There are only certain answers for this field.
Press <Tab> to view those answers.
To make your selection, use the arrow keys to highlight the line of the
code you want or type the line number at the cursor and <Enter>. Example below.

10-5. SB DOB: Enter the
subscriber’s date of birth as follows:
Month, Day, Year (00/00/0000). If
the default for this field is NO, press <Enter> to bypass it.
In the
FMCONTROL program there is an option switch for a forced date check on the
subscriber’s date of birth. The switch
is SB_DOB=YES. By setting this switch to
YES, the system will force you to enter a date, you will not be allowed to
bypass this field.
10-6. GROUP ID: Enter the group
identification of the insurance.
10-7. CONTRCT: Enter the
contract number of the insurance company.
You may use up to 15 digits.
Press <Enter> for the default of the social security number.
10-8. SERVICE: A third number
which identifies this benefits may be entered here.
10-9. EF DATE: Enter the
effective dates of this insurance and <Enter>. The canned-in expiration date is 12/31/1999. If an insurance has expired, update the
expiration date and put O (stands for old)
in the
ORDER field.
10-10. SB ADD1: This should
default to what you entered for the patient.
You may enter a different address and <Enter>. DO NOT USE lower case letters or
punctuation. The street address should
appear as follows:
10-11. SB CITY: This should
default to what you entered for the patient. You may, however, enter a
different city and <Enter>.
10-12. SB STZP: Enter the
subscriber’s state postal abbreviation (two digits). Enter the zip code. This field holds up to 13 numbers. You do not need to add dashes as they are
automatically inserted.
10-13. SB EMPL: Enter the
subscriber’s employer and <Enter>.
10-14. COV: Enter the patient’s benefits code. This
benefits code would apply to this insurance only. This is an optional field to be used if you
find it necessary to override the benefits in field 11 of the Patient
Information screen.
10-15. SB TELE: Enter the
subscriber’s telephone number and <Enter>.
SAVE
AND EXIT: To exit this window and save the insurance
entry, <Enter> to go to field 14 or
press
<Escape> to go to the Action Line.
23. Benefit Class:
The system automatically inserts the benefits code based on the
patient’s insurance if the toggle AUTOCOV is set to AUTO. You may press <Tab> to search and
select a benefits code. This field is
mandatory. You cannot exit this field
without a valid entry. A toggle also
exist to prevent certain operators from even entering this field. It is found in FMCONTROL.
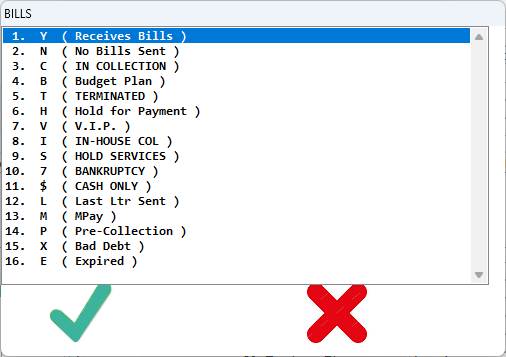
24. Statements:
This field will only accept certain answers. Press <Tab> to view those answers. To choose an answer, use the arrow keys to
highlight the line or type the line number at the cursor and
<Enter>. Example below.

25. DUNN:
If the account is overdue, here is where you enter whether or not you
want past due notices to print on the patient’s statement. Default is Y (yes)—even if you skip
this field it will
default to
yes. Other choices are: N (no), V
(V.I.P)—same as no.
26. BUDGET:
This displays the expected monthly amount to be applied to the unpaid
balance.
27. CHART:
Enter the patient’s chart number if you maintain your files numerically
rather than by patient name and <Enter>.
This field will hold up to 20 digits.
You may press <Enter> to skip it or you may enter free text.
Additional uses: Store x-ray numbers or the hospital medical
record number.
28. MedRec#:
Stands for Medical Record Number.
This was designed to be used with a Master Patient Index. You may <Enter> to skip this field.
29. ICD-10: Enter the primary diagnosis code of the
patient (if applicable) and <Enter>.
Diagnosis codes should be entered using ICD-9 codes. The diagnosis code entered in this field will
be used primarily in Patient checkout.
It may also be used for statistical purposes later. Press the <Tab> key to search and
select a diagnosis code.
30. Specialist:
Enter who referred the patient to the office using up to an
eight-character abbreviation from the Referral Codes Dictionary. The information entered in this field will be
used in Patient Checkout for billing purposes.
You may also find it useful for referral statistics.
ADD A
PHYSICIAN: Press <Tab> at this field to have a
blank Referral Code Dictionary screen displayed. Fill out the screen doing a zero and
<Enter> at the Action Line to save the entry. Zero and <Enter> again to be returned
to field 18 of Patient Information.
SEARCH:
To search for the code of a referring physician, type, type a few
letters of the physician’s last name and press <Tab>. A list of referring physicians on the system
will be displayed to your screen.
Example below.
To add a Referral Code
from the Search Screen press <Tab>.
To make
your selection, use the arrow keys to highlight the line or type the line
number at the cursor and <Enter>.
That physician’s referral code will be inserted in field 30.
31. Primary-Care:
Enter the Primary Care Physician who referred the patient to the office
using up to an eight-character abbreviation from the Referral Codes
Dictionary. The information entered in
this field will be used in the EMR.
32. Sent-By:
Enter the source of referral to the office using up to an
eight-character abbreviation from the Referral Codes Dictionary. You may also find it useful for referral
statistics. ( e.g. Google Search )
TRACKING
REFERRAL OTHER THAN PHYSICIAN: If you want to track other referrals, such as
hospitals, just add codes for these in your Referral Codes Dictionary.
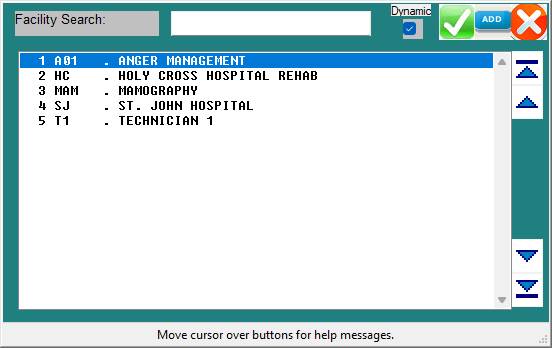
33. FC CODE:
Enter the facility code of where this patient will ALWAYS be treated,
such as a nursing home, and <Enter>.
To SKIP this field, press <Enter>.
Example: FC_CODE: HC
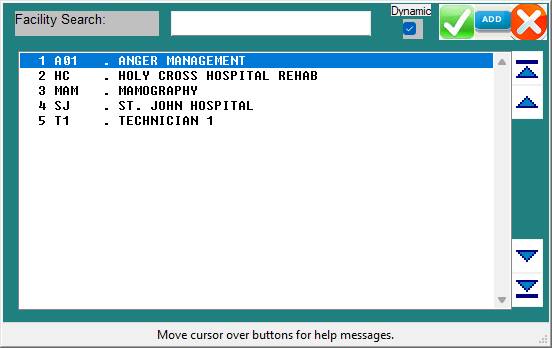
SEARCH: If
you do not know the code for the facility, type the first few letters of the
facility name and press <Tab>. A
listing of facility codes on the system will be displayed.
To make
your selection, use the arrow keys to highlight the line or type the line
number at the cursor and <Enter>.
That physician’s referral code will be inserted in field 18.
ADD A
FACILITY: Press <Tab> at field 19 or press
<Tab> from the Search Screen to have a blank Facility Code Dictionary
screen displayed. Fill out the screen
doing a zero and <Enter> at the Action Line to save the entry. Zero and <Enter> again to be returned
to field 19 of Patient Information.
34. Employer:
Enter the name of the company where the patient is working and
<Enter>. Maximum 20 characters.
35. EM ADD1:
Enter the address of the company where the patient is working and <Enter> Maximum 20 characters. If the subscriber and/or the patient is not
employed, press <Enter> to skip.
36. EM ADD2:
Additional address information may be entered here. Example:
room number or attention line.
37. EM CITY:
Enter the name of the city where the company is located and
<Enter>. Maximum 20
characters. If the subscriber and/or the
patient is not employed, press <Enter> to skip.
38. EM STZP:
Enter the two-digit post office abbreviation for the state. Enter the zip code using up to nine digits.
39. Employer Phone:
Enter the telephone number of the company where the patient is
employed. The area code should go in the
brackets. Do not use dashes as the
system automatically inserts them.
47 Alert 1:
This is an optional field in which you may store data on your
patient. The data is limited to the use
of 25 characters. Example entry might be
LIKES AM APPOINTMENTS.
INFORMATION
ENTERED IN THIS FIELD WILL FLASH THROUGHOUT THE SYSTEM.
48. Alert 2:
Information in this field will also flash throughout the system.
49. Alert 3:
Information in this field will also flash throughout the system.
ACTION LINE FUNCTIONS
(To access the Action Line press the <Escape> key.)
(#) To edit a field, enter the number of
the field and <Enter>. You may also
press the <Up>
arrow key from the Action Line and arrow up to the field.
(I)ns Type I at the Action
Line and <Enter>to move to the Insurance section of the screen.
(L)dg Type L at the Action Line and
<Enter> to see the complete ledger card on the patient. Also: L1 = Ledger Type 1, L2 = Ledger Type 2.
(N)xt To select other screen types, type N
at the Action Line and <Enter>. A
window
will open displaying the
five available screen types of Patient Information. These
screen types are also referred
to as pages.
(S=Single Record M=Multiple Records)
Page 1 Redraws the Patient Information screen.
Page 2 Draws a Patient Guarantor screen.
Page 3 Displays insurance information.
Page 4 Operator-defined screen of Patient Information.
Page 5 Lists patient’s chronic problems and diagnosis
codes
Page 6 Lists
permanent medications
Page 7 Details
Claim Dates
Page 8 Contains Prior Authorications
Example
screens of pages 2 through 8 begin on the next page.
Example
screen of page 2 (Guarantor Information):
Here you
enter the information on the responsible party.
The responsible party many times is
not the
patient.

Example
screen of page 3 (Insurance Information):
The
Insurance Center Section of the Patient Information screen will update as shown
below. Select the insurance you wish to view/edit/delete by using the arrow
keys to highlight the line or type the number of the line at the cursor and
<Enter>. To exit this window and
return to the Action Line, press the <Escape> key.
Once you
select an insurance, that insurance record will be displayed. Use the arrow keys to move through the
fields. Press the <Escape> key to
return to the above screen.
Example
screen of page 4 (Operator-Defined Screen):
This page
may be customized to meet the needs of your practice. You may put UB fields on this screen to have
certain patient specific information transferred to the UB Options screen for
each claim (this will only happen if you go to the UB Options screen in Patient
checkout). This information will appear
on the UB92 forms.
The first
eight fields of this screen may be used to enter notes on a patient. If notes have been entered on a patient, the
word NOTE will appear at the Patient Information screen.
Information
contained in pages 1 and 4 may be used to create patient specific letters or
medical records using the word processor.
Contact
your office manager if you would like to rename the fields of the
Operator-Defined page.
Example
screen of page 5 (Chronic Problem List):
This
displays a summary of the patient’s chronic problems.

To return
to the Patient Information screen from this screen press the <Escape>
key. To select a chronic problem to
view/edit/delete use the arrow keys to highlight the line or type the number of
the line at the cursor and <Enter>.
That record will be displayed to your screen.
Example
Record:

Use the
arrow keys to move through the fields.
Press the <Escape> key to exit this window. You will return to the Chronic Problem List.
(Action
Line Functions continued)
(P)vd To change the provider assigned to
this patient, type P and <Enter>.
(R)te Typing R will print the default
route slip that you have in your word processor.
The file name of the
default route slip is ROUTE. A window
will open allowing
you to select an output
device. Select the appropriate printer
and <Enter>.
(T)yp This stands for type of route
slip. When you have more than one type
of route
slip, typing T
displays the ENTER TYPE prompt. At this
prompt type the
character(s) that
identify the route slip you want or press <Tab> to have the
system display a list of
route slips you have created. Use the
arrow keys to make
your selection or type the
line number at the cursor and <Enter>.
Then select the
appropriate output
device and <Enter>.
(U)add This command is used to update an address for all family
members. The system
will prompt:
COPY ADDRESS
INFORMATION FROM THIS PATIENT TO ALL
MEMBERS
(Y/N) _
(S)ign Although not listed in the Action
Line, type S and <Enter> to print a
Signature Authorization
form. Select the appropriate printer and
<Enter>.
(0)End To
exit and save the information you entered for this patient type 0 (zero)
and
<Enter>. Or Press
the ESCAPE key.
ACTION LINE <TAB> FEATURE
If you have
the <TAB> feature, pressing the ? and <Tab> key at the Action Line
opens a window listing additional functions.
Use the arrow keys to scroll through this listing. Highlight your selection using the arrow keys
or type the line number at the cursor and <Enter>.

To exit this window without making a selection press the
<Escape> key.
A brief
explanation of the above options begins on the next page.
1 A
( APPOINTMENTS )
Takes you
into Appointment Scheduler 1 unless you have the toggle APPT=TMSAPPT, then it
takes you to Appointment Scheduler 2.
A1 = Graph Scheduler
A2 = Calendar Scheduler
2 B
( Benefits Details )
Displays
the last eligibility inquiry information
3 C
( CHARGE PT )
Takes you
to Patient Checkout.
4 D
( DELETE )
Deletes a
patient from the Medical system. May
need to enter a security password. Do
not delete any member of a family account that has ever had activity. If you do, when you run your reports they
will not accurate.
5 E
( ENCOUNTER IN )
This stores
encounter to be printed from Patient Reports.
6 F
( FAMILY UPDATE )
Copy
insurance information to all family members.
7 G
( GOTO PROG )
To go to
any system program.
8 H
( HARDCOPY )
To print a
hard copy of the Patient Information screen.
9 I
( INSURANCE )
Moves the
cursor to the Insurance Center section of the Patient Information screen.
10 J
( PRACTICE COPY )
Copy
patient from Master Patient Index to your current PRACTICE.
11 K
( COPY ACCOUNT )
Copy
patient demographics to another account.
12. L (
LEDGER )
Takes you
to the patient’s ledger card.
13 M
( MED REC )
Takes you
to the EMR / Medical Records.
14 N
( NEXT PAGE )
To go to
another page of Patient Information.
15 O
( OUTSIDE )
Allows you
to access Referral Log and Laboratory Log programs. Prompts: (R)EFLOG OR (L)ABLOG? (R/L):
16
P ( PROVIDER ) – Select a provider
17
q ( Quit ) – Quit w/o Saving Changes
18
R ( Router or Encounter Form )
19
S ( Signature Form ) Used for policies and HIPAA notifications
20
T ( Type of Form ) Generates a certain type of form. Examples: History,
Medications, Workmans Comp, Consent.
21
U ( Update for All Family Records ) Records a change made on this
Patient to all family members
22
V ( View Dates and Changes )
23
W ( Set Next Number Sequence )
24
* (Queue this Patient to a Chart
Labels list)
25
L2 (View legacy ledger screen)
26
‘ ( Apostrophe ) Show All Carriers and Balances
A1:
Legacy Graph
Scheduler
A2:
Legacy Book Scheduler
A3: New Graph
Scheduler
A7:
Advanced Book
Scheduler
A9:
Simple Book
Scheduler
AQ:
Assign to
Queue: This function sends the patient to the EMR for a certain Physician,
Nurse or MA.
BE: Go to Billing Edit screen
CF: Prints a series of patient documents and various surgical consent forms all at once
for the Patient to sign and review.
CS: Chart Scan
FA: Future
Appointments: This command will list all upcoming appointment and optionally
send a reminder test/email for the appointment.
LI: Go to line item Posting
MIPS: Enter quality measures
RC: Enter a recall for this Patient
RX: Go to Script Writer for this Patient
TA: Text Next Appointment Info
TRG: Enter a triage call ( Medical Phone Message )
VS: Enter Vitals
$: Take Copay
Payment ( There is also a dedicated icon for this on the lower task bar )
: ( Colon ) - Send Patient Portal Invite text
and email
^ - Send Message to Patient ( There is also a
dedicated icon for this on the lower task bar )
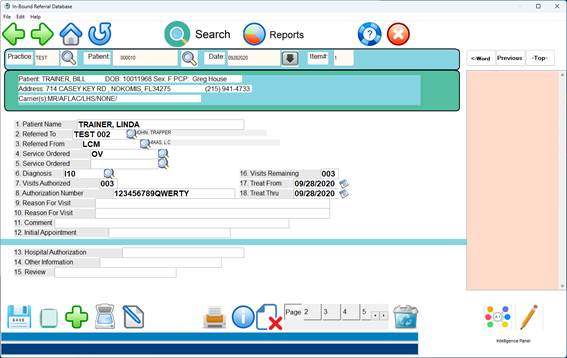
REFERRAL LOG PROGRAM
Reflog keeps track of Prior Authorization.
EXISTING
PATIENT: Enter the patient name or ID and
<Enter>. The system will default
to the current date. A summary of the
patient’s referrals will be displayed.
To view an
existing referral, at the date prompt type the date of the referral you wish to
see and <Enter>. The database for
that referral will be displayed.
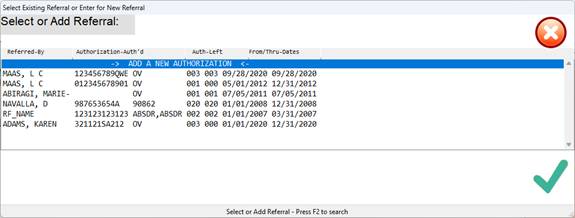
To add a
referral for a patient already in the Referred Out Database, enter the date of
the referral at the date prompt and <Enter>. Answer
Y to the not on file prompt shown below.
NOT ON FILE,
ADD?___ (Y=YES, N=NO)
A blank
Referred Out Database screen will be displayed.
Instructions for filling out this screen are the same as those for a new
patient. New patient information begins
on the next page.
ENTERING
A NEW PATIENT: Enter the patient name or ID number and
<Enter>. Then
enter the
date of referral; the default for this prompt is the current date. An example screen
is below.

After you
type Y to add this patient to Reflog, a
Referred Out Database screen will be displayed (example below). The following page has instructions for
filling out this screen.
Your cursor
will be at field 2, RL_ATDR (attending doctor), and the bottom of your screen
will display how that doctor is defined on your system
Example:
Document HIPAA page here:
These date fields are
available when needed. At this time of
change during the implementation of HIPAA policies, not all of these date
fields are being used at the present time.
As requirements change, please be aware that you can access these date
fields by clicking on the HIPAA tab, at the main patient information screen.
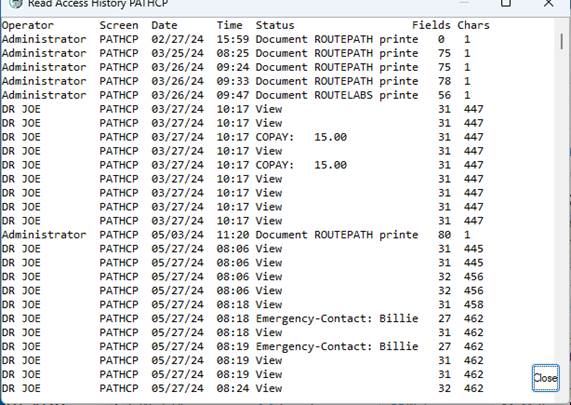
HIPAA access logging information:
All access to protected information is logged
and can be viewed by typing the “V” command at the action line:
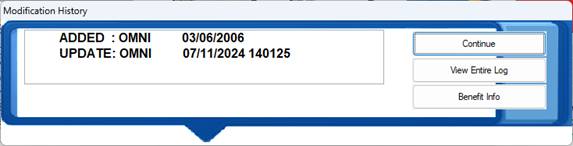
The
click on View Entire Log:
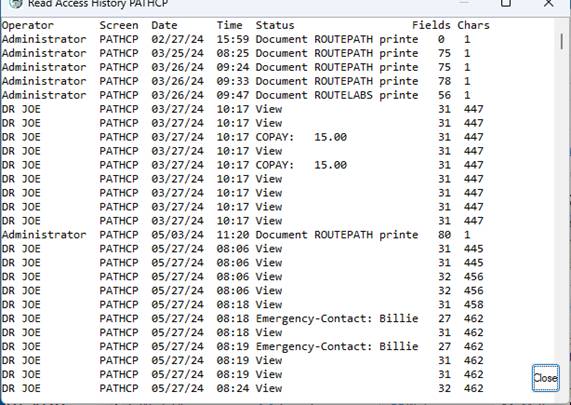
Both
viewing and changes to protected information are logged.
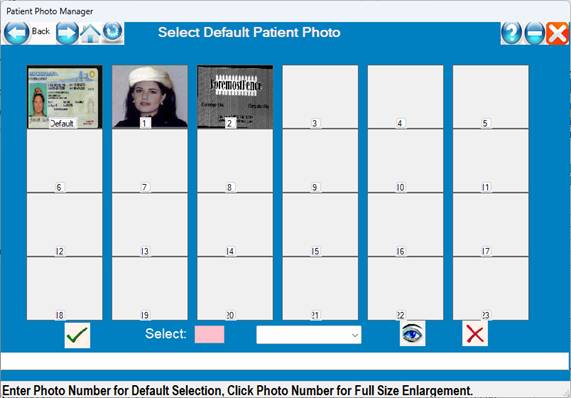
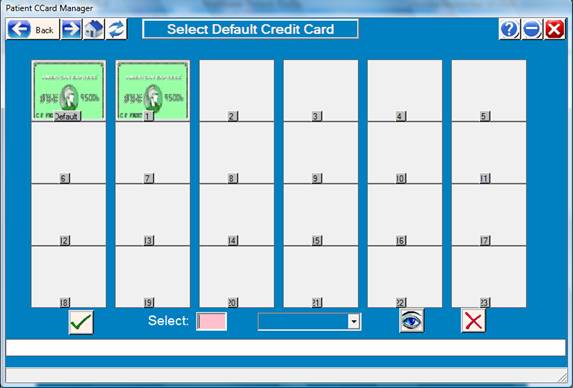
Manage Photos or Credit Card:
Click on the
Photo ID icon or the Credit Card to manage photos or credit cards.
Multiple
Credit Cards card be scanned/managed.
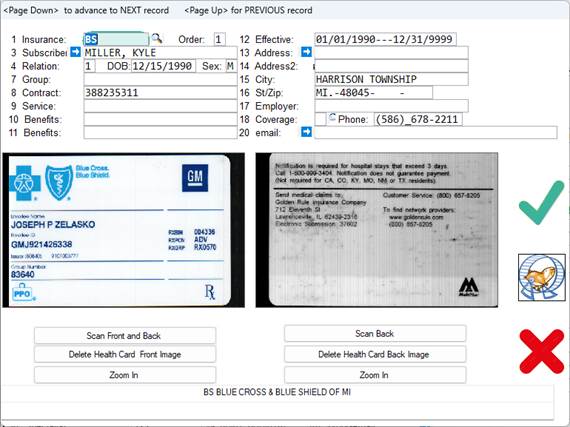
Example Photo
IDs:
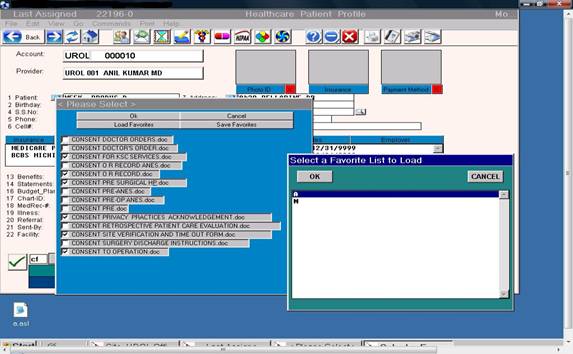
The command
“CF” prints a series of merged patient documents for surgical consent forms,
pre surgical orders and post surgical discharge instructions.
These
documents must be setup in a table in a profile based on the type of surgical
procedure being preformed.
Ø
A
popup list of recently accessed Patients can be listed by pressing the
<Down Arrow> in patient Name/ID fields.
This holds the last 50 patients accessed in chronological order.
Ø
A1,
A2 & A3 commands for new color block scheduler – see scheduler below
Ø
RX
command for shortcut to Script Writer.
Ø
Support
for multiple Dymo label printers with different size
labels from the same workstation.
Ø
Outgoing
lab log has mini result reporting capability and tracking capability.
Ø
Ex:
INR results.
New
System Setup Instructions
Prior to
entering patients into the system, you must first load each person’s Operator
Identification Table (the ENTER OPERATOR ID prompt looks to this table or
dictionary),
Provider
Codes Dictionary, Charge Codes Dictionary, Benefits Definitions Dictionary,
Referral Codes Dictionary, and Carrier Codes Dictionary.
When
deciding which patients to enter when setting up a new system, you basically
have four choices:
1
Enter
all current accounts. ( There is a program to import all patients from most
existing Practice Management or EHR systems )
2
Enter
only those accounts that have a balance.
3
Enter
patients as they arrive, starting at the present time.
4
Have
the Patient pre-register on the patient portal.
If you
choose to manually enter all your patients prior to their next appointment, you
may want to consider hiring temporary employees.
To estimate
how much time would be involved, multiply the number of accounts you want to
input by 2-3 minutes. (i.e., 500
patients would take about 16 to 25 hours to complete).
The
training staff at Perfect Health Cloud recommends the following order:
1
Enter
or import all accounts that have a balance.
2
Enter
all accounts that are scheduled for an appointment the week
you plan to go live.
3
Each
week input the accounts that are scheduled for an appointment
for the following week.