Merging
EMR Documents with Word
Quick Setup Guidelines For Merging EMR Documents with Word
Overview: The function creates consult, recall, injury and other letters containing Charted information automatically.
1. Documents are created using normal merge codes using the “[]” or “{}” to denote the field to be pulled from the database.
2. Examples: [PF1] [PT_NAME] [RFN] [HPI.onset] [PF1.drainage]
A field for a given section of the EMR consists of the form code
Followed by the field code.
Example: The field “BP” from the Vital Signs form ( code VS) would be merged as [VS.BP].
Examples:
[PF1.|] This field pulls the entire Physical findings 1 information.
[PT_NAME] This merge code pulls the patient’s name.
[RFN] This code pulls the referring Dr.
[HPI.onset] This code pulls the field “onset” from the HPI form.
[PF1.drainage] This code will be replaced with the “drainage” field from the “PF1” form.
A complete list of merge fields can be found at the end of this document.
3. In order to flag the codes as a merge code, each merge code must be highlighted, and then from the insert command on the upper toolbar, a unique bookmark must be assigned to the code. The bookmarks must start with “A” and increment until “Z”. Once Z is reached the next code must be “AA”, followed by “AB” “AC” “AD” and so on.
4. If you wish to format the merged data “as is” and not reformatted to a paragraph within the letter, follow the merge code with a “|” (pipe—shifted backslash) and include this character when highlighting for the bookmark. This will merge the data with exactly with same spacing as used within the EMR form. This is useful for lab reports and tests.
5. Example [PK1|].
6. If you wish to format the merged data with numbered bullets for each item, follow the merge code with a “#|” and include this character when highlighting for the bookmark. This will merge the data with exactly with same spacing as used within the EMR form. This is useful for lab reports and tests.
7. Example [MEDS.#].
8. If lower case conversion is desired, add the “~” character to the end of the field.
9. Example [PK1.turbinates~]
10. The “@” sign will pull all the (cumulative) sections from all dates on file.
11. Example: [PK1|@] – Pulls every test going backward in time.
12. Any merge code which calls for “{}” to be around the code in order to print a description instead of an actual code {CV_CODE}”)
13. If you need to use both a “|” and a “}”, the brace “}” needs to appear before the pipe “|” “{CV_CODE}|”
14. Optional Sections: By highlighting an entire paragraph or sentence, the highlighted area will be deleted in the case where the merged data not does exist in the EMR.
Example: “Fiber optic results were as follows: [FOX.interpretation]”
If the interpretation field is blank (Within the FOX section) the entire sentence will be eliminated from the document. This allows the formatting of all procedures from within the referral letter.
15. Document name must begin with “PMR” and must be saved as a word document with a “.doc” extension (i.e. PMRLETTER.DOC) in the C:\om8\wp directory.
16. Any merge document without the “.doc” extension will be treated as a regular (ASCII) merge document and will be printed as plain text.
17. Documents are stored in C:\om8\wp folder – on the server local disk C:\
NOTE: Every merge code must be book-marked starting with the letter A, and going forward A,B,C,D,E,F,G etc or the merge codes will not function. If you have used up merge codes A-Z, then start with AA, AB AC, AD etc.
Example Referral Letter:
-------------
[RFC], [RFZ]
Re: [PTN]
Dear Dr. [RFL],
We had the pleasure of seeing your patient, [PTN], on [DOSL] for a follow up evaluation.
The current diagnoses are:
The current recommendations are:
Allergy prick skin testing had revealed [PK??.Results Summary:]
Intradermal skin testing had revealed [ID??.Results Summary:]
Pulmonary Function Test showed [PFT.Interpretation:]
Spirometry showed [SPIR.Interpretation:]
We have asked [PFN] to return to our office [EXAM.Follow Up :] for further assessment.
Thank you for the opportunity to participate with you in the care of your patient. It is our policy to get your patients on a program that will improve their allergy problems, and then return them to your office for ongoing care.
Sincerely,
Specialist Dr.
Example letter to be used as a report:
Patient:
Name:[PT_NAME] ID#: [PT##] DOB: [PT_DOB]
Age:[AGEB] Gender: [PT_SEX] [PT_CITY]
Referring Doctor: [REF_BY]
NOTES: [PMRS.FLAGS]
Chief Complaint and History of Present Illness:
[CC.|]
HPI: [HPI.Subjective:]
Plan:
[PLAN.Prescription:]
Recall in [EXAM.Follow Up :]
Past Medical History:
Hospitalizations: [PMH.Hospitalizations:]
E.R. Visits: [PMH.E.R. Visits:]
Medical: [PMH.Medical:]
Surgeries: [PMH.Surgeries:]
Allergic/Adverse Food Reactions: [PMH.Advers/Allergic Food Reactions:]
Adverse Drug Reactions: [PMH.Adverse Drug Reactions:]
Latex Sensitivity: [PMH.Latex Sensitivity:]
Insect Sting: [PMH.Insect Sting:]
Skin Testing:
PST: [PK1.Results Summary:@*]
IDST: [ID10.Results Summary:@*]
IDST: [ID12.Results Summary:@*]
IDST: [IDC.Results Summary:@*]
Spirometry/Pulmonary Function Testing
[SPIR.|]
[PFT.|]
Diagnoses:
[DIAGLST]
Medications:
[MEDS.|]
Triage:
[TRG.|]
Labs/Procedures:
Date: [CT.month], [CT.year]
X Rays: [XRAY.Xray]
Date: [XRAY.month], [XRAY.year]
Labs: [LABS.|]
For best results, after first letter is printed, leave Word running (you can minimize) to speed access for the next letter. The system can be configured to automatically close Word, close only the document just used, or leave all documents open (best for high speed batch printing). Default setting is to leave Word running, but close each document after printing.
Limitations
Cannot use merge codes inside of a Word textbox, due to Word’s inability to pull up bookmarks inside textboxes.
Pause Option
If the Pause Options is activated, the letter will stop for the reviewer to annotate. Clicking “OK” will automatically print he letter afterwards.
More on Merge Codes :
[PMRS.FLAGS] = Pulls the Flag Fields from the EMR dashboard (Intro) screen.
[EXAM.Recall when:] Pulls data from the “Recall when:” field located
on the main (first) navigation page. The “EXAM” merge code is the form code
for the first screen that appears when entering an exam record. This screen contains
all the other section codes to be entered.
[HH] will print “His” or “Her”
[HS] will print “He” or “She”
[FT] will print “Mr.” or “Ms.”
Standard Merge codes
[PT#] PATIENT ACCOUNT # WITH JOB CODE
[PT##] PATIENT ACCOUNT # BUT NO JOB CODE WITH IT.
PT_NAME] PATIENT NAME
[PT_DOB] PATIENT DATE OF BIRTH [AGE] PATIENT AGE PRINTS AS “years”
[PT_SEX] PATIENT SEX [AGEB] PATIENT AGE PRINTS AS “Days, Months, Years”
[SOC_SEC] SOCIAL SECURITY NUMBER – FIRST 5 DIGITS ARE MASKED AND ARE NOT VISIBLE
[FULLSSNO] SOCIAL SECURITY NUMBER - UNMASKED
[PT_TELE] PATIENT TELEPHONE [EN#] ENCOUNTER #
[PT_ADD1] PATIENT ADDRESS [DATE] SYSTEM DATE
[PT_ADD2] PATIENT ADDRESS TWO [TIME] SYSTEM TIME
[PT_CITY] PATIENT CITY
[PT_STZP] PATIENT STATE & ZIP [PLSTS] PAT. CHRONIC PROBLEM LIST
[CV_CODE] COVERAGE CODE [PROB_DX]:#1 PROBLEM DIAGNOSIS #1
[BILLS] PATIENT BILLS [PROB_DX]:#2 PROBLEM DIAGNOSIS #2
[DUNN] PATIENT DUNNING [PROB_DX]:#3 PROBLEM DIAGNOSIS #3
[BUDGET] PATIENT BUDGET
[CHART] PATIENT CHART
[PTBAL] PATIENT BALANCE
[MRN] PATIENT MEDICAL RECORD #
[PRI_DX] PRIMARY DIAGNOSIS
[REF_BY] REFERRAL DOCTOR + REMOVES EXTRA SPACES: MORE THAN
[FC-CODE] FACILITY CODE ONE BRACKET ON A LINE, TYPE +[ ] OR
[PT_EMPL] PATIENT EMPLOYER +{ }. REMOVES ALL SPACES EXCEPT ONE.
[EM_ADD1] EMPLOYER ADDRESS 1
[EM_ADD2] EMPLOYER ADDRESS 2 [RF_ ], [FC_ ], [INS_]
[EM_CITY] EMPLOYER CITY AFTER THE UNDERSCORE, TYPE FIELD
[EM_STZP] EMPLOYER STATE & ZIP LABEL FROM THE DICTIONARY TO HAVE
[EM_TELE] EMPLOYER TELEPHONE # THAT SPECIFIC INFORMATION PRINTED.
EX: [RF_PHONE] PRINTS PHONE NUMBER
[OPTION1] OPTION 1
[OPTION2] OPTION 2
[INS_CO]:#1 PRIMARY INSURANCE {CV_CODE} DESCRIPTIVE COVERAGE CODE
[INS_CO]:#2 SECONDARY INSURANCE {PROVO} PRINTS NAME OF THAT PROVIDER
[INS_CO]:#3 TERTIARY INSURANCE NUMBER (0-5).
[SB_NAME] SUBSCRIBER FULL NAME {REF_BY} PRINTS REFERRAL DR’S NAME
[SFN] SUBSCRIBER FIRST NAME {FC_CODE} PRINTS FACILITY NAME
[SLN] SUBSCRIBER LAST NAME {INS_CO} PRINTS INSURANCE CO. NAME
[PT_RELS] PATIENT RELATIONSHIP
[PLINS] SUBSCRIBER INS. DATA
[INSBAL] INSURANCE BALANCE [fff] FORM FEED PAPER TO NEXT PAGE
[FAMBAL] FAMILY BALANCE [FT] “MR” OR “MS”
[FAMAGE] AGED FAMILY ACCT. BALANCE [EDATE] ENCOUNTER DATE
[GROUPID] GROUP ID
[CONTRCT] CONTRACT #
[SERVICE] SERVICE CODE
[PROVO] PRIMARY PROVIDER
[PTN] Patient Name: Last, First
[PTNF] Patient Name: First Last
[PFN] Patient First Name
[PLN] Patient Last Name
[RFN] Referring Dr
[RFF] Referring First Name
[RFL] Referring Last Name
[RMI] Referring Middle Initial
[RFA] Referring address
[RFC] Referring City
[RFZ] Referring State/Zip
When you create documents for use in the Office Medicine ™ system, here are the two types of merge codes you may use:
Field Names:
Any field name can be merged in by enclosing the field name in square brackets. You can pull information from any patient information field, referral, facility, provider, carrier, or patient medical record.
To distinguish between various carriers, follow the field with #1:
[INS_CO]:#1
To print a description, use braces:
{CV_CODE}
All field names are merged in without moving the information in the document around (so columns stay lined up).
Other Merge Codes:
The abbreviations below are merged in and move the information in the document to eliminate blank spaces (so letters look nice):
fff Form feed
DATE Working date. In some versions, it will print appt date if run from appts.
TIME Current time, unless printing from appts, then it’s the time of appt.
BAL Same as PTBAL
PT## Patient account number (last 6 digits)
PT# Patient account number (full 16 digits including job code)
PTBAL Patient balance & delinquent date
PTBAL2 Patient balance
INSBAL Insurance balance & date of last payment
INSBAL2 Insurance balance
EN# Encounter number (route slip number), also enables “no checkout”
feature of daily logs
PLSTS Prints everything on the user-defined page of patient information
PLINS Prints everything on all insurance screens of patient information
PFN Patient first name
PTN Patient’s entire name (last name first)
PLN Patient last name
PMI Patient middle initial
PTA Patient address
PTC Patient city
PTZ Patient state & zip
FT Formal title (Mr. or Ms.)
SFN Subscriber first name
SLN Subscriber last name
Other Merge Codes: (continued)
SERVICE Insurance service code
CONTRCT Insurance contract number
RFN Referral name (as it is in the dictionary)
RFF Referral first name
RFL Referral last name
RMI Referral middle initial
RFA Referral address
RFC Referral city
RFZ Referral state & zip
RFT Referral telephone number
The following codes use PROV0 from patient information unless printing from appts, then it’s the appt doctor. If printing from recall, it’s the recall doctor
DRN Doctor name (as it is in the dictionary)
DRF Doctor first name
DRL Doctor last name
DRA Doctor address
DRC Doctor city
DRZ Doctor state & zip
DRT Doctor telephone number
PROVN Doctor name (as it is in the dictionary)
PROVA Doctor address
The following codes always use PROV0 from patient information
DOC# Doctor in-house number
DOCF Doctor first name
DOCL Doctor last name
DOCN Doctor name
DOC_PHONE Doctor telephone number
DOC_STZP Doctor state and zip
DOS Last claim date. If printing from appts, it’s the appt date (well, it’s
supposed to be anyway). If printing from recall, it’s the recall date.
PROC If printing from appts, it’s appt reason. If printing from recall, it’s
recall procedure. Otherwise, it’s blank
FAMBAL Prints both patient and insurance balance for the whole family
It will look like this: FAMILY: $10.00 CARRIER $20.00
FAMBAL2 Print total patient amount for the whole family.
FAMAGE 30/60/90/120 aging of family balance
AGE The patient’s age in years.
AGEB The patient’s age in years, months, and days
PTPYM Amount of
last patient payment & date of payment
PTPYM2 Amount of last patient payment
INSPYM Amount of last
insurance payment & date of payment
INSPYM2 Amount of last insurance payment
From Recall Letters/Cards
[PROC] Recall Reason
[PROV] Recall Doctor
Another Example of a bookmarked letter:
[DATEL]
Re: [PTN]
[RFN]
[RFA]
[RFC]
[RFZ]
Dear Dr. [RFL],
We had the pleasure of seeing your patient, [PTN], on [DOSL] for
evaluation of: [CC.Chief Complaint:]
The following diagnoses were made
[DIAGLST]
[ASMN.]
The following recommendations were made:
[PLAN.plan:]
COLONOSCOPY REPORT
|
PATIENT NAME |
PATIENT ID |
DOB |
AGE |
SEX |
EXAM DATE |
ATTENDING PHYSICIAN |
REFERRAL |
|
[PT_NAME]] |
[PT_DOB] |
[AGE] |
[PT_SEX] |
[DOS] |
[DRN] |
[RF_NAME] |
[COLN.|]
Colonoscopy revealed [COLN.Impression:] 
We have asked [PFN] to return to our office [EXAM.Follow Up :] to assess the response to our interventions.
We appreciated the opportunity to participate in the care of your patient and it is our intention to return [HH] quickly to your office. We will keep you informed of our involvement with your patient.
We are requesting that the patient return to the office for a reevaluation in [EXAM.Recall when:]
[RFSTS]
Sincerely,
David N. Green M.D.
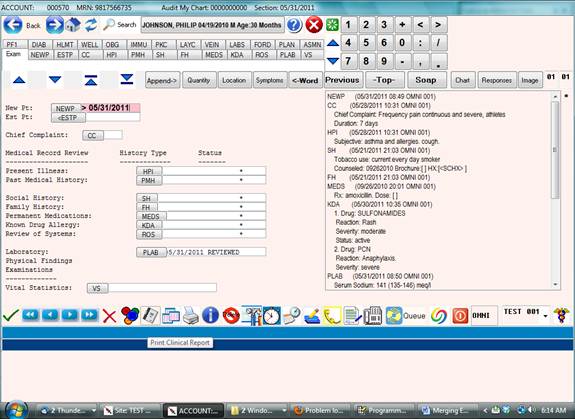
Procedure to Merge, Edit, Save and/or Fax a single document from the EMR
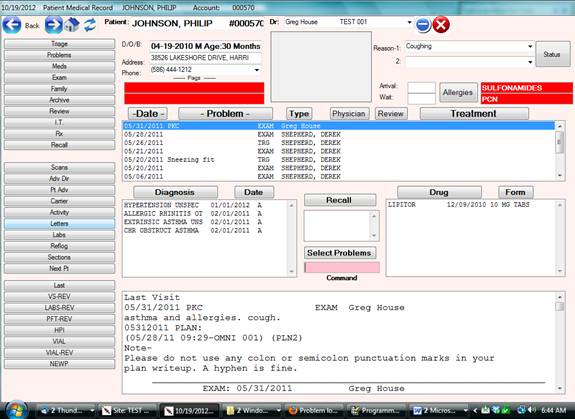
- Pull up a patient and open an Exam or Triage.
- Click on the printer icon located on the lower toolbar and select “WORD”
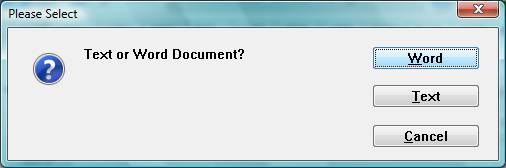
Note: If the “WORD” prompt is not available, then the default document has not been created and saved. The default document is saved as “PMREXAM”+SITE CODE+DR NUMBER.doc in the C:\om8\wp folder
Example of default document for site FAA and Dr Number 007 would be PMREXAMFAA007.doc
Example of a default document for all sites and all Physicians would be PMREXAM.doc.
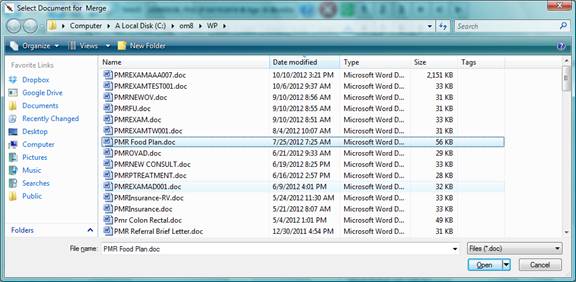
 Any document to merge
can also be selected from the “Print Clinical Report” icon located on the lower
toolbar, 2 selections to the left of the printer icon.
Any document to merge
can also be selected from the “Print Clinical Report” icon located on the lower
toolbar, 2 selections to the left of the printer icon.
![]()
Printer Icon
The Print Clinical Report Icon can contain many documents ( any Word document starting with PMR) Examples are school forms, injury letters, insurance company chart details and reports for special purposes.
Example of Clinical Report Screen – Selecting document to merge.
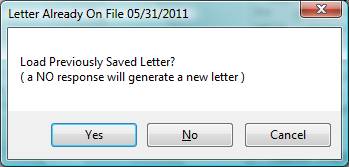
- Editing the selected document.
Once the document is selected, the fields contained within the document will be populated (merged) from the database. A Popup Command Window will be visible near the top of the screen indicating that the merge is completed.

The letter can be edited by using word at this point.
To Save the letter permanently for this visit click “OK-SAVE”
To Quit and discard the letter for this visit click “CANCEL”
To Save and Fax the letter for this visit click “FAX”
Note: Do not use the internal Word “File – Save As” function to save the edited letter or the changes in the letter will be not be saved to the database as this Word function re-names the letter.
Once a letter is saved under a specific visit, using “OK-SAVE” or “FAX” it can be retrieved again by selecting the Printer or Print Clinical Document icons respectively. ( By using the same method that was used to create the document originally )
- Faxing the document.
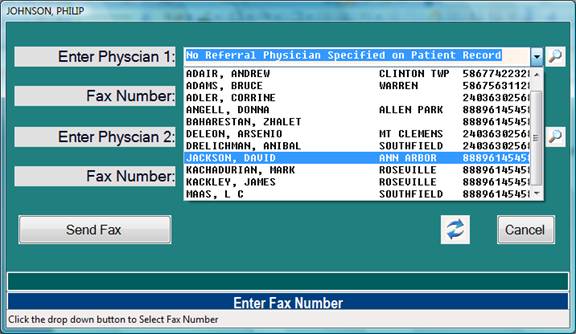
Selecting “FAX” will bring up the FAXING options. Please see screen below.
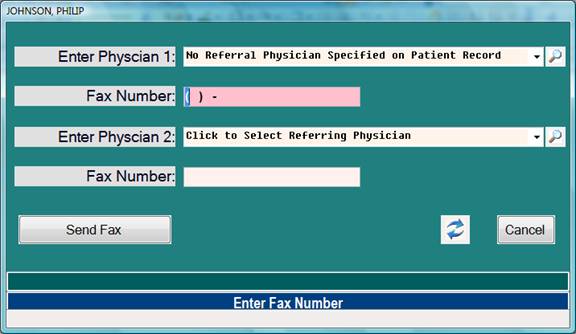
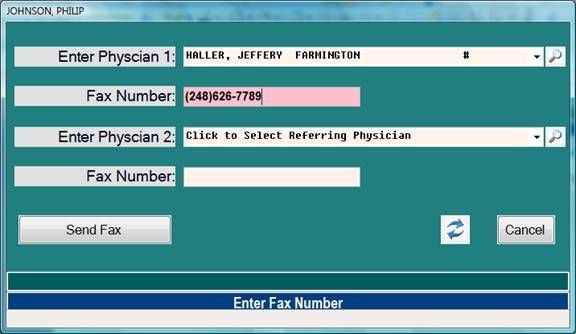
Note: The Referring Physician attached to the Patient Demographics will automatically be selected as the fax destination and Fax Number.
The selected Physician can be changed by way of the drop down button.
A second Physician or fax destination can also be selected.
Example of Fax Option Selecting another Physician:
Example of Fax Number automatically populated from the Referring Physician field in Patient Demographics:
- Creating documents for All Visits/Encounters.
The same documents used for a specific visit can be used from the dashboard. The documents produced here will pull data from the most recent visit for the respective merge field.
![]()
Select this option “Letters” for Merging Documents using all available data from every encounter, not just a specific date or encounter.
Documents for merging are located in the C:\om8\wp folder.
Any version of word is supported by Office Medicine.
Procedure to Merge a batch of documents by date from the EMR
Overview: A document ( Chart note or Referral letter for example ) can be produced for every patient by a range of service dates.
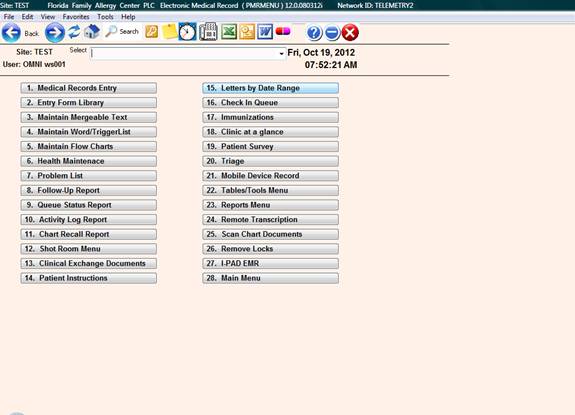
Procedure: Select #15 “Letters by Date Range” from the Electronic Medical Records Menu.
Now enter: ( Example )
Enter Starting Date: 10/01/2012
Enter Ending Date: 10/07/2012
Enter Section Code: ECHO
Please Verify Above: Y
The above options will procedure an “ECHO” letter for all patients where an ECHO was ordered for the dates specified.
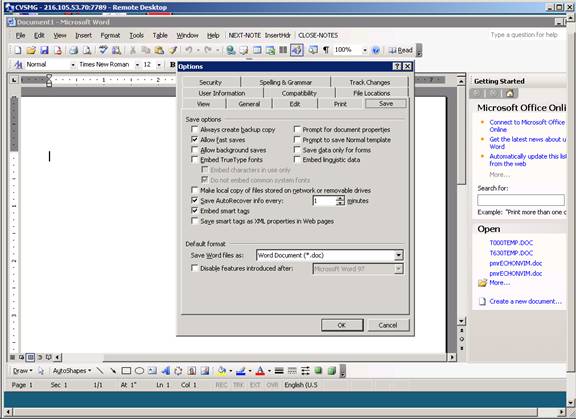
Setting Auto-Save options in Microsoft Word
Please turn on the AUTOSAVE option for EVERY ONE MINUTE
Word 2003: From the upper toolbar, select Tools>> Options >> Save tab >> click Allow Fast saves >> check Save Autorecovery info every: 1 mins
Word 2007-2013: Click the “Office”
button in the upper left corner, then click “Word Options” located on the
bottom center of the next window.
Now select “SAVE” options from the left side panel. Change Autorecovery info to
every: 1 mins.