


 |
WELCOME to the world of e-prescribing powered by H2H Solutions, Inc. and Digital Rx™.
Digital Rx is an Internet delivered application that allows the physician to send safe, secure prescriptions electronically to the patient’s pharmacy of choice. Digital Rx has been designed and tested by medical professionals in order to provide the highest level of functionality for physician use.
Prescribing medications with the utmost consideration for the patient’s drug/food/allergy interaction history can be a time consuming activity in the physician’s already busy office. Working with the patient to determine their level of benefits is also an important consideration. Digital Rx provides the physician with the patient’s drug history, active medications, drug-drug interaction warnings, drug-food interaction warnings, drug-allergy interaction warnings, insurance specific formulary and insurance benefit information, all in real-time.
Through the use of any device with an Internet connection using a valid browser (Internet Explorer®, Firefox®, Safari®, Opera®, Chrome®, etc.) the physician can prescribe, refill and electronically deliver medications to the pharmacy with the most updated and accurate information available. Digital Rx is an easy to use application that includes the most current resources for today’s health care professionals.
H2H Solutions is delighted to guide you through the Digital Rx application with this step-by-step instructional manual.
TABLE OF CONTENTS
1.1 Introducing “H2H Solutions”™ developers of “Digital Rx”™
10 PHARMACY SELECTION WORKFLOW
1 PROGRAM INTRODUCTIONS
1.1
 Introducing
“H2H Solutions”™ developers of “Digital Rx”™
Introducing
“H2H Solutions”™ developers of “Digital Rx”™
H2H Solutions, Inc. is a Michigan based company, with an extensive background in Healthcare IT staffing, consulting and product development. The company, founded in 2000 has been most recently recognized by INC. Magazine as a fast growing (113th in the nation) privately held corporation. H2H Solutions offers clients expertise in HIPAA compliance, extensive payer experience and a history of innovative product development in various areas of health care.
For more information, please visit www.h2hsolutions.com
1.2
 About “Surescripts”™
“Surescripts” was founded in 2001 by the National Association of Chain Drug Stores (NACDS) and the National Community Pharmacists Association (NCPA) to improve the quality, safety, and efficiency of the overall prescribing process. The Pharmacy Health Information Exchange, operated by “Surescripts” is the largest network to link electronic communications between pharmacies and physicians, allowing the electronic exchange of prescription information. This connection allows Digital Rx to send prescriptions electronically to any pharmacy of choice (CVS, Walgreens, Rite-Aid, Wal-Mart, Kroger, Sears, Costco, Publix, Sam's Club, Meijer, etc.).
“Surescripts” provides the necessary clinical decision support information including patient eligibility, formulary, and medication history at the point-of-care through certified, secured networks, in addition to providing the ability to route prescriptions electronically to retail and mail order pharmacies. The mission of “Surescripts” is to partner with all stakeholders in the prescribing industry to improve patient safety, increase workflow efficiency and reduce the overall cost of health care delivery.
For more information, please visit www.Surescripts.com
2 HOW TO USE THIS MANUAL
The following section will describe the icons and text indications for ease of following the instructions of this manual. These icons and text indications can be found throughout this training manual (also available in program under the help menu).
2.1 Icon Indications
The following icons are used to call attention to an action or reference content of the program. The visual display of the icons will be used along with the words to take into account various ways users develop understanding.
2.1.1  New Screen
This icon indicates a transition from one screen to the next while progressing through the application. A screen transition is typically followed by either 8 8 clicking the mouse key or pressing the submit button.
2.1.2  Mouse Click
This icon indicates the need for the user to do a single left 8 click of the mouse. If a double 8 click is required than the instructions will indicate that. This application does not use any right mouse 8 clicks.
2.1.3  Glossary Terms
Appendix B includes a glossary of terms. This icon indicates the term along with its explanation can be found in the glossary.
2.1.4  Quick Steps
This icon indicates abbreviated instructions for the experienced user looking for simple, concise process steps.
2.2 Legend of text
Text that is in Italics and underline indicates a sub heading or field name. A subheading is a reference to a section or entry point on the application screen. A field indicates a place on the input screen where the user is expected to enter information. Application indications are in “quotes”. The two applications that will be described in this program are; “Digital Rx” ™, “Surescripts” ™.
3 LOGGING IN
The user id and password will be unique to the office/ practice setting. Every staff member will have a unique user name and password to access the system.
3.1 Stand Alone
This method of logging in is applicable only to stand alone practices and practitioners.
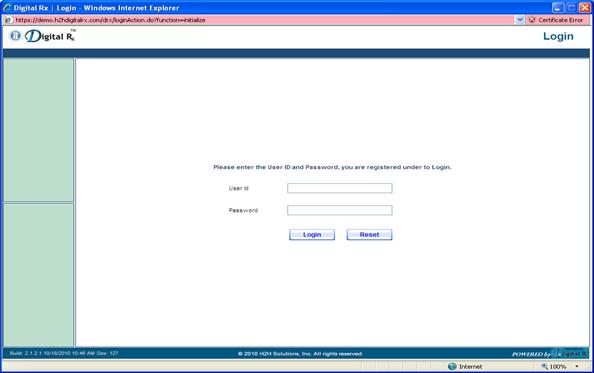
Input the assigned user name and password. If the password is forgotten, it can be retrieved by contacting the application support team.
Clicking on the “Reset” button will clear the fields and the login credentials can be reentered.
 Quick Steps
1. Type the unique assigned user id and password
8 Click the “login” button
The integrated logon is for practices and practitioners who are using an “EMR” application which is integrated with Digital Rx.
3.2 Integrated
The integrated logon is a “single sign on” method. Here, the user (in this case, the provider) is redirected to the Digital Rx application after clicking the “prescribe” tab on some other system. For this to work, Digital Rx must be integrated with the EMR system. All authentication activities happen behind the scene and the user does not have to use his Digital Rx credentials.
4 PATIENT REGISTRATION
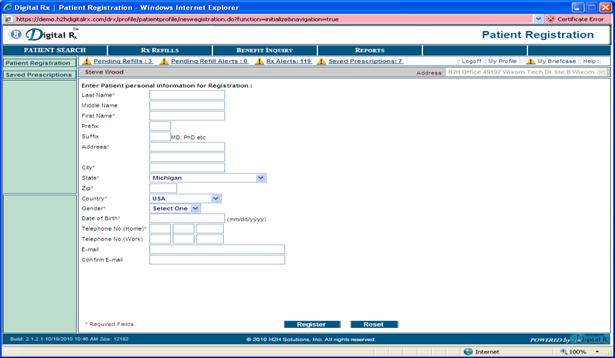
4.1 Stand Alone
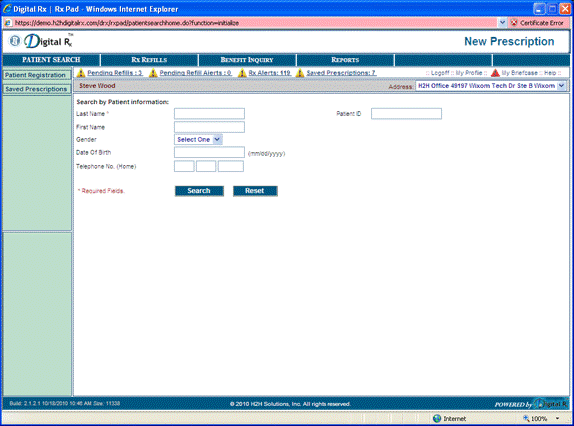
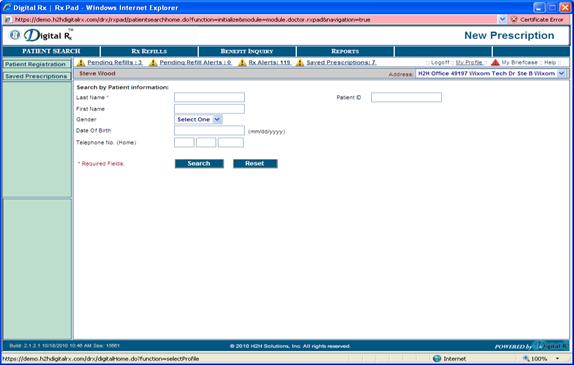
For standalone practitioners, the patient has to be registered manually through the Patient registration page of Digital Rx (Displayed below). Once a new patient is registered you will be directed to the Patient Search screen where you can find the patient that was just registered.
4.2 Integrated
Patient Registration is done behind the scene. The practitioner does not have to enter the patient information manually. The patient information is pushed from the EMR database to Digital Rx.
5 Patient Search
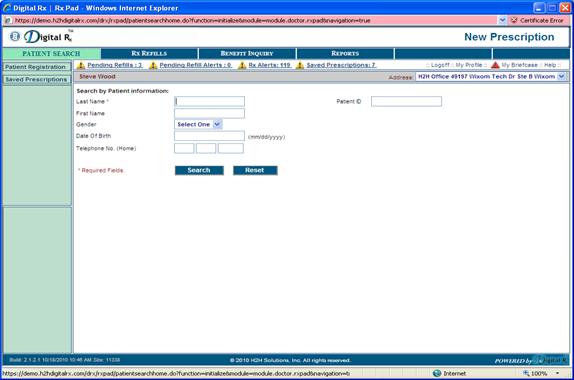
While using Digital Rx it is important to keep in mind that the program is centered on the ability to write a prescription. The basis for writing a prescription is to first identify the recipient of the prescription. Each new prescription starts with the search for a patient in which the prescription will be written for. The search screen allows the Digital Rx user to enter information and 8 click search for a list of potential patients.
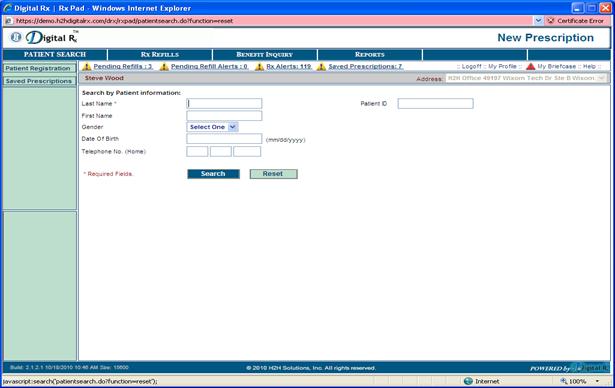
The 8 patient search page begins with the lastname field. Last name is the only required field.
You may enter as little as the first letter of the last name or the entire last name. The more letters you provide results in a more refined search. The first names, gender, date of birth and telephone number fields are not required fields.
The additional fields will assist the user to expand the search in the instance of several patients with same last name.
If after 8 clicking search the patient name is not found then the patient may need to be registered before continuing. The next section includes instructions on how to register a new patient. Once the patient is registered the user will need to choose 8 New Prescription and use the search page to find the patient and continue.
If the patient has previously been registered please skip the next section; “Patient Registration” and go to step 2b; “Patient List”.
Quick Steps
1. 8 Click on the last name field
2. Type at least one letter of the patients last name
3. 8 Click the “Search” button below
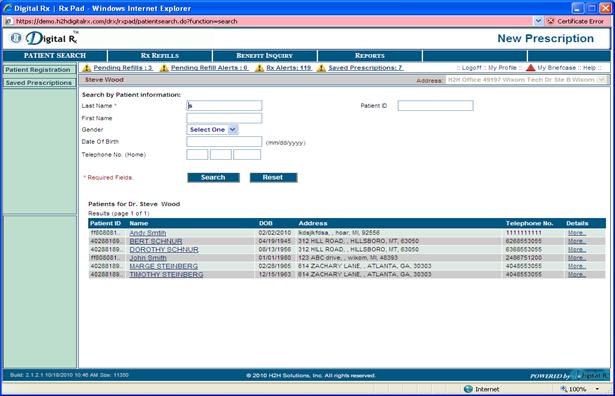
SELECT:
Once the patient information is entered the user can 8 click search. This will result in a list of current patients in the office database sorted by last name. At this point basic demographic information is provided (name, address, and telephone number) however more detailed information is available by 8 clicking the “more” link under the details column. Once the patient name is selected by the user you will be automatically directed to the Rx Pad.
RESET:
The user can 8 click reset to clear the search.
Quick Steps
 8 Click on the name of the patient from
the list
8 Click on the name of the patient from
the list
1. The user will automatically be directed the 8 Rx Pad
6 PRESCRIPTION WORKFLOWS
In this section, we will describe the different prescription workflows (Drug Search, PBM History, Favorite Drug and Medication History workflows).
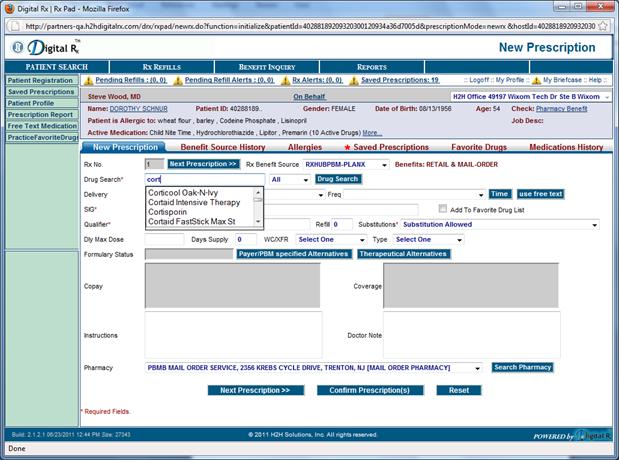
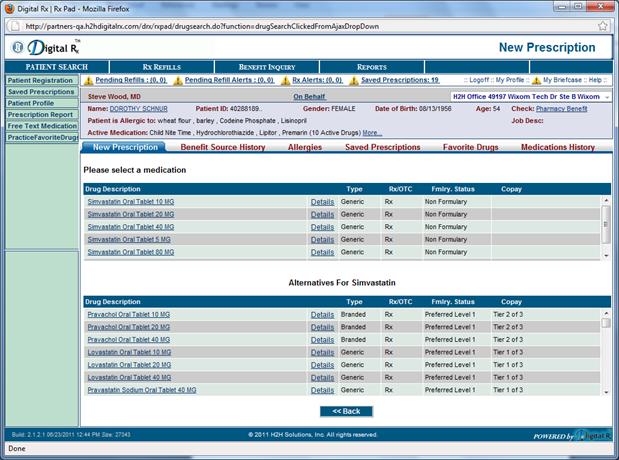
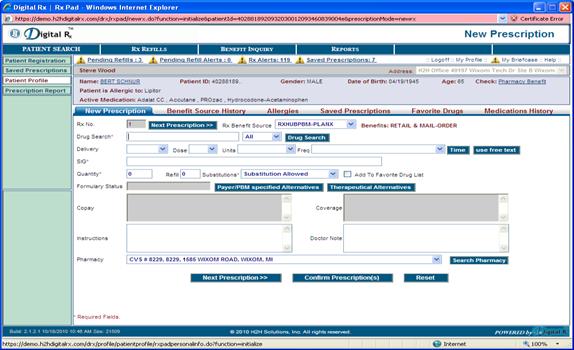
This feature provides access/connection to local databases for drug information. This database includes a listing of over 60,000 prescription drugs with up to date information on drug-drug, drug-food, and drug-allergy interactions. The drug search list provides the user with the available options for the medication selected including dosage and form, drug type, Rx/OTC information and the formulary status, which will automatically fill in the formulary status field on the Rx Pad once a medication is selected from the list. The user must provide at least the first 3 letters of a medication name to conduct a medication search.
If the medication is OTC (over the counter) and does not require a prescription a message will appear on the Rx Pad in red print next to the drug search button.
The information in the formulary status field tells the user if the medication selected is reimbursable by the benefit source and at what level. The formulary level rates the level of preference for the medication with the following rating system:
|
Formulary levels |
|
|
U |
Unknown |
|
0 |
not reimbursable |
|
1 |
non formulary |
|
2 |
not preferred (on formulary) |
|
3 |
Preferred level 1 |
|
4 |
preferred level 2 |
|
5 |
preferred level 3 |
|
up to 99 |
highest preferred level |
payer/pbm (pharmacy benefit management) specified alternatives provides any known alternatives to the current medication selected, or the user may select therapeutic alternatives, which will again provide a list of alternative medications when available.
therapeutic alternatives are automatically provided to the user in this field by category and with consideration for the patients benefit levels. The user may choose to make changes as needed or maintain the original selection.
The strength, dosage form, route, coverage and copay fields are disabled and are not designed for user entry. They provide updated information through Surescripts for the user’s reference.
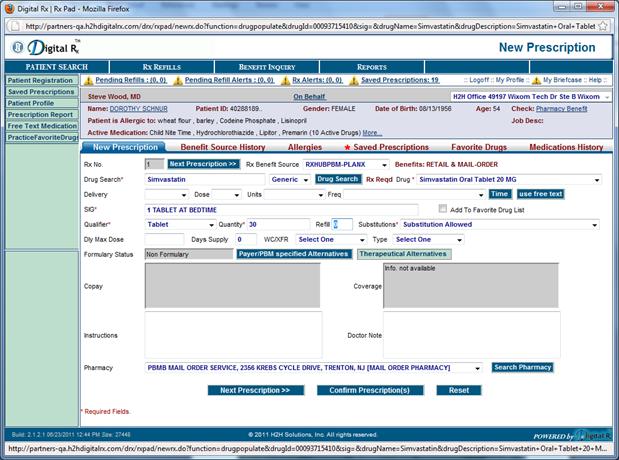
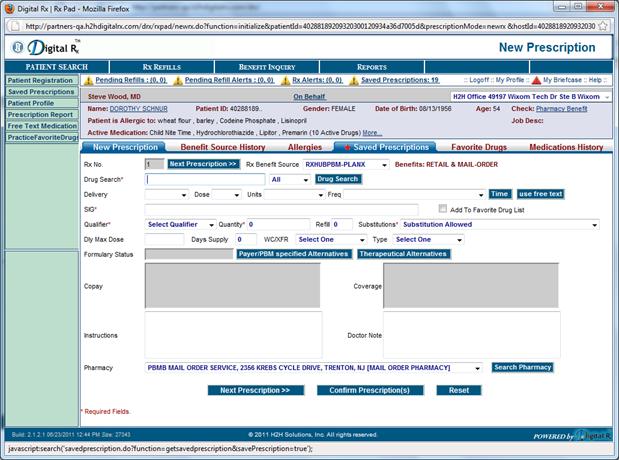
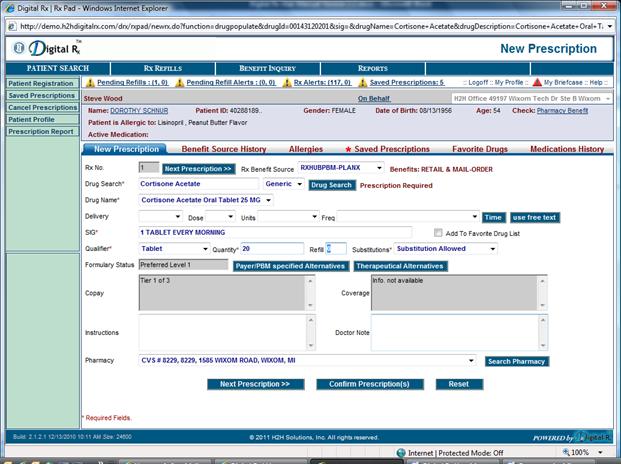
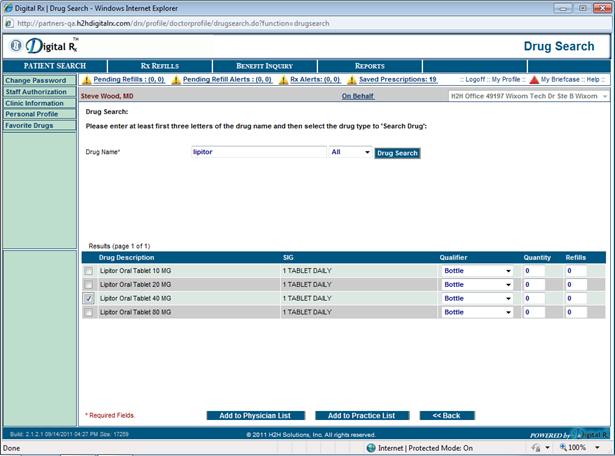
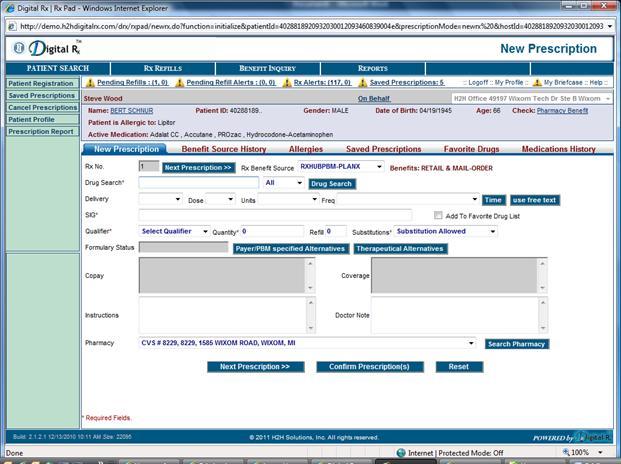
It is also important to note the “Qualifier” field next to the quantity input. This field is used to differentiate between prescription delivery mechanisms – such as capsules, tablets, injections, pills, mixtures, and so forth. This field requires selection before a valid e-prescription can be made and is demonstrated in the screenshot below:
![]()
![]()
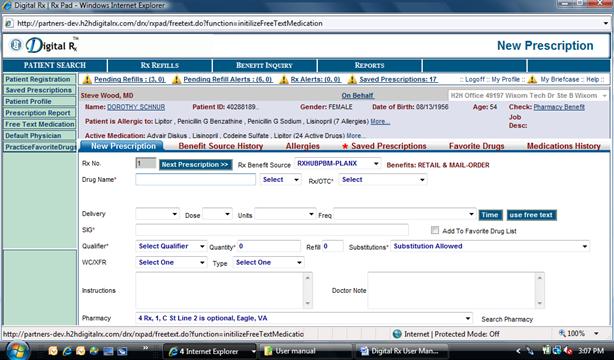
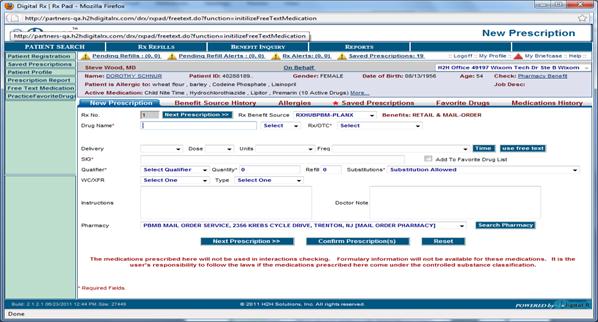
Users may also choose to prescribe free-text medication. By clicking the ‘free-text-medication’ tab on the left-hand side of the screen, the user will create a prescription by free-text writing instead of the normal Drug Search. This functionality may be important for certain prescriptions, such as chemical compounds which are mixed uniquely per patient requirement. Medications here will not be used in drugs/allergies interactions checking.
The above information is provided as a VIEW ONLY of information that has been provided by the selected patients PBM. Some information may not be available for all patients depending on the selected patient’s coverage. For more information visit www.surescripts.com.
7 FAVORITE DRUG
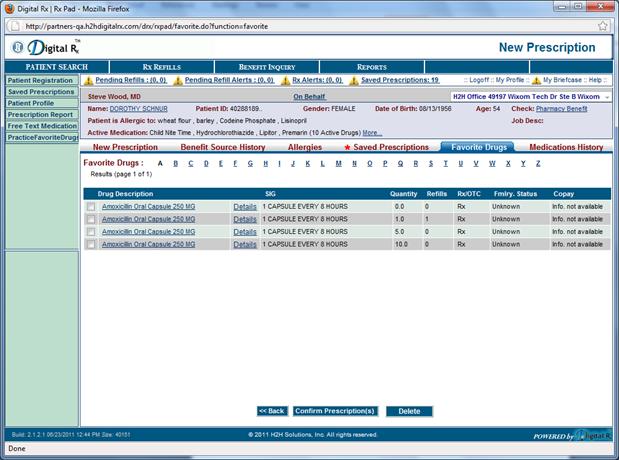
Favorite Drugs provides a list of frequently prescribed drugs by the physician. The user can select a drug from the 8 favorite drug list that provides the drug name and dosage, sig, formulary status and copay by 8 clicking on the medication name or by checking the box next to the prescription and clicking “Confirm”. The medication will be added to the drug name field in the Rx Pad. The user can 8 click on details column and will be provided with the drug name, type, strength, strength unit, dosage form, route, and any instructions listed.

The physician can add a drug to the 8 favorite drug list from the Rx Pad page by checking the add to favorite drug list box as shown above.
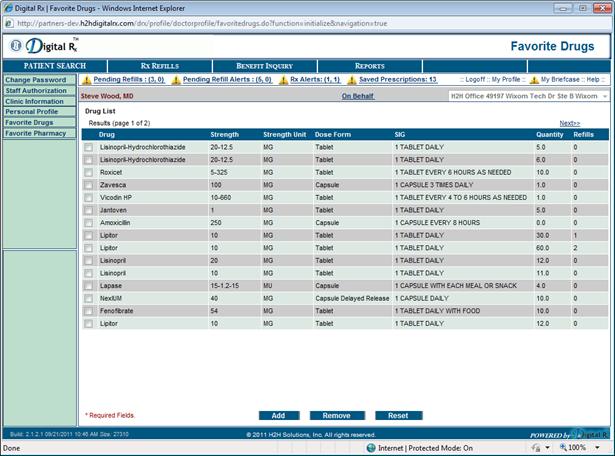
Favorites can also be added using the favorite drugs module. To get to this, click on ‘My Profile’ and then select ‘Favorite Drugs’ from the left panel options. The screen below will be displayed. Click on ‘Add’ to add a new drug to favorite list as shown above.
The physician will have the option to either add to the physician’s list or to the practice list as shown below. If added to the practice list the drug will be shown in the favorite display screen for all the physicians in the practice.
8 MEDICATION HISTORY
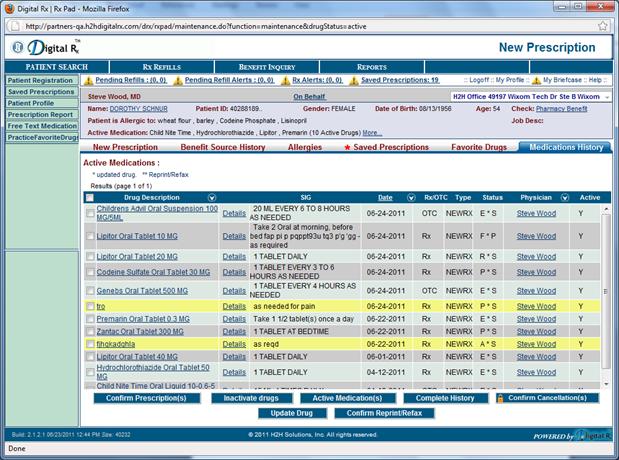
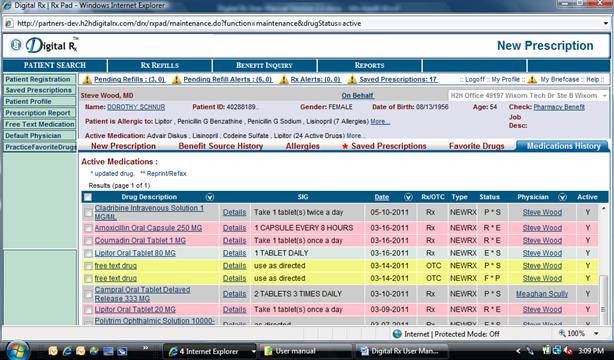
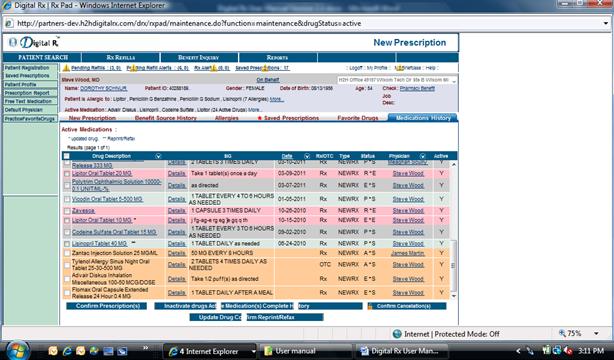
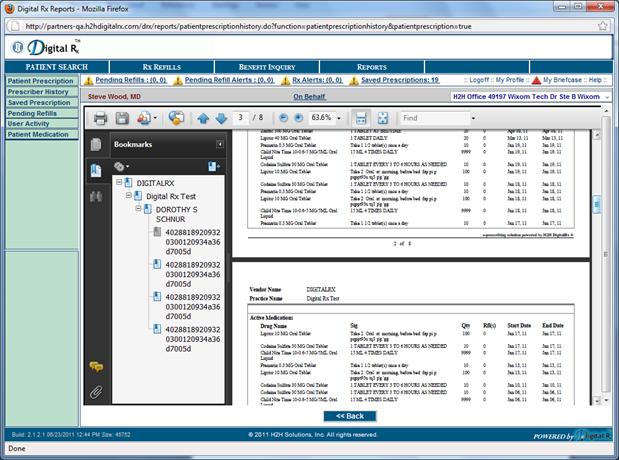
The 8 medication history tab provides a list of medications previously prescribed to the current patient selected. The user can select a drug from this list and add it as a new prescription on the Rx Pad from this field. Details about the medication including drug type, strength, dosage form, strength unit, route and any special instructions are available in the 8 medication history. Prescription or over the counter information along with the formulary status and available co- pay information can be found in the 8 medication history. The default view is the “Active Medication” list. You can always look at the complete history by clicking on the button labeled “Complete History” at the bottom of the page.
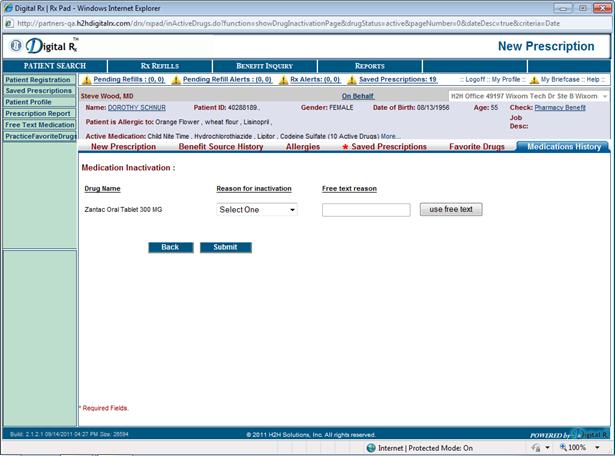
If a patient is no longer taking a medication the user must check the box next to the medication and click the button on the bottom that says “Inactive Drug(s)” in the medication history display screen. This will open a new screen to enter a “Reason for Inactivation” of the medication as shown below and a reason is required to be entered. The will remove the medication from the active list but will always be available on the complete history list.
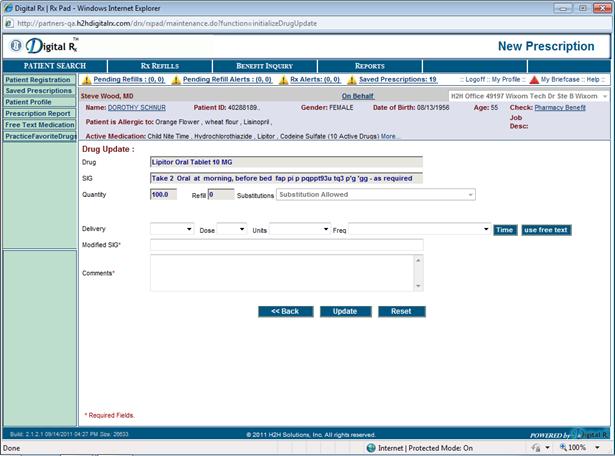
If a drug’s data needs to be updated, select the drug and click Update.
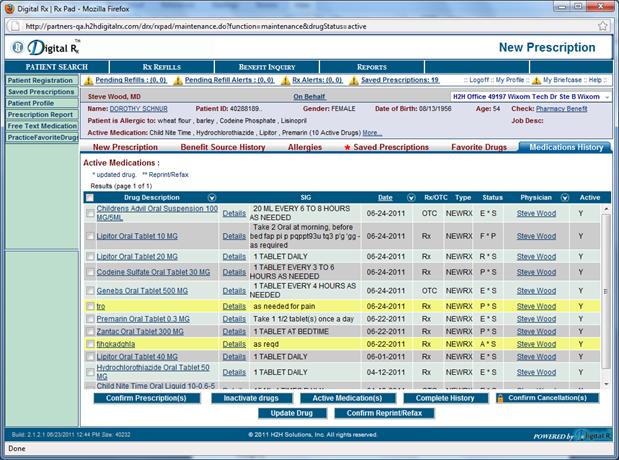
If a drug needs to be reprinted or re-faxed this can be accomplished through the Medications History screen in the bottom menu of tabs as demonstrated in the above screen shot.
. 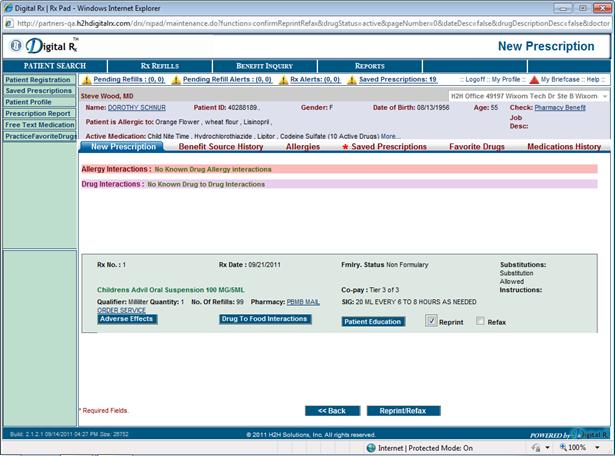
This function demonstrated in screen shot above (Reprint/Refax), allows to print the prescription and information to give to the patient or to be manually faxed if needed (see also on page 28).
![]()
![]()
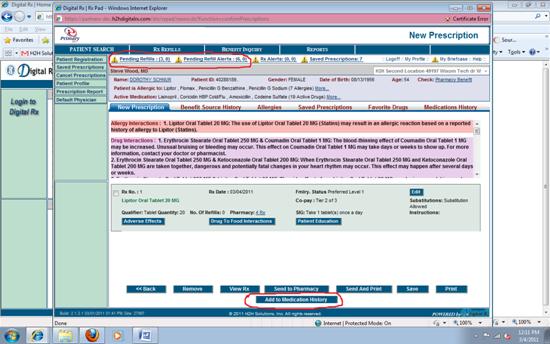
New button added to the confirm page (Add to Medication History) which will allow the user to add drugs which are currently being taken by the patient to the Medication History without actually prescribing the drug as shown above.
Further the following screen shots (see pages 32 and 33) demonstrates how drugs are classified by color in the medication history.
1) Free text will be displayed in yellow color
2) Previously prescribed drugs which are now obsolete are displayed in peach color and are not selectable
3) A problem and error in the transmission of prescriptions are displayed in pink

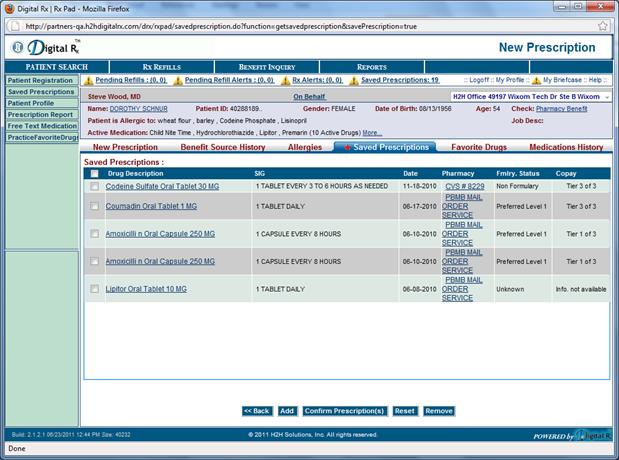
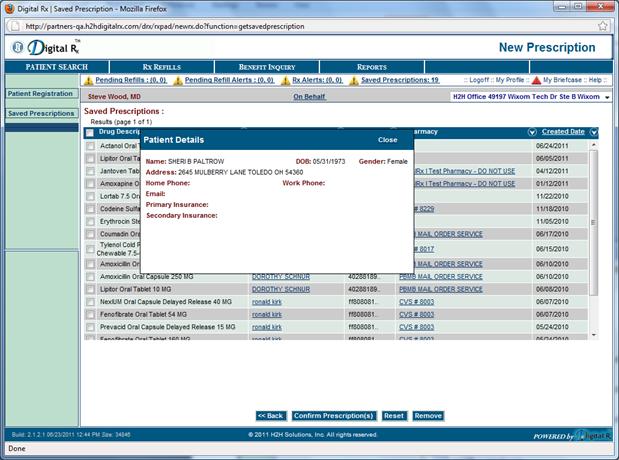
9 SAVE PRESCRIPTION
The save prescription tab enables physicians and other authorized personnel's to save the prescription generated for patients.
In both the screen shots given below give a detailed description. In the 1st screen shot the entire listing of patients with their drug description and pharmacy are been stated. While in the 2nd screen shot details per patient are been stated.
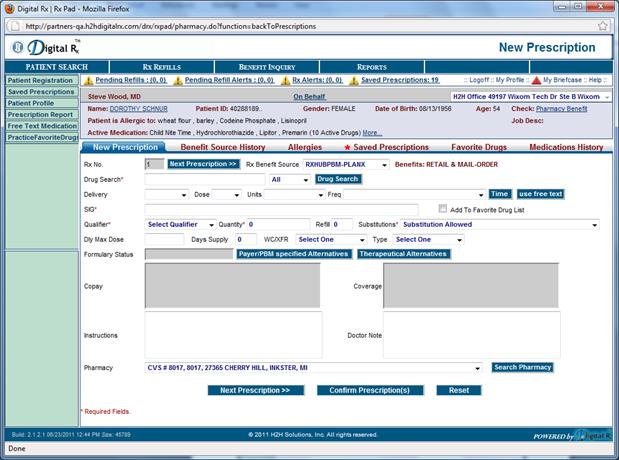
10 PHARMACY SELECTION WORKFLOW
The pharmacy field is a required field (unless printing the prescription) and provides the user with a list of pharmacies previously used by the patient by use of a drop down list. (As shown below)
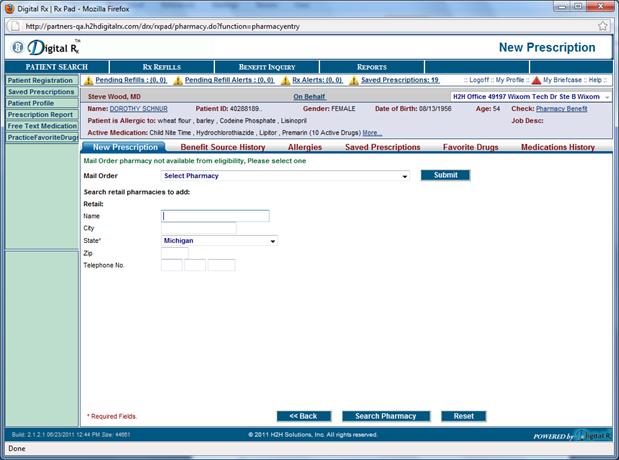
Or the user can press the search pharmacy button to begin a search for a convenient pharmacy location for the patient. You can search for Mail-Order or Retails pharmacies from this page. The search pharmacy page has optional fields for name, city, and zip code and phone. The state field is a required field as indicated by the asterisk*. User can also place the % symbol in the Name field as a wild card for a search for a pharmacy.
The user can select the search pharmacy button to obtain a list of pharmacies that meet the criteria provided. Common searches are by name in a given city or simply a location.
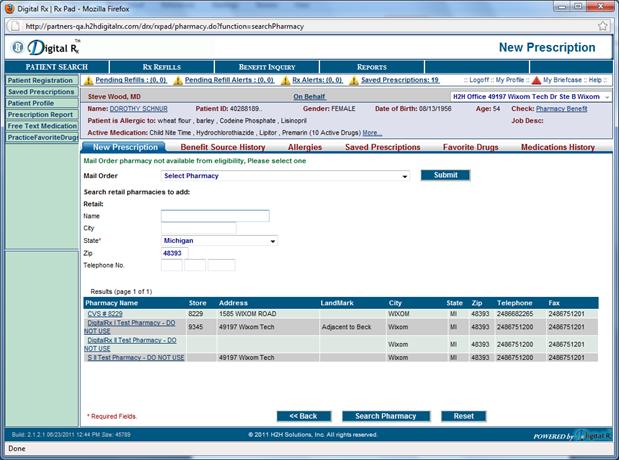
The user can select the location that is convenient to the patient by 8 clicking on that location, which will automatically fill in the pharmacy field. The user also has the option of selecting the reset button to clear the fields or the back button to go back to the Rx Pad page.
Quick Steps
1. 8 Click on the “Search Pharmacy” button on the 8 Rx Pad
2. Type location and/ or name of pharmacy
3. Identify the pharmacy that best matches the search criteria from the pharmacy search list.
4. 8 click the pharmacy name from the list
5. Continue to Step 5 to confirm the prescription
11 DRUG SCREENING
This segment of the user guide is focused towards interactions of drugs with each other and other multiple factors.
There are high chances of a patient taking multiple dosage of medication for different drugs. With the feature of 'Drug Screening', physicians at the time of assigning medications to patients can look into the following aspects:
(a)Can screen for drugs that do not conflict and have adverse negative effects at the time of consumptions i.e. Drug-Screening
(b)Can screen for drugs that do not cause allergy at the time of consumption i.e. Drug-Allergy
(c)Can screen for drugs that do not have adverse negative effects at the time of consumption in accordance with consumption of food i.e. Drug-Food
In addition to the above features drug screening also provides the following:
(a)Reporting of daily dose limit
(b)Patient new drug interactive with new drug
(c)Reporting and updating of duplicate drugs
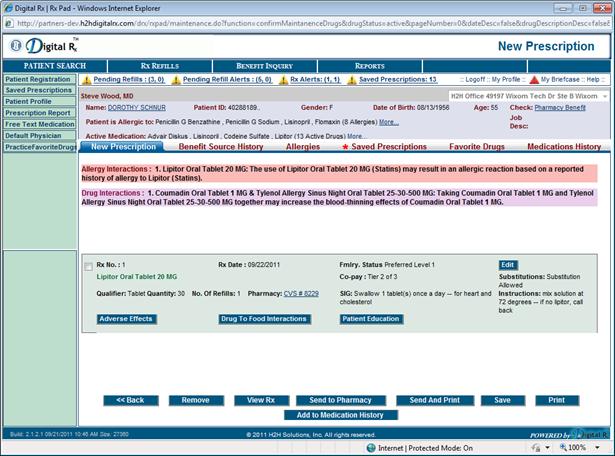
12 PRESCRIPTION CONFIRMATION
The final step in the process is to review the prescription summary and confirm the order before it is sent to the pharmacy. The patient information is carried over to this page. After 8 clicking “Confirm Prescription(s)” a window will appear to preview the prescription. The summary information includes the Rx number, date of the prescription, formulary status, co pay, medication name and dosage. If no drug interactions are found the screen will look similar to the following:

If any drug or allergy interactions are found, the program will notify the user. The following screen shows an example of this situation;
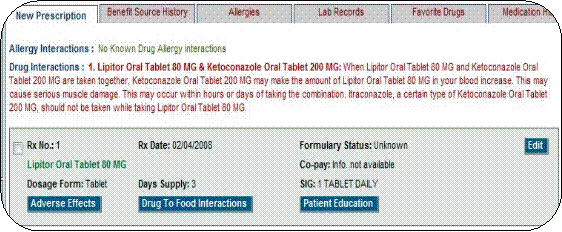 |
The user can also review a copy of generalized information about the medication prescribed by selecting the patient education button.
The user may also 8 click on edit which will take the user back to the Rx Pad for editing. When all editing is complete, the user must 8 click confirm prescriptions to continue.
The user 8 clicks on send to pharmacy when ready to submit the prescription. This will complete the process and return to the Rx Pad, veiw Rx will allow the user to see a copy of the prescription. Print is designed for situations where the patient would prefer to hand a printed Rx to the pharmacy rather than having the Rx sent electronically. When print at the front desk is selected, no electronic prescription is sent. Remove will remove the currently prescribed medication(s). Save will store the prescription for later use and can be accessed by clicking on the “Saved Prescriptions” tab on the Rx Pad. In Addition, for “Controlled Substances and/or Scheduled Drugs, they can be filled out and prescribed on the Rx Pad the same as any other medication, however, they can be Printed (Only) to either hand to patient or to be manually faxed according to Federal laws, regulations and guidelines given for each of the medications.
Quick Steps
1.
8
Click on “Confirm Prescription” from the 8
Rx Pad
2. Watch the screen for any interactions
3. Preview the Prescription
4. click on “Send to Pharmacy”
13 REFILL WORKFLOW
Click on Pending Refills or Pending Alerts
Next to the physicians name is an alert that will notify the user if a patient has requested a refill.
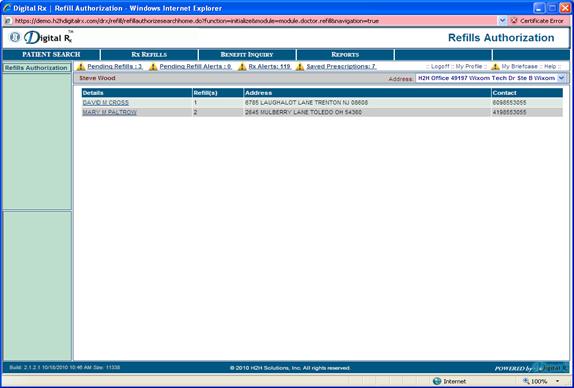
Click on the patient’s name (see screen shot above)
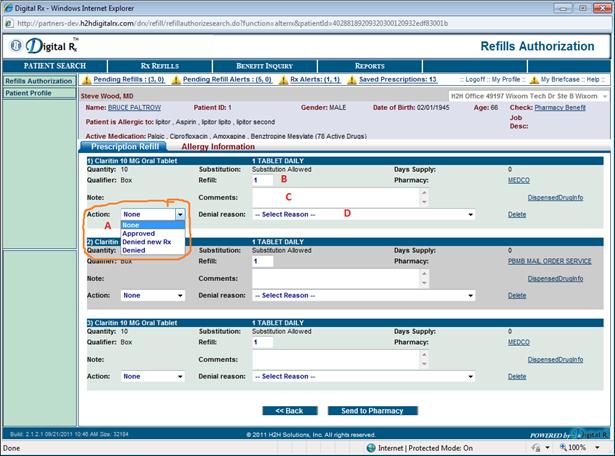
Once having clicked on the patient requesting the refill, all refills for that patient will show up. The user can approve or deny using the drop down “Action field” marked A above. The only fields that can be changed and/or updated are the refill quantity (marked B) and the comments field (marked C). If the refill is being denied, a reason has to be selected from the drop down box (marked D). If “Denied ” with the New Rx selected and “Send to Pharmacy” is clicked on, a denial transaction will be sent to pharmacy and the application will open the Rx pad with the drug details populated so that the new Rx can be sent.
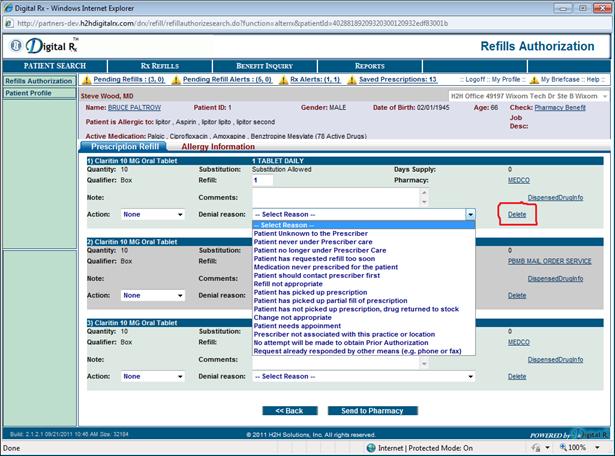
The denial reason codes are shown above. The user also has the option to delete the refill as shown above if the refill has been taken care of by calling into pharmacy, already manually faxed or a renewal request has already been sent to another pharmacy etc.

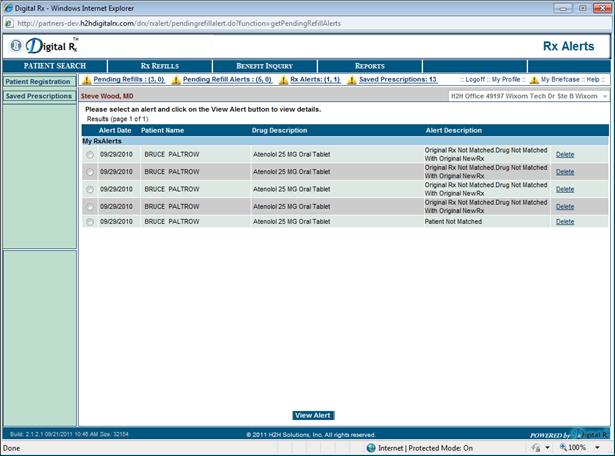
If the refill request coming in does not match with the patient data we have or the original Rx is not found (etc.), the request will go to the refill alert queue. When clicking on refill alerts, here is what the user will see (shown in screen shot above).
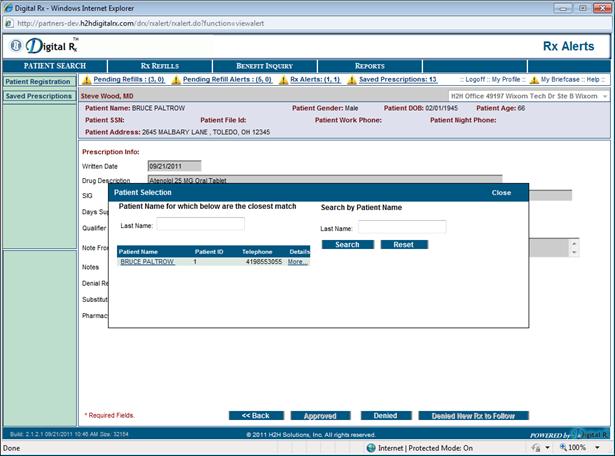
Select the one which indicates patient not matched and click on view alert. A pop up will be shown with the patient name(s) with the closest match within the Digital Rx Data Base with the one that came in the request shown above. The user can select the patient name if it is the right patient.
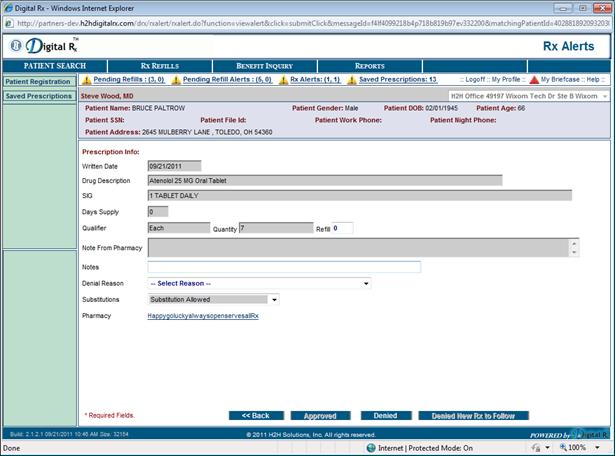
Upon selecting the patient from the pop up, the following screen will appear for approval or denial (as shown in screen shot above).
If the one which says “Original Rx” is not matched, drug not matched… as shown above is selected, the user will see the approved/denial screen shown on page 49.
14 RX ALERT WORKFLOW
Located at the top of the screen, uses the alert symbol to notify the physician that the pharmacy has questions regarding prescriptions they have received. The user can simply 8 click on Rx alert and will be directed to a listing of patient names including the drug description and alert type.
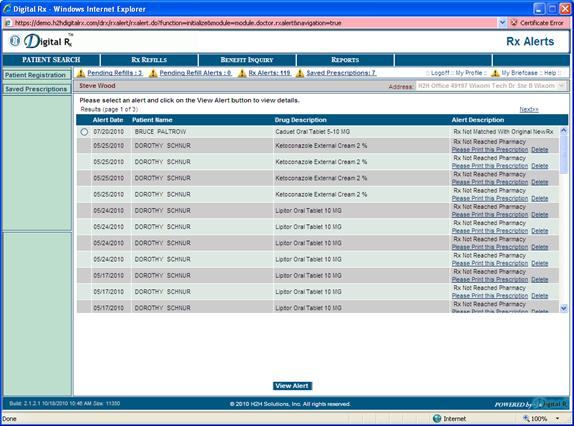
The user can select a patient by 8 clicking the circle next to the name of the patient, or by 8 clicking on the view alert button located at the bottom of the page, and will be directed to the prescription info page. The patient’s personal information, prescription detail, a drop down list of denial reasons, substitutions and pharmacy code and /name are provided on this page. The prescription is authorized by clicking on approved. The user can choose to deny the refill request by 8 clicking on denied, or denied new Rx to follow to alert the pharmacy that a new Rx will be forthcoming. If a printed prescription is desired than the user may select the print at front desk to be taken to an authorized pharmacy for refill. log off is found and the top right side of the 8 prescription list Page. When clicked directs the user back to the 8 log in screen.
While prescribing for a particular patient, a situation may arise where an RxAlert of Refill Request is brought to the user’s attention. These alerts are noticeable at the top where the yellow exclamation points indicated a pending alert or refill request.
While prescribing a new drug in a patient’s course of treatment, it may be appropriate to add the drug into a patient’s medication history to ensure that proper record is kept for the user and other physicians the patient may see. This feature can be utilized at the drug-interaction check screen in the bottom menu of tabs.
Both of the above features are demonstrated in the screenshot below.
15 REPORTS
The Repots page is loaded after clicking on the “REPORTS” tab. Type in the last name or part of the last name. Click on the “Search” button and a list of matching patients is pulled up.
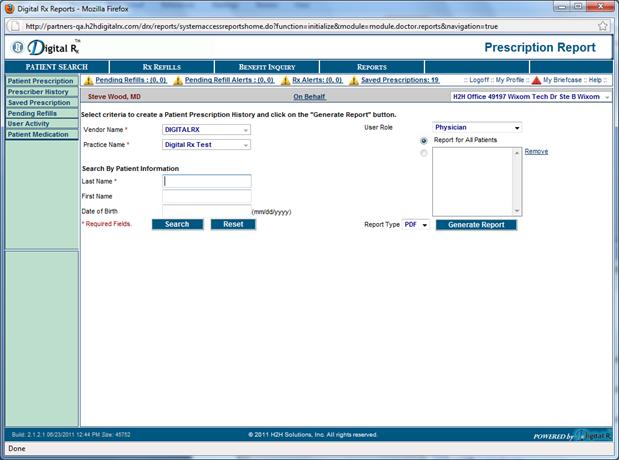
“Add” the desired patient and click on “Generate Report”. The report generated is displayed below.
16 PROFILE MAINTENANCE
16.1 PHYSICIAN
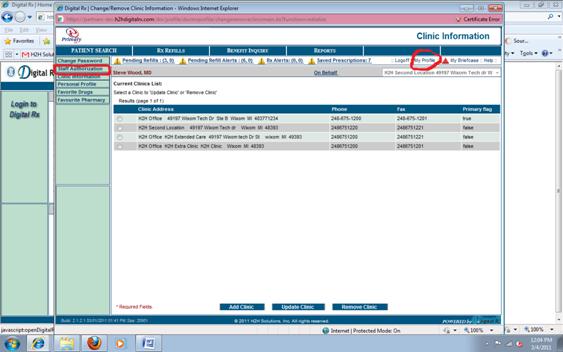
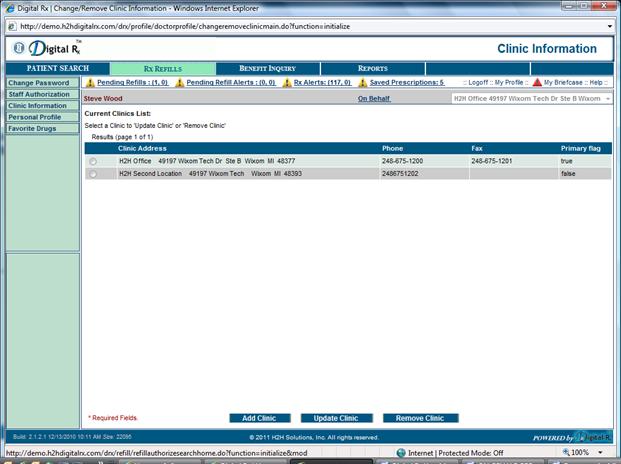
The physician’s profile page can be accessed by clicking on the “My Profile’ link on the top right corner of any page. Displayed below is the profile page that is loaded.
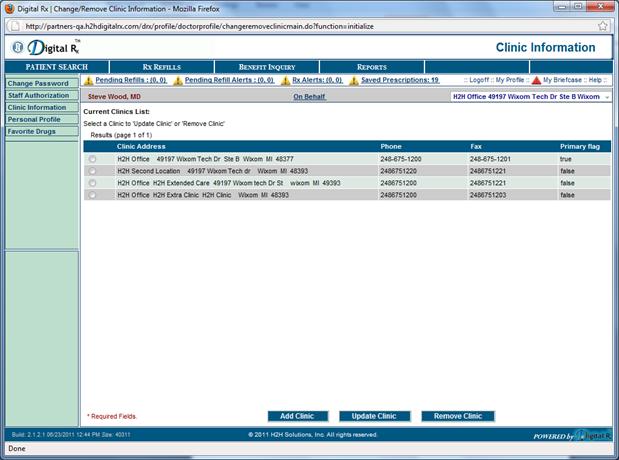
The physician can change password, update clinic information and update their personal information. The below screenshot indicates how to identify the Change Password and Clinic Information via the My Profile page.
The physician can also choose to allow additional staff authorization for use of Digital Rx, as determined by state and local laws. If legally allowed, the process for adding additional staff authorization is in the My Profile section and indicated in the screenshot below:
16.2 PATIENT
The patient’s profile page can be accessed by clicking on the “patient Profile” link on the upper left side of the RX Pad.
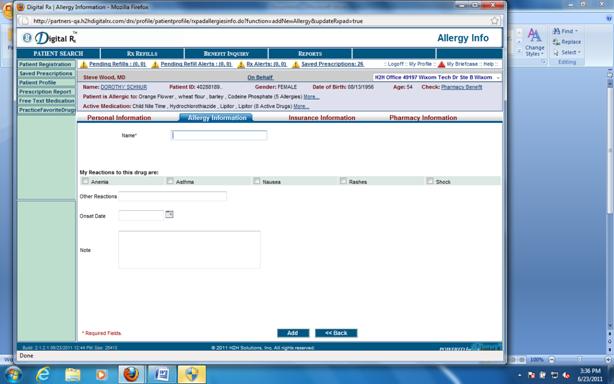
17 ALLERGIES
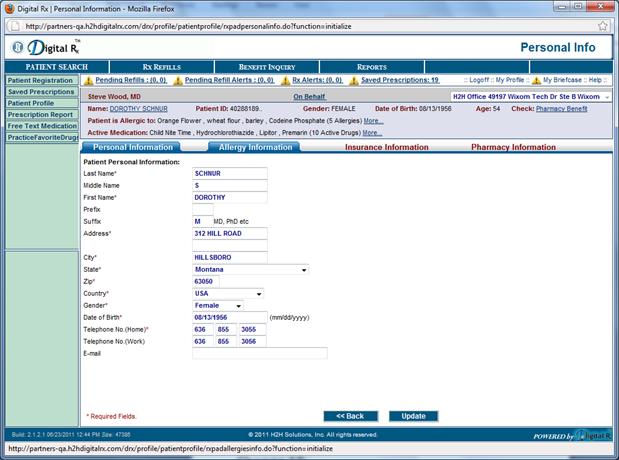
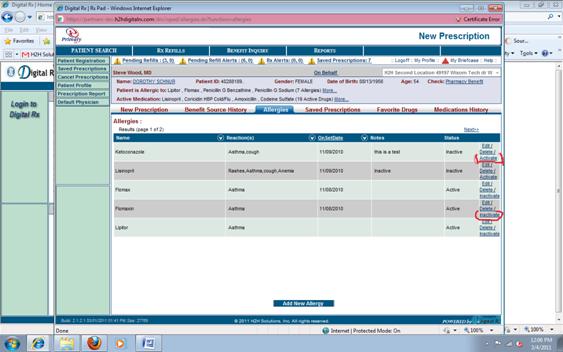
Patient allergies can be stored in our application for greater assistance when prescribing medications for the selected patient.
- Go to the “Patient Profile” tab on the left quick launch bar
- Click on the “Allergy Tab”
- To add a new allergy click “Add New Allergy” at the bottom
- Search for the drug that patient is allergic to
- Choose a common reaction or use free text to specify the reaction
- Click “Add”
- To edit an existing allergy, select the allergy and click “Update”
Additionally, physicians may choose to turn off particular allergy warnings depending on the specific patient’s treatment. The process for doing so requires clicking “inactivate” and is demonstrated in the screenshot below:
18 ON BEHALF PRESCRIBING
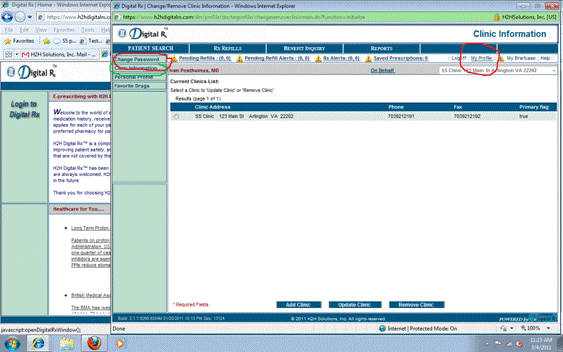
The Provider will log into the application and choose ‘My Profile’ found in the top right side this will take the user to the profile page.
![]()
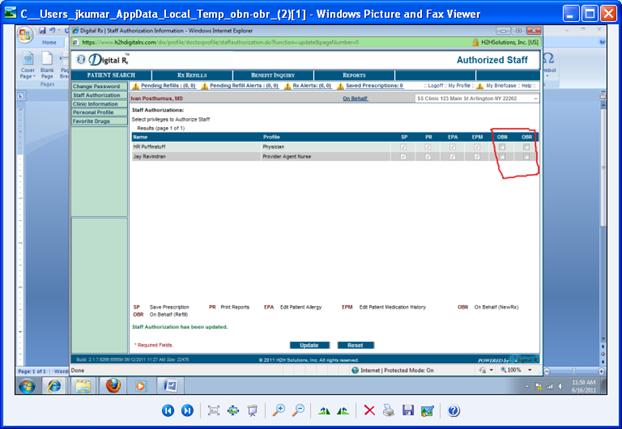
Inside the profile page on the left corner under change password select Staff Authorization.
![]()
The screen will display all Enrolled users in the practice with check boxes for OBN and OBR. If the User will be sending refills on behalf of ONLY, click on OBR. If the User will be sending New Rx and Refills, click on OBN check box and both will be enabled. Very Important you will be DENIED access to submit Prescriptions ON BEHALF OF if the proper boxes are not selected. Now Select Update option found at the bottom middle section of the page.
Now the Provider Agent (The person sending on behalf of the Provider) can sign in as themselves and choose the link On Behalf.
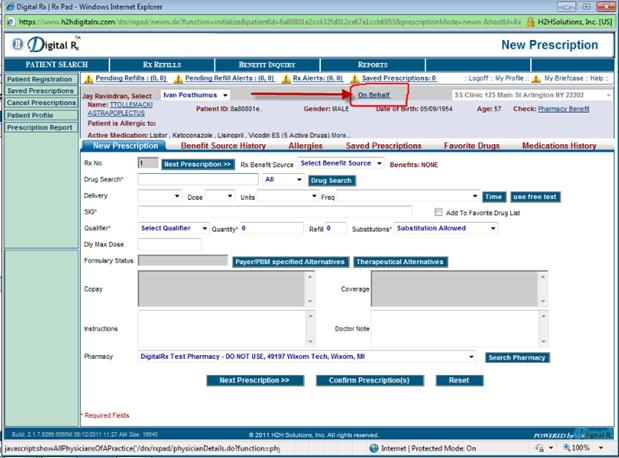
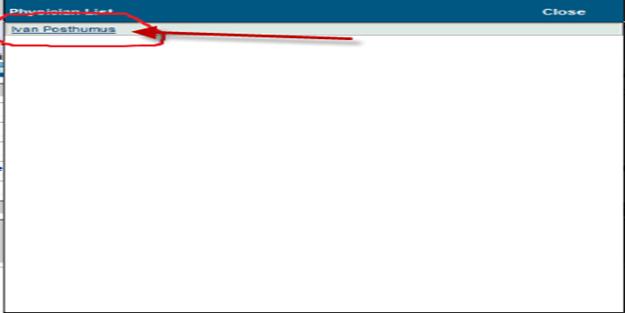
A pop up window will appear and you will be prompted to choose the Provider you are prescribing on behalf of.
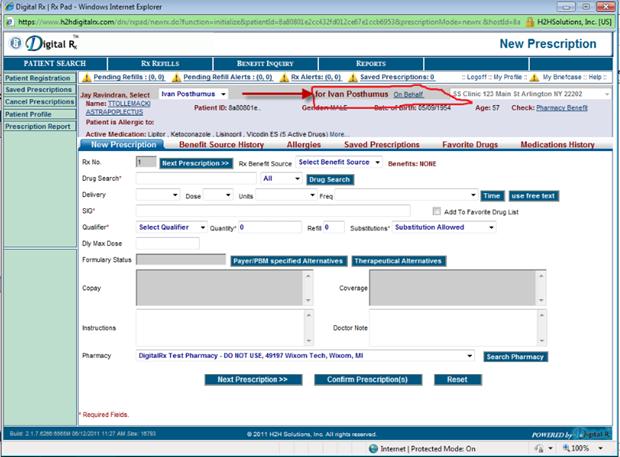
The screen will now display the physician’s name on whose behalf the user is working. Continue with the prescribing process and the confirm page will have the options to ‘Send to pharmacy’, ‘Print’ etc. enabled for the user.
19 Glossary of Terms
For the purpose of this document we are including a list of terms we have developed for understanding.
19.1 BRANDED/GENERIC DRUGS
The branded medication is generally only available through the original brand name. A generic drug has the same properties as the branded drug, however is manufactured by more than one company and may be a more cost effective option or required to guarantee payment by the benefit source.
19.2 COPAY TIERS
Copays describe the cost to the patient as defined by their benefit source. They can be defined by flat dollar amounts, percentages, or tier levels.
Tier levels are defined by the payer and as an example can mean lower pt copay for lower tiers of coverage.
19.3 DOSAGE FORM
Describes the medication form, such as tablet, capsule, liquid etc.
19.4 Formulary
In medicine, a listing of prescription drugs approved for use.
19.5 OTC/OVER THE COUNTER
Medication is available for purchase without a prescription from the physician or healthcare provider.
19.6 PAYER/PBM
Pharmacy benefit management
19.7 ROUTE
Describes the method for administration of a medication such as orally, injection etc.
19.8 SIG
Is Latin for “write” and informs the pharmacist about special instructions to add to the prescription label… for example “take this medication at bedtime”
19.9 THERAPEUTIC ALTERNATIVES
Therapeutic alternative medications are chemically different but have similar therapeutic effects. For example, acetaminophen and aspirin are different chemicals but because both are used for pain, inflammation and fever, they may be used as therapeutic alternatives.