OMNI Office Medicine(tm) for Windows XP
PATIENT CHARGE ENTRY (POS CHECKOUT)
OVERVIEW: The Patient Checkout program is used to record all
procedures or services provided for the patient.
The charges for each procedure are based on information
contained in the Charge Codes Dictionary and Coverage
Definitions Dictionary. The expected amounts will be
automatically listed on the patient and/or insurance
side of the ledger based on the patient's insurance
coverage. All procedures for a date of service for
one patient may be added onto a single entry screen.
PROCEDURE: From the Main Menu, select Option 2 and press <Return>.
The system will display a Medical Patient Checkout
screen.
______________________________________________________________________
EXAMPLE SCREEN:
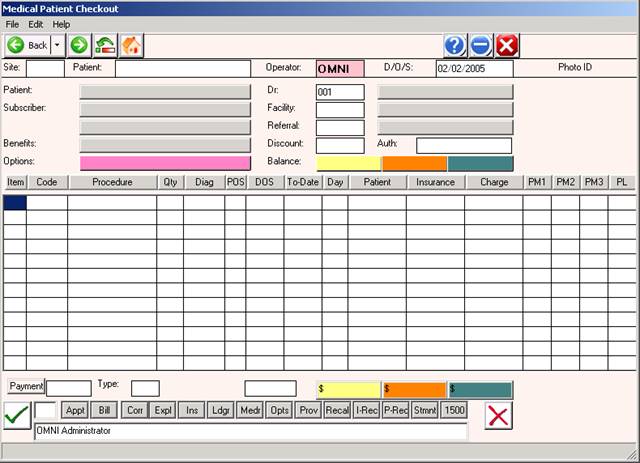
ENTERING A CLAIM:
ENTER ID: The system will default as to how you signed on. If it
does not, enter your user ID (generally the initials of your first
and last name in capital letters) and press <Return>.
ENTER DATE: The cursor will move to the MM/DD/YY section. If
the default date shown is the date of service, press <Return>.
Otherwise, type in a new date of service and press <Return>.
D/O/E stands for Date of Entry. This is the date
on which you entered the information into your
system and is stored in the ATLmmy file.
D/O/S stands for Date of Service. The D/O/S and
and D/O/E dates will be the same ONLY if you are
doing Patient Checkout on the same date that the
procedure was performed.
ENTER SITE: After you have entered the D/O/S, the cursor will
move to the ENTER Site prompt. The default is the current working
job. Once the Site Code prompt is satisfied, the cursor will move
to the PATIENT prompt.
NOTE: If your practice does not have more than one location,
the system will not ask you to list the jobs for processing.
Search: If you do not know the Site Code, type the first few
letters of the name of the Site and press the <Tab> key. A list
of jobs and their codes will be displayed to your screen. To
make your selection, type the line number of the SiteCode at the
flashing cursor or use the <Up>/<Down> arrow keys to highlight
the line and press <Return>.
Not Found: If you want to enter a Site but it is not listed,
you exit the screen when the cursor is at the ENTER CODE prompt
by typing 0 (zero) and pressing <Return>; type 0 (zero) again
and press <Return>. You should then go into the Dictionary Menu
and add the needed code(s) to the Site Code Definition module.
ENTER PATIENT: At this prompt you may do one of two things:
Enter the patient's name or enter the patient's ID code (a code
of up to 12-digits assigned to the patient). The zeros that
precede account numbers are automatically inserted by the system.
Example: For 000065-1, enter the 65-1, the system will insert the
zeros. Once entered, both the name and the ID code should appear.
The cursor will then move to the Dr.# prompt.
Search: If you enter a Patient ID code or name that is not on
file, your system will prompt at the bottom of the screen:
Patient Data Unavailable, <cr> to cont.,
To search for a patient, type the first few letters of the
patient's LAST name and press <Return>. The system will search
for names beginning with those letters and display a list to
your screen. Please see the example below.
EXAMPLE SCREEN:
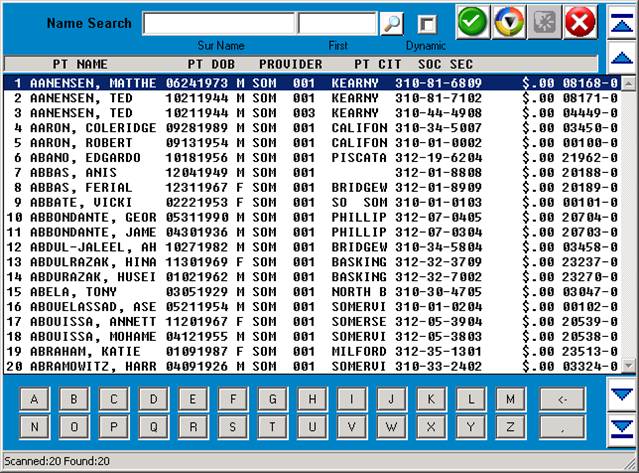
You may select the patient in one of two ways: (1) At the flashing
cursor, type the line number of the patient and press <Return>.
(2) Use the <Up>/<Down> arrow keys to highlight the desired line
and then press <Return>. Using either method, the system will
fill in the appropriate information on the Patient Checkout screen
and the cursor will move to the Doctor Number prompt (Dr.#).
DOCTOR #: The system will default to the provider code assigned to
this patient on their Patient Information screen. Press <Return>
to keep the default information. If you need to change the provider
number, you may type over the default information. Press <Return>.
There is an option switch you set at the FMCONTROL module which
activates the Resident Option. If you wish to screen the billing
of a resident provider vs. a non-resident provider, set this switch
to YES.
Search: At the Dr.#: prompt, enter a few letters of the doctor's
surname and press <Tab> to search all Dr's. alphabetically. To
select the doctor, type the number to the far left of the name
and press <Return> or use the <Up>/<Down> arrow keys to highlight
the name and then press <Return>. The system will fill in the
physician information.
FAC-REF: The cursor will move to the FAC-REF: section. This
is a two-step entry.
FACILITY CODE: Enter the Facility Code (up to a 6-character
code from the Facility Code Dictionary) and press <Return> or
press <Return> to enter the default Facility Code defined on
the Patient Information screen. If the Facility Code field
is blank, the Facility Code will appear blank to indicate that
the procedure was performed in the provider's office.
e.g.: FAC-REF: HF HENRY FORD HOSPITAL
Search: If you do not know the Facility Code, type the first
few letters of the name of the facility and press the <Tab> key.
A list of facilities and their codes will be displayed to your
screen.
To select the facility, type the line number of the desired
facility, or use the <Up>/<Down> arrow keys to highlight the
facility and then press <Return>.
Not Found: If the facility you need to enter is not among those
listed, exit the search screen when the cursor is at the ENTER CODE
prompt by typing 0 (zero) and pressing <Return>; type 0 (zero)
again and press <Return>. You should then go into the Dictionary
Menu and add the needed code(s) to the Facility Codes Dictionary.
REFERRAL CODE: Next, enter the referral code (up to an eight
character code from the Referral Code Dictionary) and press
<Return>.
e.g.: FAC-REF: HF HENRY FORD HOSPITAL
A01 ANDREW APPLESEED MD
Search: If you do not know the Referral Code, type the
first few letters of the name of who referred this patient
to the provider and press <Tab>. A list with codes will
be displayed to your screen.
You may select the referral source by typing the line number
of the desired referral, or use the <Up>/<Down> arrow keys
to highlight the referral source and then press <Return>.
Not Found: If the Referral you need to locate is not listed,
exit this screen when the cursor is at the ENTER CODE prompt.
To do this you press <Return>. Your system may or may not
display the following prompt: ENTER PRINT FORM? (Y/N).
If this prompt is displayed, type an N and press <Return>.
The cursor will now be flashing at the ENTER CODE prompt.
Type 0 (zero) and press <Return>; type 0 again and press
<Return>. The system will take you to the Main Menu. From
here you should select the Dictionary Menu and add the
needed code(s) to the Referral Codes Dictionary and then
return to Patient Checkout.
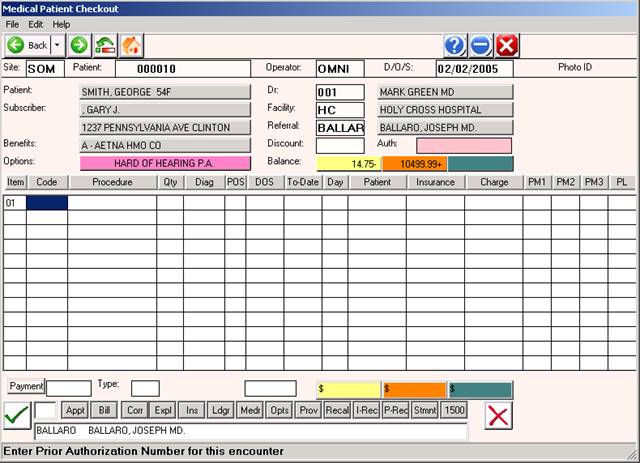
Example of screen with FAC-REF areas filled in.
DISCOUNT: If this patient is to receive a discount, enter the
amount of the discount at this prompt. Press <Return>.
CRNA: Certified registered nurse anesthetist. This prompt is
displayed only if the provider is an anesthesiologist.
ASSIGN: The following numerical entries for the patient's
coverage code dictate what will be displayed at this prompt.
The Coverage Definitions Dictionary is where these entries
are made.
1=The claim will be marked Y (Accept Assignment)
The expected amount(s) from the Charge Codes
Dictionary, based on the patient's coverage code,
will be entered as the insurance balance.
2=The claim will be marked N (Do Not Accept Assignment)
The expected amount(s) will be entered as the patient's
balance.
3=The system will prompt ACCEPT ASSIGNMENT? Y/N (Decide)
ASSIGN CARRIER: A window will open listing all of the patient's
insurances. This allows you to select a carrier other than
the primary carrier. If you press <Return>, the primary
carrier will automatically be assigned.
EXAMPLE SCREEN:
1. 100 NEW YORK LIFE 01011990 - 12319999 <O
2. MDKY KENTUCKY MEDI 01011990 - 12319999
3. BS BLUE CROSS IN 01011990 - 12319999
To select a carrier, enter the line number of that carrier at
the flashing cursor or use the <Up>/<Down> arrow keys to high-
light the line and press <Return>.
FORM: The following entries made in Form field of the patient's
coverage code (see Coverage Definitions section of the Dictionary
Menu) dictate what will be displayed at this prompt.
1=the system will display Y (Print Form)
2=the system will display N (Do Not Print Form)
3=the system will prompt PRINT FORM? (Y/N) (Decide)
PRIOR AUTHORIZATION: If you enter PA in Option 1 or Option 2
in Patient Information, the system will prompt you to enter a
Prior Authorization number on each claim entered for this patient.
The letters PA will be displayed above the word PROCEDURE.
If Needed: Type the Prior Authorization number for this
claim and press <Return>.
Not Needed: If a Prior Authorization number is not needed for
this claim, or the number is not available, press
<Return> to skip past this area.
Needed But
Not Available: If a Prior Authorization is necessary and
not available, you will be able to input the
Prior Authorization Number for this claim in
Automated Billing. Just press <Return> to
bypass this field.
2ND CLAIM? Y/N: If there was a claim previously entered on
this patient for this date of service, the system will alert
you that a claim has been entered for this date with the
2ND CLAIM prompt.
You may proceed to enter a second claim by typing Y and pressing
<Return>. Use the same procedure you did to enter the original
claim.
PRINT FORM? (Y/N): If the coverage code is set to ask PRINT
FORM this prompt appears, otherwise it does not.
If you type Y (yes), the system will Batch Bill this account.
If you type N (no), this account will have to be individually
billed. Once you have answered this prompt, the Patient Checkout
screen will update and the cursor will be flashing at the ENTER
CODE prompt.
COLLECTION DATABASE: If the patient is set up in the Collection
and show the balance on the patient's ledger.
BALANCE: The current balance for this patient is shown on
the line labeled "$Bal ->". The patient balance appears
above PT.AMT; the insurance balance appears above INS.AMT;
the sum of both appears over CHARGE.
ENTERING A PROCEDURE CODE OTHER THAN ONE FOR ANESTHESIA
ENTER CODE: Enter the code (one through five characters) for
the procedure performed and press <Return>. All procedures
must be entered in the Charge Codes Dictionary and have a code
assigned before you can use them.
Procedure Not On File: If this procedure is not on file, the
system will prompt at the bottom of the screen:
Procedure Data Unavailable, <cr> to cont.
Press <Return> to continue entering other services performed
for the patient or <Tab> search.
<Tab>=Search: = Press <Tab> to have a window open listing
procedure codes (numerically/alphabetically)
or enter a few letters/numbers of the Procedure
Code and press <Tab>. Example below.
EXAMPLE SCREEN:
SELECT or SEARCH:
01 EKG AA .EKG
02 76091 AA .MAMMOGRAPHY BILATERAL
03 90050 AA .OFFICE VISIT EXTENDED
To make your selection, type the line number at the flashing
cursor and press <Return> or highlight the line using the
<Up>/<Down> arrow keys and press <Return>.
<Tab>=Add: Press <Tab> to add a procedure code to the
Charge Codes Dictionary. After you have added the
code, type 0 (zero) and press <Return> to go back to
where you were in Patient Checkout.
<Down> Arrow Key: Pressing the <Down> arrow will repeat the code
on the line above. If the DATES OF prompt (in the Charges Codes
Dictionary) is set to Y, the date of service will advance by the
quantity shown if it is more than one.
<Up> Arrow Key: Allows you to navigate all the way back to the
physician number and not loose any procedure or line item
information.
Correcting An Error: Use the Back Space to correct an error.
<Home> to View Ledger: Once you are at an ENTER CODE prompt, you
may press the <Home> key to view the ledger. The system will ask:
TYPE OF LEDGER (F)AMILY, (P)ATIENT
Enter F for Family Ledger or P for Patient Ledger. The cursor
will begin flashing at the STARTING DATE prompt. Type in the
desired date and press <Return>. The cursor will move to the
Going Back To prompt. Enter the desired date and press <Return>.
The system will begin sorting. Upon completion, a window will
open allowing you to select the Ledger Type. Example below.
EXAMPLE SCREEN:
1. FULL DISPLAY <O
2. CHARGES ONLY
3. ALL PAYMENTS
4. PATIENT PAYMENTS
5. INSURANCE PAYMENTS
6. ALL NOTES
7. EXTERNAL NOTES
8. INTERNAL NOTES
9. STATEMENTS
10. OPEN PATIENT ITEMS
Select the Ledger Type and press <Return>. Example below.
EXAMPLE SCREEN: FULL DETAIL LEDGER CARD
2004 #000300 LIKES AM APPT NEXT APPT IN A YEAR PAGE: 1
PATIENT : JONES, JANE FAMILY :00/00/0000 00/00/0000
SUBSCRIBER: JONES, JANE $78.00 $00.00
ADDRESS : 111 SUNSET ROSEVILLE MI48066 PATIENT:00/00/0000 00/00/0000
CARRIER(S): BCBS TYPE: 1_________________ $78.00 $00.00
DATE DR PROC DX DESCRIPTION BILLED INSBAL PTBAL INSAMT PTAMT BY SB
072195 001 69210 38870 EAR IRRIGAT 13.00 13.00 .00 13.00 .00 HS
072195 001 0 0 Patient and Insurance Charges 022195 13.00+ .00+HS
BILLED:
JANE BALANCE 072195 1 13.00+ .00+
070195 001 57500 V726 BIOP CERVIC 65.00 65.00 00.00 65.00 .00 HS
070195 001 0 0 Patient and Insurance Charges 020195 .00 .00 HS
BILLED:
JANE BALANCE 070195 1 65.00
(S)tart Over, (B)ackup, (T)ype of Ledger, (I)nsurance, <Ret>=Cont, Esc=END
(S)tart Over: Takes you to the following ledger prompt:
TYPE OF LEDGER (F)AMILY, (P)ATIENT
(B)ackup: Takes you to the previous screen.
(T)ype of Ledger: Opens a window allowing you to select a ledger
type to view.
EXAMPLE SCREEN:
1. FULL DISPLAY
2. CHARGES ONLY
3. ALL PAYMENTS
4. PATIENT PAYMENTS
5. INSURANCE PAYMENTS
6. ALL NOTES
7. EXTERNAL NOTES
8. INTERNAL NOTES
9. STATEMENTS
10. OPEN PATIENT ITEMS
(I)nsurance: Opens a window that displays expanded insurance
information (policy information and insurance
balances are shown). Example below.
Esc=END: Displays the Auxiliary Function Line shown on the
next page.
(H)ARDCOPY, (R)EDRAW, (T)YPE OF LEDGER, (I)NSURANCE, <RET> to Cont:O
(H)ARDCOPY: To print a hardcopy of the ledger, type H and press
<Return>. A screen similar to the one below will be displayed.
EXAMPLE SCREEN:
<Please Select Output Device>
1. HP 1320 (LP)
2. Okidata 320 (P1)
3. HP Laser 4200N (P2)
4. Your Terminal Screen (TR)
5. ----> EXIT <----
Select the appropriate output device and press <Return>.
(R)EDRAW: To redraw the screen, type an R and press <Return>.
(T)YPE OF LEDGER: Opens a window allowing you to select a ledger
type. Example below.
EXAMPLE SCREEN:
1. FULL DISPLAY <O
2. CHARGES ONLY
3. ALL PAYMENTS
4. PATIENT PAYMENTS
5. INSURANCE PAYMENTS
6. ALL NOTES
7. EXTERNAL NOTES
8. INTERNAL NOTES
9. STATEMENTS
10. OPEN PATIENT ITEMS
(I)NSURANCE: Opens a window that displays expanded insurance
information (policy information and insurance
balances are shown). Example on previous page.
<RET> to Continue: Returns you to the ENTER CODE prompt of the
Patient Checkout screen.
Esc=END: To exit Patient Checkout from the ENTER CODE prompt, type
0 (zero) and <Return>. If charges were entered, total out. If no
charges were entered, the cursor will move to the ENTER ID prompt.
Zero and <Return> again to go to the Main Menu.
ENTER AN ANESTHESIA PROCEDURE CODE:
ENTER CODE: Enter the anesthesia procedure code and press <Return>.
All procedures must be entered in the Charge Codes Dictionary and
have a code assigned before you can use them.
Procedure Not On File: If this procedure code is not on file,
the system will prompt at the bottom of the screen:
Procedure Data Unavailable, <cr> to cont.
Press <Return> to continue entering other anesthesia procedure
codes for the patient or press <Tab> to search.
<Down> Arrow Key: Pressing the <Down> arrow will repeat the code
on the line above. If the DATES OF prompt (in the Charges Codes
Dictionary) is set to Y, the date of service will advance by the
quantity shown if it is more than one.
Correcting An Error: When entering a code, use the Back Space
to correct an error.
<Home> to View Ledger: Once you are at an ENTER CODE prompt, you
may press the <Home> key to view the ledger. The system will ask:
TYPE OF LEDGER (F)AMILY, (P)ATIENT
Documentation on viewing a ledger is on page 9.
Anesthesia Concurrency Screen: After you 0 (zero) and <Return>
at the ENTER CODE prompt, a window will open as shown below.
EXAMPLE SCREEN:
Physical Stat : Age: Emergency:
Start Time: : Ending: 00:00
CONCURRENCY CHECK
CALCULATED FEE: .00
ACCEPT FEE Y/N: ( )
ENTER UNITS:
ENTER FEE :
RATE/UNIT : MINS/UNIT : B+MODS:
BASE UNIT : ADD UNITS : TIME:
ROUND AMT : MEDCR MAC : TOTAL:
DEFINITION OF FIELDS:
Physical Status: Choices are 1, 2, 3. You need to define these
in the Charge Codes Dictionary as P1, P2, P3. How you define
these (healthy or ill, including OBs) will vary by insurance
compamy.
Age: Choices are Y (yes, age is a factor= over 70 or less than
one year) or N (no, age is not a factor. You will also need to
define age in the Charge Codes Dictionary as AGE.
Emergency: Choices are Y (yes) or N (no). Again, you will need
to devine these in the Charge Codes Dictionary as EMG.
Start Time: Enter time anesthesia was started.
Ending: Enter the time anesthesia was ended.
CONCURRENCY CHECK: A check to see if the anesthesiologist is
concurrently serving more than one patient.
CALCULATED FEE: Calculation based on rate and units for procedure
performed.
ACCEPT FEE Y/N: If you need to start over, press <Return> at this
prompt and the cursor will move to the Start Time prompt.
Y = calculated fee is acceptable.
N = calculated fee is not acceptable.
If you enter an N, the prompt below will be displayed.
ENTER UNITS: Enter the units of administered anesthesia. The fee
will be recalculated and the new calculation will be displayed.
The system will then prompt:
ACCEPT FEE Y/N: Y = calculation correct- fee acceptable.
N = calculation not correct- fee not acceptable.
Once you enter Y and <Return>, the window will close and you may
continue with patient checkout.
The fields below have been defined in the Provider and Charge Codes
Dictionaries. They are not fields you can edit in this window.
RATE/UNIT : Dollar amount charged per unit.
BASE UNIT : Base units used for this procedure.
ROUND AMT : Amount to round up to the nearest dollar amount.
(Often used by private carriers in patient billing.)
Example: 7 units at $43.25 per unit generates a total charge
of $302.75. By entering the number 10 in the ROUND AMT
field, this charge amount would be rounded to $310.00.
MINS/UNIT : This is the number of minutes per unit.
ADD UNITS : Additional units to add to each procedure
automatically.
MEDCR MAC : This is the Medicare MAC amount.
B+MODS: This is base plus modifiers.
TIME: Number of anesthesia units for time.
TOTAL: Total of B+MODS and TIME.
PROMPTS
ENTER CODE: The first prompt will be _____ENTER CODE. You
enter the procedure code and press <Return>.
The various fields that were given a Yes answer
in the Charge Codes Dictionary will be displayed
for you to answer.
The screen below is an example of where the
various prompts will appear.
EXAMPLE SCREEN:
PAGE:01 MEDICAL PATIENT CHECKOUT D/O/E: 08/01/95
AA 000030 AA 002 DR 002
NAMES: SMITH, MARY FAC-REF: BS HF HENRY FORD HOSPITALB
_______________________ AO1 ANDRE APPLESEED MD
10785 S. SAGINAW BS DISC:N AA 002 ASGN:Y FORM:YB
P.A. $BAL-> 100.00+ .00+ 100.00+B
PROCEDURE DAY DATE DX # CODE PT.AMT INS.AMT CHARGE
90060 ICD DIAG?____
Pt.=
Pc.=
EXAMPLE OF PROMPTS:
QUANTITY? DISCH?_______
PLACE/O/S? (3 3 3 3) MISC?________
ICD DIAG?_______ PM-1?
Pt.= PM-2?
Pc.=
PL:
DOS?_______
TO?________
ADMIT?_____
*QUANTITY: Enter the number of times this service was performed
on this date.
*PLACE/O/S: At the PLACE/O/S prompt, indicate the place where
the procedure was performed. (i.e.: 1=inpatient
hospital, 2=outpatient hospital, 3=office, etc.
These codes are defined by BS, MR, and MD.) The
system will prompt you with the information as
previously entered in the Charge Codes Dictionary
as the usual and customary PLACE OF SERVICE. If
you press the <Return> key, the system will
default to P/O/S in the Dictionary.
*ICD DIAGNOSIS: Enter the 3-5 digit ICD diagnosis code and press
<Return>. This is a mandatory field.
Search: If you do not know the diagnosis code, type the
first few letters of the diagnosis and press the
<Tab> key. A list of codes with their description
will appear on your screen. Type the number to
the left of the diagnosis and press <Return>.
The system will complete line one in the body of
the entry screen. A description of the diagnosis
will appear at the bottom of the screen. The cursor
will be flashing at a new ENTER CODE prompt if there
are no other prompts that need to be satisfied.
Not Found: If the diagnosis you need is not found on your
system you may go ahead and use the diagnosis
code as found in the ICD9 book. The code will be
listed without a description until you add it to
the Diagnosis Library.
Default for If the patient has a diagnosis listed in Patient
Pat. Info. Information screen, it will be displayed. This
Diag.Code: is shown as "Pt.= ". If the diagnosis is
correct, press <Return>; otherwise, type the
correct diagnosis.
Default for If this procedure code was assigned a diagnosis in
Procedure the Charge Codes Dictionary, it will be displayed
Code: This is shown as "Pc.= ". If several codes are shown,
enter the correct one and press <Return>. If there
is NO diagnosis listed in Patient Information, the
first diagnosis listed under the procedure code is
the default when you press <Return>.
Problem At the DIAG? prompt, you may press the <Down> arrow
Diagnosis to obtain a diagnosis history on this patient. A
List: window will open (example on the next page) displaying
this information. Use the arrow keys to highlight the
correct diagnosis and press <Return>. The system will
automatically complete the Checkout Line for you.
EXAMPLE SCREEN:
1. 2500 DIABETES
3. 5990 URINARY TRACT INFECTION
DIAG: When entering additional procedures, the default
(cont.) diagnosis will be the last diagnosis code used.
Example: OV ICD DIAG?_____
Pt.=78650
Pc.=4019 486 78650 2859
*D/O/S: If this procedure was performed on a date different
(from) from the date of service entered at the top of the
screen, type the correct date (mmddyy) and <Return>.
From and To dates advance automatically when the
DATES OF field in the Charge Codes Dictionary
is set to Yes. This will also calculate correctly
when the quantity (MULTIPLES) field in the Charge
Codes Dictionary is set to Yes.
*TO: The date performing of the procedure ends.
(i.e., Subsequent hospital care days.)
*ADMIT: Enter the DATE the patient was ADMITTED to the
hospital and press <Return>. If there was no
admission date, press <Return>.
*DISCH: Enter the DATE the patient was DISCHARGED from the
hospital and press <Return>. If there was no
discharge date, press <Return>.
*MISC: Enter the MISCELLANEOUS DATE and press <Return>.
(This date is used as the date of injury, L.M.P.,
onset of symptom, etc. and prints in box number 24
on the Michigan Health Benefits Claim form.
*PM-1 AND If the procedure requires a MODIFIER that may vary
PM-2: depending upon the specific circumstances for this
procedure code, enter the MODIFIER and press <Return>.
Presssing the <Up> arrow on the second price modifier
will allow you to edit the first price modifier.
A <Return> will use modifiers as defined in the
Charge Codes Dictionary or bypass the field.
AMT/CHARGE: Will prompt for amount/charge if amount #1 in
Charge Code Dictionary is left blank.
**PROBLEM LIST: This prompt, if turned on in the FMCONTROL program,
writes to the Problem List page of Patient Information.
The default for this prompt is N (no).
* Will be asked only if prompt is turned on in the Charge Codes
Dictionary.
ACCOUNTING SECTION
PRICE CHANGE: To change the amount on an entered procedure,
Hold down the <Shift> and then press the <Tab> key. The
cursor will move to the amount columns and permit you to change
the dollar amount. Use the <Right> Arrow key to move from the
left column to the right columns.
If you list an amount lower than the original,
the claim will still indicate the original billed amount.
If you list a higher amount, the claim will
show the higher amount.
The difference in $ figures will appear as an
adjustment on the Monthly Financial Report.
VARIABLE PRICE: If you left amount #1 blank in the Charge Codes
Dictionary, you will be prompted to enter the price during
patient checkout. You must have an amount listed on Line 1 for
each procedure code, or you will be prompted for a price.
12 LINE ITEMS: The screen will allow you to put in up to 12
claim lines before it prompts ADDITIONAL PAGE? Y/N. If you
have more claim lines to enter for this patient, type Y and
press <Return>. This will create an additional page and allow
you to continue. If this was your last entry for this patient,
and you do not need an additional page, type N and press <Return>.
PROCEDURE(S) When all procedure codes have been entered for
ENTERED: this patient, type 0 (zero) and press <Return>
at the ENTER CODE prompt. PT.AMT, INS.AMT,
and CHARGE AMT are calculated and entered as a
SUBTOTAL by the system.
The TOTAL balances contain both the previous
balance as well as the charges for the claim(s)
just entered.
BALANCE: The current balance for this patient is shown on
the line labeled $Bal->. The patient balance is
above PT.AMT.; insurance balance is above INS.AMT.;
and the combined total is above CHARGE.
AMOUNT PAID: At this prompt, enter the amount paid and press
<Return>. The system will assume you are
entering whole dollar amounts unless you include
the decimal point.
Example: 1=one dollar
1.00=one dollar
100=one hundred dollars
PAYMENT TYPE: Enter the code for the type of payment received.
Codes for Payment Type are set up in your
Transaction Codes Dictionary.
The most commonly used are : C=cash, K=check,
and V=charge.
EXPLAIN: If the toggle for this prompt is set to yes, it
will display and you may proceed as follows:
Enter up to 50 characters if needed, or press
<Return> to skip. Information entered here will
appear on Line 19 of the Medicare/AMA HICFA
form or box 23 of the AMA 1500 form or box 39 of
the Blue Shield Health Benefits claim form. You
may enter up to 50 characters. Press <Return> to
skip.
FINAL AMOUNTS: Final dollar amounts are then calculated and
recorded by the system. The new current
balances are now shown at the bottom of your
screen in the appropriate sections.
PT.AMT INS.AMT CHARGE
The patient balance is below PT.AMT and contains
the previous balance, plus the current patient
charges, minus the patient payment.
The insurance balance is below INS.AMT and
contains the previous insurance balance, plus the
current insurance charges.
The combined total is below CHARGE and contains
the previous balance, plus the current charges,
minus the payment.
There is an auto adjustment which represents the
difference between the gross and expected amounts.
ACTION LINE FUNCTIONS:
V= VERIFY: If information is correct, type V and press <Return>.
The system will ask:
INVOICE? Y/P/N: The Patient Checkout program will provide each
patient with an ITEMIZED RECEIPT/INVOICE for
each visit. This receipt will be printed on
plain white paper.
Default=N: If you press the <Return> key, the system will
default to No and will not print an invoice.
Y: Enter Y and press <Return> to print out a standard
invoice containing both the patient and insurance
balances. This receipt will contain all the
necessary information for the patient to submit
to their insurance company for reimbursement. The
receipt will total the above procedures billed,
indicate if any payment was made, any previous
balance, and list the current balance of the
account.
P: Enter P and press <Return> to print out an invoice
containing only the amounts owed by the patient.
APPT/RECALL? Do you wish to have the system help you keep
1/2/R/N: track of when this patient is due to return
to the office?
1 or 2: By entering either 1 or 2 the screen will go
to item Number 13 on the Main Menu which is the Time
Management System.
1 and 2 are both appointment scheduling
programs. The only difference is the
format they use.
For a further explanation, please see the corresponding
section in this manual.
R=Recall: If this patient should be set up with a recall
date. Type R and press <Return>, the screen will prompt:
ENTER RECALL DATE: MMDDYY TIME: HHMM
PROC:____1/2/R/N:R
Type in the date to be recalled. If the patient is to return
in several weeks or months with no definite date, enter the
number of months. If a date is given, use the six-digit format.
If this patient has an appointment time set up, and you are
using the recall to remind the patient of his/her appointment,
you can fill in the hour and minute of the scheduled appointment.
You may press <Return> without filling in the time.
You must fill in the procedure code at the PROC:___ prompt to
allow the computer to set up the recall.
N=No: If this patient should not be set up with a recall
date, type N and press <Return>. OR, since this is also
the default, you may press <Return> without typing N for No.
OUTPUT DEVICE: Select the printer on which the receipt is to
be printed by typing the number that precedes the printer name
at the flashing cursor, or use the <Up>/<Down> arrow keys to
highlight the line and then press <Return>. If you did not
instruct the system to print an invoice, this prompt will not
be displayed.
REPRINT?: If the patient requests a copy of the bill, you may
print a second copy at the REPRINT? prompt. If there is no need
for an additional copy, type N and press <Return>. The patient's
claim displayed on the screen will clear and permit you to enter
a claim for another patient. If you answered N to invoice and
then the patient requests a receipt, you can exit to the Main
Menu, select Option 7 (Patient Reports), and from the Patient
Reports Menu select Option 3, Reprint Previous Receipt.
D= DELETE: Type D to have the system delete the transaction and
exit the patients file. The cursor will be flashing at the
ENTER ID prompt. You may now proceed to select another patient.
C= CORRECT: C to correct from the Action Line will only allow
you to <Up> arrow and remove the line above. When you type C
and <Return>, the cursor will move to the last line entered and
be flashing at the ENTER CODE prompt. You may use the <Up> arrow
to delete the last procedure entered.
OMNI Office Medicine(tm) for Windows XP
PATIENT CHECKOUT
(FPC #) Rev.2/2004 v8.4
O=OPTIONS: If it is necessary to indicate that you are attaching
documentation to the claim, enter O (alpha character, not zero)
for an OPTION screen. Depending on which insurance you are
working with, one of the following option screens (HCFA 1500 or
Blue Cross) will be displayed.
H C F A 1500 FORM OPTIONS MENU
The fields in parentheses correspond to those found on the
HCFA 1500 form.
EXAMPLE SCREEN:
FORM H C F A 1 5 0 0 OPTIONS MENU
ITEM FIELD DESCRIPTION CURRENT VALUE
1. (8) PATIENT STATUS :
2. (10a) EMPLOYMENT RELATED :
3. (10b) AUTO ACCIDENT :
4. (10c) OTHER ACCIDENT :
5. (10d) RESERVED FOR LOCAL USE :
6. (14) DATE OF CURRENT ILLNESS :
7. (15) DATE OF SIMILAR ILLNESS :
8. (16) DATE UNABLE TO WORK FROM:
9. (16) DATE UNABLE TO WORK TO :
10. (19) RESERVED FOR LOCAL USE :
11. (20) OUTSIDE LAB :
12. (22) MD RESUBMISSION CODE :
13. (22) MD ORIGINAL CLAIM REF NO:
ITEM #__ TO CHANGE - PRESS <RETURN> TO RETURN TO CLAIM
ITEM #__ TO CHANGE: Type the item number for which you need to
enter a value and press <Return>.
PRESS <RETURN> TO RETURN TO CLAIM: Press <Return> to go back to
the claim you are working with.
DEFINITION OF HCFA 1500 OPTIONS MENU FIELDS:
1. (8) PATIENT STATUS: Valid responses are E=Employed, F=Full Time
Student, P=Part Time Student, or you may leave this field blank.
2. (10a) EMPLOYMENT RELATED: Was this claim due to an employment
related accident. Valid responses are Y=Yes, N=No, or you may leave
this field blank.
3. (10b) AUTO ACCIDENT: Was this claim due to an auto accident.
Valid reponses are Y=Yes, N=No, or you may leave this field blank.
4. (10c) OTHER ACCIDENT: Was this claim due to an accident other
than the two mentioned above. Valid responses are Y=Yes, N=No, or
you may leave this field blank.
5. (10d) RESERVED FOR LOCAL USE: Valid responses vary from state-
to-state.
6. (14) DATE OF CURRENT ILLNESS: Using the MMDDYY format, enter the
date of the current illness (first symptom), injury (accident), or
pregnancy (LMP).
7. (15) DATE OF SIMILAR ILLNESS: Using the MMDDYY format, enter the
date the patient had same or similar illness.
8. (16) DATE UNABLE TO WORK FROM:
9. (16) DATE UNABLE TO WORK TO: Using the MMDDYY format, enter the
dates patient unable to work in current occupation.
10. (19) RESERVED FOR LOCAL USE: This field may be used for free
text.
11. (20) OUTSIDE LAB: If there are Lab charges, was the service
performed by an outside lab. Valid responses are Y=Yes, N=No,
or you may leave this field blank.
12. (22) MD RESUBMISSION CODE: For this code, you will need to
refer to Medicaid guidelines.
13. (22) MD ORIGINAL CLAIM REF NO: For this reference number, you
will need to refer to Medicaid guidelines.
BLUE CROSS OPTIONS-MICHIGAN USE ONLY
The fields in parentheses correspond to those found on the
Michigan Blue Cross form.
EXAMPLE SCREEN:
OPTIONAL MEDICAID FORM OPTIONS MENU (VARIES BY STATE)
ITEM FIELD DESCRIPTION CURRENT VALUE
1. (20) CONDITION RELATED TO :
2. (25) INJURY CODE :
3. (28) EMERGENCY :
4. (45) NO ATTACH. :
5. (46) ADJ. :
6. (47) CO-INSURANCE :
7. (48) DEDUCTIBLE :
8. (53) ORIG CLAIM REFERENCE NO :
9. (54) NO. :
10. (60) MED. STATUS :
11. (61) RESOURCES :
12. (62) OTHER INS. :
13. (63) DATE OTHER INS CLM SUB :
ITEM #__ TO CHANGE - PRESS <RETURN> TO RETURN TO CLAIM
ITEM #__ TO CHANGE: Type the item number for which you need to
enter a value and press <Return>.
PRESS <RETURN> TO RETURN TO CLAIM: Press <Return> to go back to
the claim you are working with.
The above screen is for the Blue Shield Options. The information
you enter here will be permanently stored as part of this patient's
claim.
DEFINITION OF BLUE CROSS OPTIONS MENU FIELDS:
1. (20) CONDITION RELATED TO: Valid responses are E=Employment
A
related, A=Auto related, O=Other, or you may leave this field
blank.
2. (25) INJURY CODE: Valid inputs are 1, 2, 3, 4, 5, or you
may leave this field blank. These pertain to Medicaid only.
Refer to your Medicaid Manual for definitions of these codes.
3. (28) EMERGENCY: Valid inputs are 1, 2, 3, or you may leave
this field blank. For definitions of these codes, refer to your
Medicaid Manual.
4. (45) NO ATTACH.: Enter the number of attachments.
5. (46) ADJ: Mark this field with an X if this claim is being
A
submitted as an adjustment claim form. This is used for Medicaid.
6. (47) CO-INSURANCE: If a co-insurance is involved, enter the
co-insurance amount. This pertains to Medicaid only.
7. (48) DEDUCTIBLE: If the primary insurance has applied an amount
to the deductible, enter the amount here. This pertains to Medicaid.
8. (53) ORIG CLAIM REFERENCE NO: This is for Medicaid only.
9. (54) NO.: Enter the line number this claim reference is for.
10. (60) MED. STATUS: Valid inputs are 1, 5, 6, 7. This pertains
to Medicaid only. For definitions of these codes, refer to your
Medicaid Manual.
11. (61) RESOURCES: Valid inputs are 1, 2, 5, 6, 7. This pertains
C
to Medicaid only. For definitions of these codes, refer to your
Medicaid Manual.
12. (62) OTHER INS.: This is a one-character field. Refer to your
C
Medicaid Manual for choices to enter in this field.
13. (63) DATE OTHER INS CLM SUB: Using the MMDDYY format, enter
the date this claim was submitted to the other insurance company.
OMNI Office Medicine(tm) for Windows XP
PATIENT CHECKOUT
(FPC #) v8.4
U=UB OPTIONS: Type U at the Action Line to access the UB92 Form
Options Menu.
UB OPTIONS SCREEN
Setting UBOPTS to Yes (This is done through FMCONTROL for PTEX.)
will allow you to access the UB Options Screen shown below from
Patient Checkout. Type U at the Action Line of Patient Checkout
and press <Return>.
The item numbers in parentheses correspond to those found on the
UB92 form.
EXAMPLE SCREEN:
ITEM-FIELD CURRENT VALUE ITEM-FIELD CURRENT VALUE
1. (2) BOX 2 : 20. (33b) OCCUR CODE:
2. (7) COV D. : 21. (34b) OCCUR CODE:
3. (8) N-C D. : 22. (35b) OCCUR CODE:
4. (9) C-I D. : 23. (36a) OCCUR SPAN:
5. (10) L-R D. : 24. (36b) OCCUR SPAN:
6. (11) BOX 11 : 25. (37) BOX 37 :
7. (16) MS : 26. (39a) VAL CODE :
8. (18) ADMIT HOUR: 27. (40a) VAL CODE :
9. (19) ADMIT TYPE: 28. (41a) VAL CODE :
10. (20) ADMIT SRC : 29. (39b) VAL CODE :
11. (21) D HR : 30. (40b) VAL CODE :
12. (22) STAT : 31. (41b) VAL CODE :
13. (24+) COND CODES: 32. (39c) VAL CODE :
14. (31) BOX 31 : 33. (40c) VAL CODE :
15. (32a) OCCUR CODE: 34. (56) BOX 56 :
16. (33a) OCCUR CODE: 35. (57) BOX 57 :
17. (34a) OCCUR CODE: 36. (76) ADM DIAG :
18. (35a) OCCUR CODE: 37. (77) E-CODE :
19. (32b) OCCUR CODE: 38. (78) BOX 78 :
ITEM # TO CHANGE, R FOR REMARKS, PRESS <RETURN> TO RETURN TO CLAIM
ITEM #__ TO CHANGE: Type the item number for which you need to
enter a value and press <Return>.
R FOR REMARKS: Type R to access a remarks line.
PRESS <RETURN> TO RETURN TO CLAIM: Will return you to the claim
you are working with.
DEFINITION OF UB OPTIONS SCREEN FIELDS:
1. (2) BOX 2: This is an unlabeled field. Generally used for a
claim reference number or document control number.
2. (7) COV D: Covered Days. The number of days covered by the
primary payer, as qualified by the payer organization.
3. (8) N-C D: Not Covered Days. The number of days not covered
by the primary payer.
4. (9) C-I D: Co-Insurance Days. The inpatient Medicare days
which occur after the 60th days and before the 91st days in a
single benefit period and the SNF days from the 21st days in a
benefit period are considered co-insurance days.
5. (10) L-R D: Lifetime Reserve Days. Each Medicare beneficiary
has a lifetime reserve of 60 additional days of inpatient hospital
services during a benefit period.
6. (11) BOX 11: Medicaid sponsor physician identification number.
The Medicaid Provider Identification Number of the physician
primarily responsible for the medical care of a patient enrolled
in the Physician Sponsor Plan.
7. (16) MS: Patient Marital Status (MS). The marital status of
the patient at date of admission, outpatient service, or start
of care.
8. (18) ADMIT HOUR: Admission Hour. The hour when the patient
was admitted for inpatient care.
9. (20) ADMIT TYPE: Type of Admission. A code indicating the
priority of this admission (Hospital Inpatient only).
10. (20) ADMIT SCR: Source of Admission. A code indicating the
source of this admission or outpatient registration.
11. (21) D HR: Discharge Hour. Hour that the patient was
discharged from inpatient care.
12. (22) STAT: Patient Status. A code indicating the patient
status as of the Statement Covers Period date.
13. (24+) COND CODES: Condition Codes. Codes that have been
developed for the purpose of giving additional information about
the patient or circumstances regarding the services rendered.
The Condition Codes are grouped into eleven (11) categories.
Insurance Codes (01-16)
Special Conditions Codes (17-30)
Student Status Codes (31-35)
Accommodation Codes (36-45)
CHAMPUS Information Codes (46-54)
SNF Information Codes (55-59)
Prospective Payment Codes (60-70)
Renal Dialysis Setting Codes (71-76)
Other Codes (77-93)
IPD Codes 994-96)
State Assigned Codes (97-99)
Special Program Indicator Codes (A0-B9)
PRO Approval Indicator Codes (C0-C9)
Claim Change Reasons (D0-W9)
Medicaid Information (X0-Z9)
When preparing a claim where there is only one Condition Code,
F.L. 24 should be used.
If a claim requires more than one Condition Code, the Condition
Codes should be in ascending order in F.L. 24-30.
14. (31) BOX 31: Unlabeled - reserved for national use.
15. (32a) - 22. (35b): Occurrence Codes and Dates. The code of
a significant event relating to treatment. Fields 32a-35a must
be completed before fields 32b-35b.
23. (36a) - 24. (36b): Occurrence Span. When occurrence code
fields 32a-35b are filled, then 36a&b may be used to capture
additional occurrence codes. In some instances the through
date may be left blank.
25. (37) BOX 37: Internal/Document Control Number (unlabeled).
The control number assigned to the original bill by the payer
or the payer's intermediary.
26. (39a) - 33. (40c) VAL CODE: Value Codes and Amounts. A code
structure to relate amounts or values to identified data elements
necessary to process this claim, as qualified by the payer organi-
zation. The purpose is to determine eligibility of benefits.
34. (56) BOX 56: Unlabeled - reserved for state use.
35. (57) BOX 57: Unlabeled - reserved for national use.
36. (76) ADM DIAG: Admitting Diagnosis. The ICD-9-CM diagnosis
code provided at the time of admission as stated by the physician.
37. (77) E-CODE: The ICD-9-CM code for the external cause of
injury, poisoning, or adverse effect.
38. (78) BOX 78: Diagnostic Related Group (unlabeled). The
Diagnostic Related Group (DRG) code for the bill, as determined
by the provider.
Below is an example of a completed patient checkout screen.
EXAMPLE COMPLETED PATIENT CHECKOUT SCREEN:

EXIT: To exit Patient Checkout, type 0 (zero) at the ENTER ID
prompt and press <Return>. You will be returned to the
Main Menu.
ACDCONTROL PROGRAM FOR PATIENT CHECKOUT
This program gives you the ability to "activate" or "turn off"
the prompts shown in the screen below.
From the Command Line of the Main Menu, type FMCONTROL and press
<Return>. At the ENTER CODE prompt, type PTEX and press <Return>.
The screen similar to the one below will be displayed.
EXAMPLE SCREEN:
BPGN: FMCONTROL < SYSTEM CONTROLS RECORD MAINTENANCE > MAX:10000B
BDBX: /usr/OMNI/ ENTER CODE - PTEX ACTIVE: 381B
1. C_FIELD1: DR=NO, DX=PC, CONSULTREFERRAL=YES, TODATE=YES
2. C_FIELD2: GENERIC=YES, ALLRECEIPTS=YES, PT=LAST
3. C_FIELD3: EXPLAIN=YES, PL=YES, RESIDENT=NO
4. C_FIELD4: AUTOAPPLY=YES, DR2=YES
5. C_FIELD5: REC=EXPECT, UBOPTS=YES, LINKxx=BILLED
6. C_FIELD6: DX=DEFINED
ACTION-> (ENTER # TO CORRECT, (D)ELETE, (P)RINT, (0)=END)
FIELD 1:
DR: If set to NO, a <Return> will default to the doctor in Patient
Information.
If set to YES, you must type in a doctor number, even if it is
the default doctor.
DX: If set to PC, defaults to first diagnosis, Field 43, in the
Charge Codes (Procedure Codes) Dictionary.
If set to PT, default comes from Patient Information, Field 17.
CONSULTREFERAL:
If set to YES, will not allow you to bypass if you have a
procedure code identified by Medicare, BC, etc. as a consultation
procedure in the Charge Codes Dictionary.
If set to NO, no matter what procedure code you enter, you
will be able to bypass this prompt.
TODATE:
If set to YES, you will have to satisfy the To date? prompt.
FIELD 2:
GENERIC:
If set to YES, searches procedure code down to master level.
ALLRECEIPTS:
If set to YES, will print a receipt for all visits for that
day.
PT: If set to LAST, it will default to the patient you previously
worked with.
If set to NULL, it will not recycle that number.
FIELD 3:
EXPLAIN:
If set to YES, it turns on the Explain prompt.
PL: If set to YES, it turns on the Problem List prompt.
RESIDENT: If you wish to screen the billing of a resident
provider vs. a non-resident provider, set this switch to
YES.
FIELD 4:
AUTOAPPLY:
If set to YES, should payment be more than expected amount on
the date of service, you will be allowed to apply the extra amount
to a different date of service.
If set to NO, it will overpost for that date of service.
DR2: If set to YES, allows you to enter a second doctor on the
claim. The default is DR# 000.
If set to NO, it looks for one doctor number only.
FIELD 5:
REC: If set to EXPECT, system looks for the expected amount instead
of the billed amount.
If set to BILLED, system looks for the billed amount.
UBOPTS: If set to YES, allows the UB Option screen to be
displayed.
LINKEDxx=BILLED: If this toggle is not present, any deductibles
will be based on the expected/approved amount as usual.
If this toggle is present, xx=the first two bytes
of the carrier code. This will calculate the deductible based on
the billed amount instead of expected amount.
FIELD 6:
DX: If set to DEFINED, the diagnosis has to be defined in the
Diagnosis Library.
If set to NODEF, you may just enter a number out of the
ICD-9 book.