TABLE OF
CONTENTS
Overview 32
Accessing
Ledger Notes 32
Prompts 32
Patient
Name Search Screen 33
Adding
a Note 33
Entering Free Text 34
Copying a Note From Note
Abbreviations 35
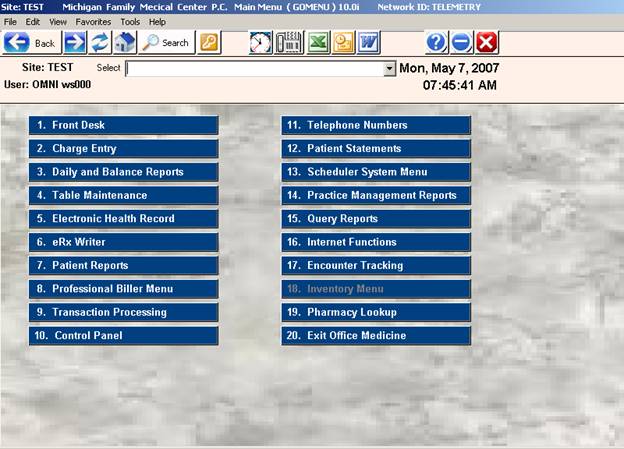
OVERVIEW: The Automated Billing program provides the means to
review and
correct all claims entered in the computer. Blue Cross/Blue Shield, Medicare, and
Medicaid claims entered for a given day can be approved and then transferred
into telecommunication files or printed out as hard copy (forms). Private insurance claims without MUST BE HARD
COPIED after reviewing and making corrections.
PROCEDURE: From the Main Menu select Option 8, Automated
Billing,
and <ENTER KEY>.
OVERVIEW: The Automated Billing program provides the means to
review and
correct all claims entered in the computer. Blue Cross/Blue Shield, Medicare, and
Medicaid claims entered for a given day can be approved and then transferred
into telecommunication files or printed out as hard copy (forms). Private insurance claims without an
appropriate EDI payer number MUST BE HARD COPIED after reviewing and making
corrections.
PROCEDURE: From the Main Menu select Option 8, Automated
Billing,
and <ENTER KEY>.
The
Automated Billing Menu, shown below, will be displayed.
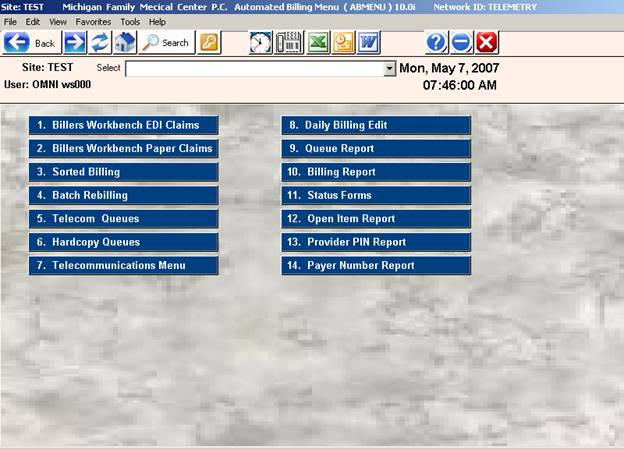
Here
is a brief description of each of the items shown on the Automated Billing
Menu.
1.
Telecommunication Billing: Allows you to review and correct primary
forms prior to their transmission.
2.
Hard Copy Billing (Forms): Allows for the printing of a claim for manual
submission.
3.
Sorted Billing: Allows for sorting and printing by Insurance
Company, Doctor, and Patient.
4.
Batch Rebilling: Allows the system to scan and print a claim
for all open items.
5.
Telecommunication Queues: Allows you to telecommunicate primary forms
at a later date.
6.
Hard Copy Queues: Allows for the printing of a claim for manual
submission from the queue at a later date.
7.
Telecommunications Menu: Selections 1 through 7 on this menu allow for
checking and sending of a file, and the receiving of a file from Blue Shield
and Medicare. Selections 8 through 13
are specific to US HDI billing only.
8.
Daily Billing Edit: System checks patient information for errors.
9.
Queue Report: Gives you status of the queues.
10.
Billing Report: Prints a list of all open
claims, paid claims, and partially paid claims.
11.
Status Forms: Prints a Blue Shield status
form.
12.
Provider PIN Report: Allows easy
checking of multiple provider identification numbers
13.
Payer Number Report: Allows easy checking of Clearing House Payer-ID
numbers.
Each
option requires the User’s ID. The
system stamps the date and ID on the claims as they are billed.
You
may select a particular carrier or all carriers. You can review claims by Date of Entry or by
Patient Account Number for a specific date of service.
Selection
7, Telecommunications Menu, allows you to send claims to insurance carriers
like Blue Shield and Medicare electronically.
That Menu is shown below.
The
claim record display will appear per the examples below for primary or
secondary.
Hardcopy 1500 Screen
HIPAA Telecommunications
(EDI) Screen
LEGEND FOR ASTERISK PLACEMENT UNDER BRO:
If the Y is placed under the
S = Line has been billed out.
If the Y is placed under the
R = Payment has been received.
If the Y is placed under the
O = That line will be billed out.
To
aid you in the first months of transmitting Medicare and Blue Shield claims
with the OMNI software, we have devised this outline. Using this outline, follow the
Telecommunications
Menu.
1. BUILD 8 1 1 <R> <R> JOB <R> <R> DATE
This allows for the preparing of
claims to be transmitted for Medicare and Blue Shield.
Once the first claim appears, you
may either review each one (B) or allow the system
to shift into “auto” (A).
2. ERROR 8 9 2 <printer> N
This is a final review of the claims
prior to transmission. The system will
look over the
claims you are preparing for
submission and identify some simple errors.
It will not be
able to tell you if a service is
covered or if the procedure is correct, but the common user
errors will be caught.
3. PRINT 8 9 1 <printer>
This will give you a list of all
claims about to be submitted. This
report is one that you
will want to keep to verify the
submission of a claim and to verify all the bills you are
sending.
4. EXIT/RETURN
You must log out and back in as admin so that the modem is available.
5. TRANSMIT 8 9 3 <ENTER
KEY>
This is the actual transmission of
claims via secure SFTP connection.
6. TRANSMISSION STATUS (Confirmation)
Make sure last transmission status matches totals on Output Report.
(i.e., number of
claims, total dollar amount, and
number of lines.)
7. ERASE 8 9 4 E Y
This just removes the claim files
submitted when last you transmitted so that they are not
sent again.
All billing done by use of “A” (auto) or “B” (non-auto) up to this point
will be erased or archived if the ERASE option is chosen. If you respond Yes to
the prompt regarding the file being sent successfully, this step is performed
automatically.
To
aid you in the first months of transmitting Clearing House claims with the OMNI
software, we have devised this outline.
All you need to do is follow along with the Telecommunications
Menu.
1. BUILD 8 7 8 <R> 5 JOB <R> <R> DATE
This allows you to prepare Commercial claims for
transmission. Once the claim appears,
you may either review each one (B) or allow the system to shift into “auto”
(A).
2. ERROR 8 7 10 <printer> <R>
This is a final review of the claims prior to transmission. The system will look over the
claims you are preparing for
submission and identify some simple errors.
It will not be
able to tell you if a service is
covered or if the procedure is correct, but the common
user errors will be caught.
3. PRINT 8 7 9 <printer>
This will give you a list of all
claims about to be submitted. This
report is one that you
will want to keep to verify the
submission of a claim and to verify all the bills you are
sending.
4. EXIT/RETURN
You must log out and back in as admin so that the internet SFTP
connection is available.
5. TRANSMIT 8 7 11
This is the file preparation of
claims and will then display the Availity Menu for the
available transmission options.
6. AVAILITY MENU
Select #1 Send Claims and Retrieve
Reports. The system will automatically
dial and
send. Watch screen for updated status of
transmissions.
7. ERASE 8 7 12 E Y
This just removes the commercial
claim files submitted when last you transmitted so that
they are not sent again. All billing done by use of “A” (auto) or “B”
(non-auto) up to this
point will be erased or archived if
the ERASE option is chosen. If you respond Yes to the
prompt regarding the file being
sent successfully, this step is performed automatically.
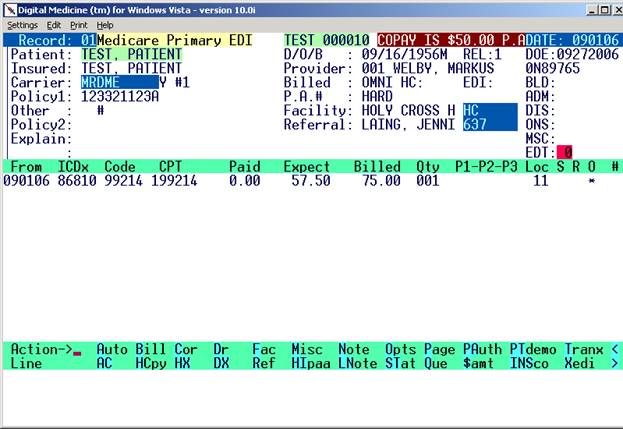
Automated Billing Action
Line Commands
(A)=Automatically
bill all claims from this patient forward.
(AA)=Accept
Assignment ( Y/N )
(AC)=ASSIGN CARRIER: Allows you to change carriers. Type AC and press <ENTER KEY>.
(AD)=Add
additional diagnoses.
(AF)=ASSIGN FORM STATUS: Allows you to hold or release a claim form (
or EDI )
(AN)=Edit
Anesthesia Information
(AQ)=Select
Queue and add claim to selected work queue.
(AS)=Assign
Admission Status
(B)=Bill
claim EDI to currently assigned carrier.
(BP)=Bill EDI a claim
assigned to a secondary payer as a primary claim. This is useful
where the services are not covered or
allowed by the primary carrier.
(C)=Enter
Correction Mode
(CP)=CONFIGURE
PRINTER LINEUP
(D)=Edit
Assigned Doctor
(DR)=Edit
Assigned Doctor
(DX)=Delete
additional diagnoses
(EQ)=Assign
to Eligibility Queue for Batch Update
(EZ)=Mark
Claim for Medicaid EZ-link documentation upload and bring up the upload website.
(F)=Enter/Edi
facility code
(FAC)=View
Facility code table for this claim. ( If one is assigned )
(H)=Hardcopy
claim to the currently assigned carrier
(HI)=Go
to HIPAA dates patient record
(HP)=Hard-copy a claim
assigned to a secondary payer as a primary claim.
(HX)=View
ERA auto-post information history.
(I)=Insert
Claim Dates – Admit, Discharge, etc.
(INS)=View
Insurance table for the assigned carrier.
(L)=View
Ledger Card
(L1)=View
Ledger Card – legacy version
(L2)=View
Ledger Card – digital version
(LN)=Add
Ledger Note to the financial ledger – does not show on claim.
(M)=Enter/Edit
miscellaneous dates
(N)=Enter
Claim Note for
(NPI)=Display
attending NPI number
(O)=Optional
Field Responses. Example: Outside Lab Y/N
(P)=Page
forward
(PA)=Enter/Edit
Prior Authorization Number
(PT)=Go
to Patient Information for this patient.
(Q)=Add
Claim to default working queue
(R)=Enter/Edit
referring Physician –
(REF)=View
Referring Physician table for this claim ( If one is assigned )
(ST)=Bring
up status claim options
(W)=View
Recent billing dates.
(X)=Delete
this claim from the EDI billing file.
(XD)=Add additional diagnoses.
($)=Quick
Entry for patient paid amount for entire claim to be attached to claim.
<Right
Arrow> = Move Forward one claim
<Left
Arrow> = Move Back
<Escape>
or (0)= Exit
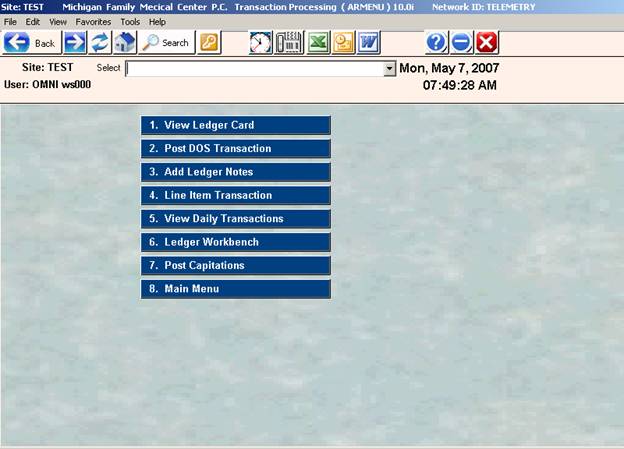
OVERVIEW: The Posting program (Line Item Transaction),
found in the Transaction
Processing
section of the AMP Manual, allows you to apply an insurance
payment, adjustment,
or transfer directly to a patient’s insurance claim
line by
line. Normally, used for insurance
amounts.
PROCEDURE: To access Line Item Transaction, select Option 4 from the
Accounts
Receivable Menu and press <ENTER KEY>.
The
system will ask you to ENTER USER
ID. Enter your identification code
and press <ENTER KEY>. This code
is, generally, the initials of your first and last name in upper case. The
screen
below will be displayed.
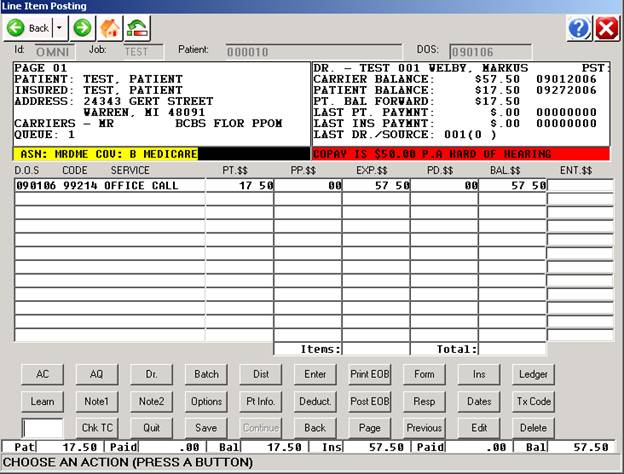
SITE: If your practice has more than one location,
the job code you are working in will be
displayed.
PATIENT NAME OR #: Enter the patient’s ID number an press
<ENTER KEY>.
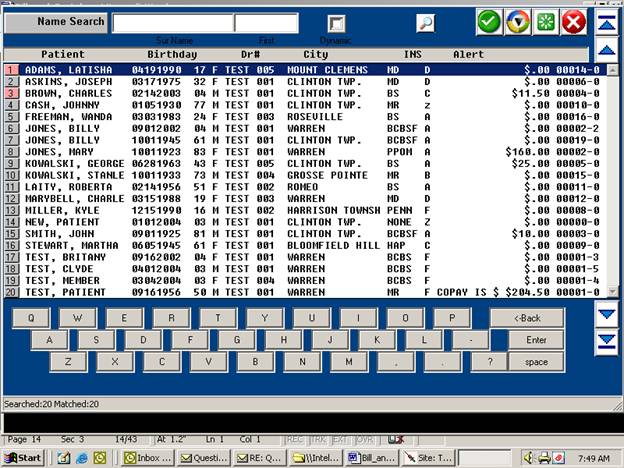
Search: If you do
not know the patient’s ID number, type the first few letters of the
patient’s last name and press <ENTER KEY>. The system will open a window in the middle
of your screen listing all patients on the system whose last names begin with
the letters you typed. Use the <Up>/<Down>
arrow keys to highlight the line you want and press <ENTER KEY>.
D/O/S (MMDDYYYY): After you enter the patient’s account number
and press <ENTER KEY>, the cursor will move to the Date of Service prompt
and display the last claim date. (The
date of service can usually be found on your check voucher.)
If
the date displayed by the system is not the date you wish to post against, you
may enter another date in MMDDYYYY format.
Press <ENTER KEY>.
Additionally, at the D/O/S prompt you may perform the following
functions:
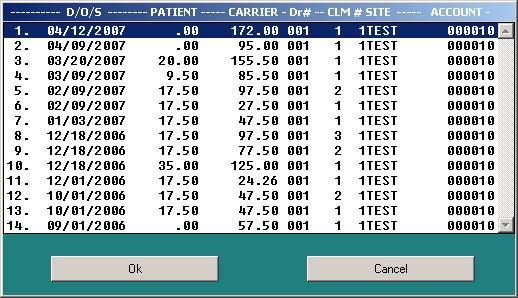
<TAB> TO LIST OPEN BALANCES: To obtain a listing of open balances for all dates
of service, press <Tab> at the D/O/S prompt. The information will be displayed in ascending
date order. Paid claims are not included.
<DOWN>
ARROW TO LIST BALANCES: Press the <Down> arrow
key at the D/O/S prompt to view all patient and insurance balances in
descending date order for all jobs. Paid
claims are included.
<HOME>
TO VIEW LEDGER: When the cursor is flashing at
the D/O/S prompt, press the <Home> key to view the patient’s ledger. You will be asked to select a type of ledger
and that ledger format will be displayed to your screen.
F = Family ledger.
P = Patient only ledger.
S = Patient only activity across
jobs. The patient’s medical record
number
is what links the jobs.
After
you select the type of ledger you want, you will be prompted for a starting and
ending date.
The
default goes back two years from the starting date. If you do not want the default date, you
may
enter a different set of dates. These
prompts are shown in the screen on the next page.
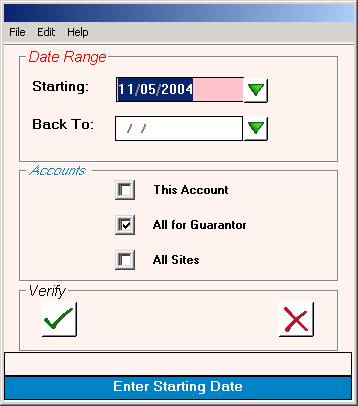
After
you satisfy the date prompt, the system will automatically begin sorting. When the sorting is completed, you will need
to select the type of ledger you want.
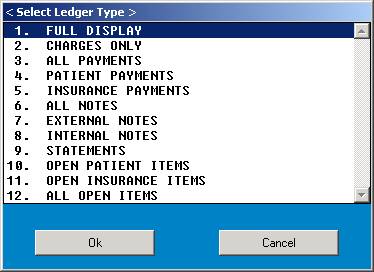
1.
Full ledger screen.
2.
Displays only claims.
3.
Any payments on the ledger.
4.
Only patient payments.
5.
Only insurance payments.
6.
Displays internal and
external notes.
7.
Notes that display on the
statement.
8.
Notes that do not display on
the statement.
9.
When statements were sent.
10.
Claims
that have yet to be paid on.
The
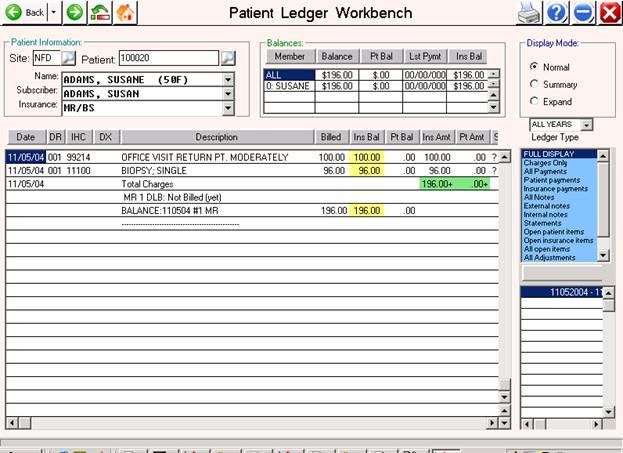
ledger you selected will be displayed to your screen. An example full ledger is below. When you view a ledger, the screen is
slightly different than when you are posting to a ledger.
Ledger Option II – legacy Ledger 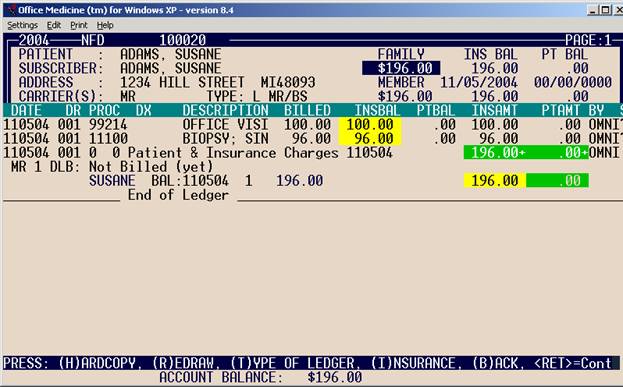
COLUMN DEFINITIONS:
DATE: Displays date of service.
DR: Displays
doctor number.
PROC: Displays the procedure code(s).
DX: Diagnosis Code.
DESCRIPTION: Description of ledger activity.
BILLED: Estimated patient liable
balance.
INSBAL: Insurance balance.
PTBAL: Patient balance.
INSAMT: Insurance payment.
PTAMT: Patient payment.
BY: Initials of person who posted the payment.
S: This is the Status column. Any one of the symbols below may appear.
$ = Indicates service described has
been paid in full.
* =
Indicates service has been billed to an insurance company
(hard copied or telecommunicated).
% = Indicates that a partial payment
has been made on this service.
? = Indicates that this has not been
billed to an insurance company
(hard copied or telecommunicated).
ACTION LINE
FUNCTIONS:
(S)tart
Over: Displays the
(F)AMILY, (P)ATIENT, (S)YSTEM-WIDE prompt.
(B)ackup: Takes you back one page.
(T)ype
of Ledger: Takes you to the Select
Ledger Type window.
(I)nsurance: Displays the Expanded Insurance
screen.
<Ret>=Cont: Displays another Action Line
with two additional choices.
(H)ARDCOPY
= Allows you to print a copy of the screen.
(R)EDRAW
= Redraws the screen.
0=End: Displays the second
Action Line. Pressing <ENTER KEY>
at this Action Line
returns you
to the ENTER PATIENT NAME OR ACCOUNT NUMBER
prompt. You may enter a new account number here or
press 0 (zero) and
<ENTER
KEY> to go back to the Accounts Receivable Menu.
POSTING TO A LEDGER: You may select the claim to post to by
entering a date at the
Date
of Service prompt, selecting a date from the <Tab> to list open balances
window, or by
selecting
a date from the <Down> arrow to list balances window. Below is an example full ledger screen.
LEDGER COLUMN DEFINITIONS:
DATE: Displays date of service.
CODE: Displays the procedure code.
AUTO.$$: Automatic adjustment per line item. This will display if the toggle SHOWAUTO
is set to Y in FMCONTROL for POSTLN. If this toggle is set to N, instead there
will be a column labeled SERVICE with the service information displayed.
PT.$$ Patient
liable amount.
PP.$$: Patient paid amount.
EXP.$$: Expected amount from insurance.
PD.$$: Amount
actually received from the insurance.
BAL.$$: The insurance balance.
ENT.$$: The amount you are applying to the claim is entered here.
BY: Initials of person who posted the payment.
ACTION LINE
FUNCTIONS
(D)IST,
(E)NTER, (N)OTE, (LN)LDGNT, (P)AGE, (R)EJ, (T)RAN, (0)=END
(D)IST = DISTRIBUTE: Allows the system to distribute a dollar
amount.
First you type T. Enter a transaction code and verify.
Second, type D (distribute) and press <ENTER KEY>.
Third, ENTER AMOUNT TO DISTRIBUTE ON THIS CLAIM: $____.00
(Enter amount of check/payment.)
Fourth, ADJUST? (Y/N) OR (A)SSIGN TO CARRIER/ (Y/N/A):
(Could be a different prompt if this is a primary claim.)
Fifth, ADDL DATE [--/--/----] VOUCHER DATE
After you have completed the above steps, the system will display the following Auxiliary Function Line:
(V)ER, (D)EL, (AC)ASN, (C)ONT, (O)PT
(V)ER: Verifies the action and displays an “ADD NOTE” prompt. The ADD NOTE prompt
may be eliminated by setting the NOTE toggle to N in FMCONTROL for POSTLN.
(D)EL: Deletes the transaction. Returns you to PATIENT prompt.
(AC)ASN: Opens a window allowing you to select another carrier for assignment if this is a
partial payment.
(C)ONT: Returns you to Action Line of same claim to perform another transaction.
(O)PT: Displays the Options Menu.
(E)NTER: This will place the cursor at the first
procedure on this claim. Type E and <ENTER KEY> to go to the ENT.$$ column. If nothing was paid on this procedure, press
<ENTER KEY> and the cursor will move to the next line. Enter in the dollar amount of this
transaction (payment or adjustment) for this procedure and press <ENTER
KEY>. (As in all programs, the
decimal only needs to be used if change is used.) Continue for remaining procedure lines on
this claim. If there is a balance
remaining on any of the claim lines after a payment was applied, the system
will prompt you to adjust the remaining amounts.
Next,
satisfy the ADDL DATE [--/--/----]
prompt.
After
you have completed the above steps, the Auxiliary Function Line (shown on the
previous page) will display again.
(N)OTE: To enter a note that only appears on the
claim, type an N and <ENTER
KEY>. A window will open in which you
may enter free text. Press the
<Home> key to exit and save the note.
Your cursor will return to the Action Line.
(LN)LDGNT: To enter a note on the ledger, type LN and press <ENTER KEY>. When you add a note to a ledger, you also
have the option of having that note appear on the statement.
(P)AGE: Type P
to go to the second page of a claim. 12
line items constitute a page.
(R)EJ: Allows you to input per claim line a BS, MR,
or MD rejection as identified in the Response Codes Dictionary. This is the Response Code that goes with the
assigned carrier on the claim. The
system will display a description of the rejection in the lower right-hand
corner of the screen if it has been defined.
You are limited to four digits when entering the rejection code. Sample codes used by BS are shown below.
N=Non
Payment A=Action E=Edit
R-=Review G=GM P=Pending
Steps
to enter a rejection code are: At the
Action Line type R. The cursor will move to the ENT.$$ column. Enter the type (an alpha character) of code
plus the rejection code (maximum 3 numeric characters) and press <ENTER
KEY>.
(T)RAN: Enter T
for transaction. This will allow you to
change transaction codes without returning to the Accounts Receivable
Menu. The system will display the
prompts shown below.
Please Note:
For Gramm Rudman “(G)%” amount (from check voucher), call OMNI to set up
this transaction on your system.
Type
the appropriate transaction code and press <ENTER KEY>. The system will prompt:
VERIFY TRANSACTION (Y/N):
Y = Yes, transaction code is correct.
N = No, wrong code. You will be allowed to enter another code.
Next,
type an E to enter amounts to be
applied to the claim. You will then be
prompted for additional dates (if the Transaction Codes Dictionary is set up
that way) and asked to verify the claim.
You
may change transaction codes as many times as you wish. Be sure that when you enter a dollar amount
for the procedure that you are using the appropriate transaction code. The type of transaction you are performing
will be shown in the lower left corner of your screen. If you are not using the appropriate
transaction code, press <ENTER KEY> until the cursor returns to the
Action Line and then enter T to
change your transaction code.
IMPORTANT REMINDER—If you are using t (lower case t), be sure to use
a negative sign (-) in front of the dollar amount.
<UP> ARROW TO USE EOB
RECALCULATION MODE: From the Action Line press the
<Up> arrow to enter the recalculation mode. The posting line will change (see
below). This mode of posting allows
entry of the contents of a typical Explanation of Benefits all on one
screen. This may include: (1)
Adjustments for contractual allowances, (2) Payer payments, (3) Deductibles,
(4) Co-payments, (5) Service not covered, (6) Patient write-offs and Rejection
Codes from the carrier.
DATE CODE SUBMIT ALLOW NOTCOV DEDUCT COPAY PAYPROV REJECT
The
system will then ask: INPUT TRANSACTION CODE:
(To exit this prompt, type 0 (zero) and <ENTER KEY>).
Input
the transaction code and press <ENTER KEY>. Next, you will need to verify the transaction
code. Once verified, the cursor will
move to the appropriate column. Make any
corrections across the line. Recalc will
automatically perform the recalculation.
*Must
see Recalc flashing at the bottom left of the screen. If the word Action is displayed, press
<Esc> once only to change to Recalc.
CONVENTIONAL
SINGLE TRANSACTION POSTING STEPS
(Do
Not Use this method to post an EOB – See EOB Posting Below )
Type
T at the Action Line of Line Item
Posting and press <ENTER KEY>.
Enter
a transaction code at the INPUT
TRANSACTION CODE prompt and <ENTER KEY>.
Verify
the transaction code and <ENTER KEY>.
Note: If you are using a patient side transaction
code, the BAL$$ column will
reflect the patient’s balance. For insurance transactions and transfers, the
BAL$$
column will reflect the insurance side balance.
Type
E (Enter) at the Action Line and
press <ENTER KEY>.
Type
(post) the transaction amount and <ENTER KEY>. If you post a full payment, you will bypass
other prompts and go directly to the ADDL
DATE prompt.
If
you post a partial payment and the toggle TRANSPT=Y, the system will display
the prompt below. If this toggle is set
to No or does not exist on your system, after the partial payment is posted you
will skip the next prompt and go directly to the ADJUST? Prompt.
Should I
transfer any remaining balances to the patient? (Y/N):
Y = Yes, transfer balance. ADDL DATE prompt will display.
N = No, do not transfer
balance. Prompt below displays.
ADJUST? (Y/N) OR (A)SSIGN TO CARRIER?
(Y/N/A):
Y = Yes, make adjustment.
Displays ENTER ADJUSTMENT CODE prompt.
Enter an adjustment code. The system will adjust off
the remaining amount for the side you
are working with
(patient or insurance) for each line
item.
N = No, leave remaining balance for these
procedures on the account.
A = Assign to carrier. Opens a window listing carriers. Select the
carrier to assign the claim to.
Next,
the system will prompt for an additional date.
If you assigned a name to this prompt in the Transaction Codes
Dictionary, it will display next to this prompt. The default for this prompt is the current
date. Press <ENTER KEY> for the
default. You may also enter a different
date, such as a deposit date.
ADDL DATE
[--/--/----] Prompt description will display
here.
Last prompts are:
(V)ER, (D)EL,
(AC)SN, (C)NT, (EOB), (H)RD, (HE), (O)PT.
(V)ER = Verify the information. This will save your entry and update the
financial files.
(D)EL = Deletes the transaction.
(AC)SN = Opens a window allowing
you to select a carrier for assignment if it is a partial
payment.
(C)NT = Returns you to the Action Line so you may perform
additional transactions.
(EOB)
= Prints Explanation Of Benefits
(on plain paper) for you to send to the secondary
carrier.
(H)RD
= Typing H prints a hard copy claim
form.
(HE) = Takes you to the hard copy screen
(Automated Billing) allowing you to edit.
O)PT = Displays the Options screen. Options screens are the same for both
<UP> Arrow and
Conventional posting.
The
Options screen below is used for Blue Shield, Medicaid, and Commercial
insurance.
The
information you enter here will be permanently stored as part of the patient’s
claim. When you enter a value, it will
be displayed in the corresponding field.
Example: ITEM FIELD DESCRIPTION
CURRENT VALUE
6 (14) DATE OF CURRRENT ILLNESS 03/01/1997
In
this example, the date you enter will be displayed in Field 14 on the insurance
form.
FULL EOB (<UP> ARROW) POSTING STEPS
<UP>
Arrow Posting pulls dollar amounts from the Procedure/Charge Codes Dictionary
to speed up the posting process.
At
the Action Line of Line Item Posting press the <UP> arrow to begin
<UP> arrow posting. This should
default the Recalc to ON; if not, press <Esc> once only to change to
Recalc. Recalc mode calculates the
dollar amount the patient owes. Press
the <Esc> key once to turn Recalc to OFF.
Input
the transaction code and press <ENTER KEY>.
Verify. If you type N at this prompt, you will be returned to the INPUT TRANSACTION CODE prompt.
A Y response will initiate
one of the following prompts.
If
the toggle TRANSPT=Y and there is no other insurance to bill, the prompt below
will be displayed.
Should I transfer any remaining balances to the patient?
(Y/N):
(Y=Transfer balance, N=Leave balance
on insurance side.)
If
the toggle TRANSPT=Y and there are other carriers available to assign the claim
to, then this prompt will be displayed.
Currently
Assigned To____ Bill Secondary To____? Y/N:
(Bill any remaining balance to the next insurance after posting this
payment?)
Enter
the ALLOWED amount and press
<ENTER KEY>.
Enter
the PAYPROV (insurance payment) and press <ENTER KEY>. <UP> Arrow Posting assumes payment is
the same as the approved/allowed amount and defaults to the amount shown on the
screen. If your payment is different or
you have not received any payment, you will need to change this field to
reflect the difference.
IF YOU ARE BILLING ANOTHER CARRIER, STOP POSTING HERE BY
PRESSING THE <END> OR <HOME>
KEY – DO NOT POST THE PATIENT RESPONSIBILITY UNTIL YOU ARE DONE BILLING ALL
INSURANCES.
*- Enter CO-PAY amount, if any, and
press <ENTER KEY>.
*- Enter DEDUCT amount, if any, and press <ENTER
KEY>.
*- Enter NOTCOV amount, if any, and
press <ENTER KEY>.
*Any
amounts entered in these fields will automatically go to patient side.
-If
a balance is remaining in BAL column, then the prompts on the next page will be
displayed.
If any balance is remaining,
the following prompt will appear:
(A)SSIGN TO CARRIER, (T)RANSFER PATIENT,
(W)RITE-OFF, (N)OTHING (A/T/N)
(A)SSIGN TO CARRIER: Opens a window allowing you to select a
carrier for assignment.
(T)RANSFER PATIENT: The balance left on the line item will be
transferred to the patient side of the ledger.
(W)RITE-OFF: Allows you to write this amount off using the
appropriate transaction code as defined in the TX_ADJCODE field.
(N)OTHING: Take no action. – This should be done when
billing the next insurance.
If
you have the following fields set in the Transaction Codes Dictionary, these
prompts will also be displayed.
ADDL DATE: Setting this to Yes will activate the
prompt. You may also assign a name to be
displayed next to this prompt. The
default for this prompt is the current date.
CHECK #: By setting the TX_PROMPT to yes, it will prompt for
a check number.
This
number will continue to default for all the following payments/patients posted.
Lastly,
the Action Line below will be displayed.
(V)ER,
(D)EL, (AC)SN, (C)NT, (EOB), (H)RD, (HE), (O)PT
(V)ER = Verify the information is correct. This will save your entry and update the
balances.
(D)EL = Deletes the transaction.
(AC)SN = Opens a window allowing you to select a the next insurance if
this is a
partial payment.
(B)
(BE)
(And brings you right
back so that you can continue posting the next patient)
(C)NT = Continues posting this same patient by moving to the next
claim for this
patient (if any.)
(EOB) = Prints Explanation Of Benefits (on plain paper) for you to
send to a secondary
carrier.
(H)RD = Typing H prints a hard copy claim form.
(HE) = Takes you to the hard copy screen (Automated Billing)
allowing you to edit.
(O)PT = Displays the Options screen. Option screens are the same for both
<UP> Arrow
and Conventional
posting.
POSTING
USING LEARN MODE
If
you have the LEARN toggle set to Yes, then you may use Learn Mode. Learn Mode updates the Charge Codes
Dictionary by allowing the system to overwrite the existing amount for the
field number you enter and permanently store this change. Learn Mode learns the payment amount and
writes it to the Procedure/Charge Codes Dictionary.
At
the Action Line of Line Item Posting, type LM (Learn Mode). A window will open prompting you to enter an
amount field.
Enter
the number of the charge code amount field that will be updated by this posting
and press <ENTER KEY>. After you
enter the number of the charge code amount field and press <ENTER KEY>,
your cursor will go back to the Action Line.
Now
proceed with <UP> Arrow posting.
The regular Line Item Posting screen will be displayed.
Also, when you are at the DOS:
[ ] prompt, you may press <Tab> to
have all open dates dis-played for this patient. From this window you select the claim you
wish to work with. When you are at the
Action Line of the chosen claim, you may page between encounters for this
patient by typing (F)orward or (B)ackward.
|
ACTUAL STEPS IN PERFORMING TRANSACTIONS |
TRANSFER PATIENT
BALANCE TO INSURANCE
Options
9 From
Main Menu choose Transaction Processing
4 Line
Item Transaction
ID Your
initials
PT ID Enter
patient’s name or ID
DOS Enter
date of service, <Tab>, or <Down> arrow
T Transaction
t Transfer
patient to insurance
Y Verify
transaction
E Press
<Enter> to move cursor to service line to be transferred
-($) You
must use the negative sign in front of the dollar amount
DATE Enter
the transfer date (only if prompt is set in Transaction Codes Dictionary)
V Verify
the amounts shown
If the screen does not look
correct, DO NOT VERIFY.
REFUND
(Posting Patient Payments)
Options
9 From
Main Menu choose Transaction Processing
2 Post
D/O/S transactions
R Refund
to patient
Y Verify
transaction code
ID Your
initials
PT ID Enter
patient’s name or ID
Enter
amount of refund DO NOT USE A (-) SIGN
Enter
the date of service of <Tab> for service date. Doctor number will fill in for you.
CHARGE IN
ERROR (Insurance Side)
These
steps will transfer the amount to the insurance so that the patient does not
see the write off. If you want the
patient to see the correction, follow the steps CHARGE IN ERROR (Posting
Patient Payments) below.
Options
9 From
the Main Menu choose Transaction Processing
4 Line Item Transactions
ID Enter
your initials
PT ID Enter
the patient’s name or ID
DOS Enter
the date of service
T Transaction
t Transfer
patient to insurance
Y Verify
transaction code
E Press
<Enter> to move cursor to service line to be corrected
-($) Use
the negative sign in front of the dollar to be adjusted
V Verify
the transaction
<r> This
will redraw the claim
T Transaction
x Insurance
charge posted in error
Y Verify
transaction code
E Press
<Enter> to move cursor to service line to be corrected
V Verify
the transaction
CHARGE IN
ERROR (Posting Patient Payments)
Options
9 From
Main Menu choose Transaction Processing
2 Post
D/O/S Transaction
W Write
off balance -or-
X Charge
posted in error
Y Verify
transaction code
ID Enter
your initials
PT ID Enter
the patient’s name or ID
DOS Enter
the date of service to write off
DR# Enter
the doctor number
PAYMENT ON
ACCOUNT (Posting Patient Paytments)
Options
9 From
Main Menu choose Transaction Processing
2 Post
D/O/S Transaction
C K V P Whichever
code pertains to the payment type you are posting
Y Verify
transaction code
ID Enter
your initials
PT ID Enter
patient’s name or ID
Enter
the amount of payment
Enter
the date of service of <Tab> for service date
Doctor
being credited will default to the doctor on the claim
Enter
the date of posting if prompted.
PAYMENT IN
ERROR (Posting Patient Payments)
Options
9 From
Main Menu choose Transaction Processing
2 Post
D/O/S Transaction
C K V P Choose
the same transaction code used when you made the error.
Y Verify
the transaction code
ID Enter
your initials
PT ID Enter
the patient’s name or ID
Enter
the dollar amount that was incorrectly posted WITH A NEGATIVE SIGN in front of the figure.
Enter
the date of service that was used with the original posting.
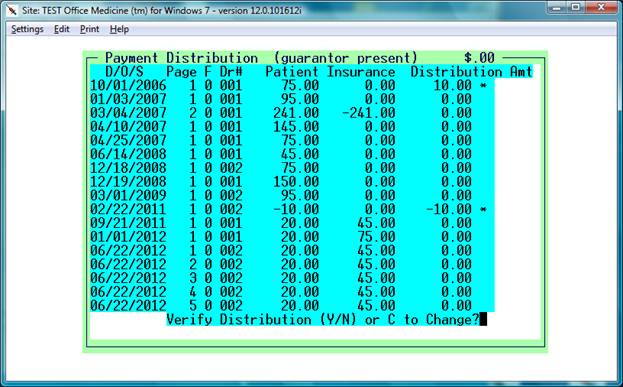
steps to auto-apply a credit balance
Options
9 From Main Menu choose
Transaction Processing
2 Post D/O/S Transaction
Enter any patient transaction
code. example "K"
Verify Transaction Code: Y
Enter Account Number:
Enter Amount : 0.00
Enter Check Number: <Enter>
Enter D.O.S.: * ( Asterisk ) <Enter>
Respond "Y" to the apply credits and “Y” to verify distributuion
prompt – Example below:
TRANSFER
INSURANCE TO PATIENT
(Posting
Insurance Payments)
Options
9 From
Main Menu choose Transaction Processing
4 Post
D/O/S Transaction
ID Enter
your initials
PT ID Enter
patient’s name or ID
DOS Enter
the date of service of <Tab>
T Transaction:
T
= transafer insurance to patient
S
= service not covered
A
= applied to deductible
These are examples of
the types of transfers.
Y Verify
the transaction code you selected
E Press
<Enter> to move cursor to service line to be perform transfer
V Verify
the transaction
If the screen does not look
correct, DONOT VERIFY.
WRITE OFF
BALANCE
(Posting
Insurance Payments)
Options
9 From
Main Menu choose Transaction Processing
4 Line
Item Transaction
ID Enter
your initials
PT ID Enter
the patient’s name or ID
DOS Enter
the date of service
T Transaction
w Write
off insurance balance
Y Verify
transaction code
V Verify
transaction
E Press
<Enter> to move cursor to line that needs to be adjusted
If the screen does not look
correct, DO NOT VERIFY.
REFUND
(Posting
Insurance Payments)
Options
9 From
Main Menu choose Transaction Processing
4 Post
D/O/S Transaction
r Refund
to in surance
Y Verify
the transaction code
ID Enter
your initials
PT ID Enter
the patient’s name or ID
Enter
the amount of refund DONOT USE A
NEGATIVE SIGN.
Enter
the date of service
Enter
the doctor number
CHARGE IN
ERROR
(Posting
Insurance Payments)
Options
9 From
Main Menu choose Transaction Processing
4 Line
Item Transaction
ID Enter
your initials
PT ID Enter
the patient’s name or ID
DOS Enter
the date of service or <Tab>
T Transaction
x Insurance
charge posted in error
Y Verify
the transaction code
E Enter
E Press
<Enter> to move cursor to service line to be adjusted
V Verify
the transaction
If the screen does not look
correct, DO NOT VERIFY.
PAYMENT IN
ERROR
(Posting
Insurance Payments)
Options
9 From
Main Menu choose Transaction Processing
4 Line
Item Transaction
ID Enter
your initials
PT ID Enter
the patient’s name or ID
DOS Enter
the date of service
T Transaction
Enter the same insurance payment transaction code
that
was used
when the payment was posted in error.
Y Verify
the transaction code
E Press
<Enter> to move cursor to the line to be corrected
-($) You
must use the negative sign in front of the dollar amount
V Verify
the reversed payment
If the screen does not look
correct, DO NOT VERIFY.
PAYMENT ON
ACCOUNT
(Posting
Insurance Payments)
Options
9 From
Main Menu choose Transaction Processing
4 Line
Item Transaction
ID Enter
your initials
PT ID Enter
the patient’s name or ID
DOS Enter
the date of service
T Transaction:
B
= Blue Shield
M
= Medicare
D
= Medicaid
I
= Private Carrier
These are just a few of
the available codes.
Y Verify
the transaction code
E With
the cursor on the correct line, enter the dollar amount being paid.
If
you need to write off the remaining balance, say Y to the Adjustment prompt and enter the adjustment transaction
code*. The entire amount will be written off.
If
the amount is LESS than you expected
and you need to status the same carrier, say N to the Adjustment prompt.
If
the balance is to be billed to a secondary carrier, use the A at the Adjustment prompt and assign
the balance to the next carrier.
If
the amount is to be transferred to the patient, say Y to the Adjustment prompt and enter the appropriate transfer code.
Enter
the check date/posting date.
Verify
the transaction by typing V.
If the screen does not look
correct, DONOT VERIFY.
*The adjustment codes are the
lower case letters matching the payment code.
THIS PAGE INTENTIONALLY LEFT
BLANK.