Attestation Guide
Modified Stage 2
Step
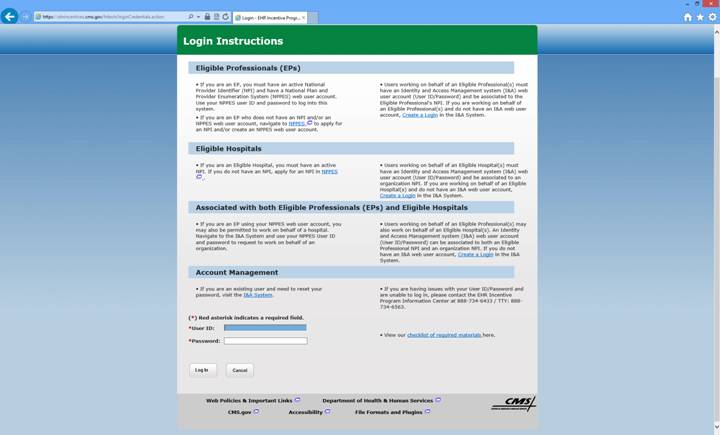
#1: Login to the attestation system as shown on the bottom of the following
screen using your
Use
this link: https://ehrincentives.cms.gov/hitech/login.action
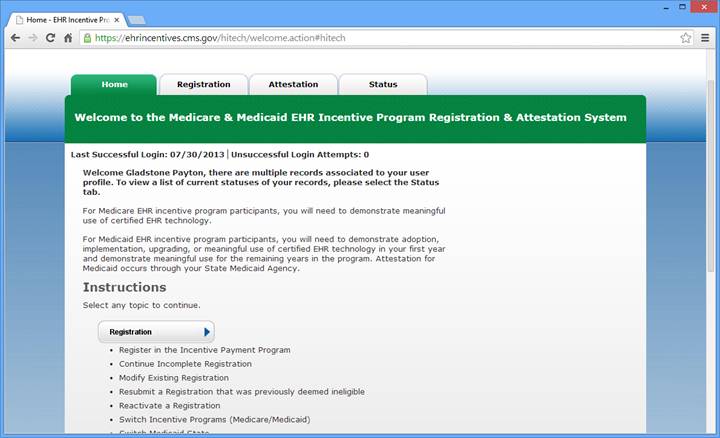
Step
#2:Click the “Attestation” tab on the top of the screen
Step
#3: On the bottom right side click “Modify or Begin Attestation”
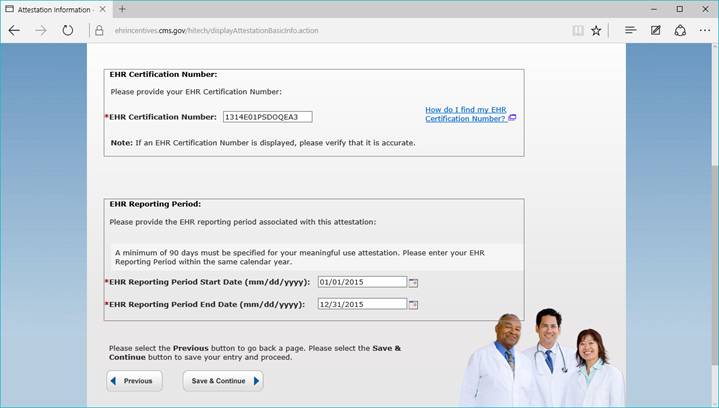
Step
#4: Click the first item “Attestation Information” and fill out the EHR
certification number and the dates used for the 1 year period. ( Example 01/01/2015
– 12/31/2015 )
Please
use the Office medicine EHR certification number as shown below.

Select
the program year and click “ATTEST” or if you already have started click
“MODIFY”
BE
CAREFUL NOT TO GO INTO THE REGISTRATION SECTION BY MISTAKE AND CLICK MODIFY.
DO
NOT MODIFY THE REGISTRATION!
Now we start attesting to the following:
A - All 15 Core Measures
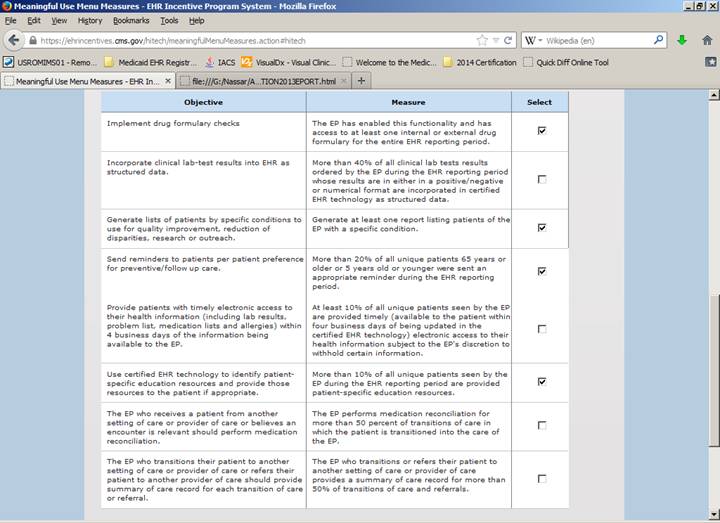
B.- 5 of the 10 Menu Measures
C.- 3 Clinical Quality Core Measures
( or alternate core if one of these first 3 has a zero denominator )
D.- 3 Additional Quality Measures – These vary by practice and specialty
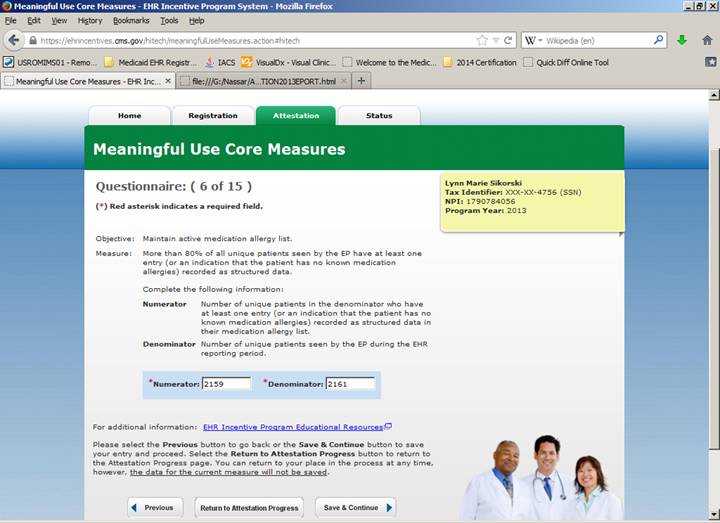
Core #1: CPOE: This is the number of unique patients seen during the period that received one or more e-prescibed Rx or the medication orders from the ORDERS sections.
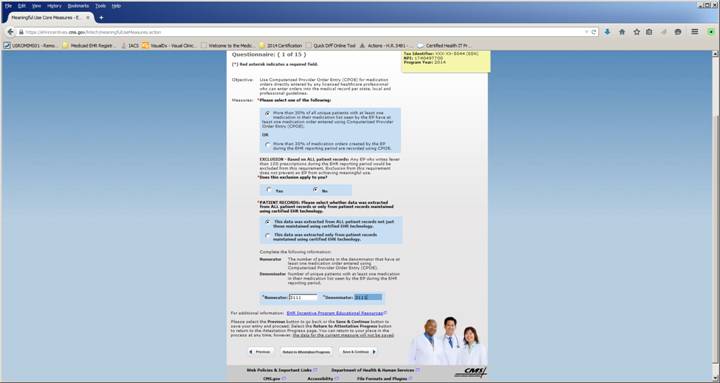
“ALL” patient records ( always answer ALL patient records ) “NO” exclusion unless you write less than 100 Rx per year – This refers to all Patients, not just Medicare Patients.
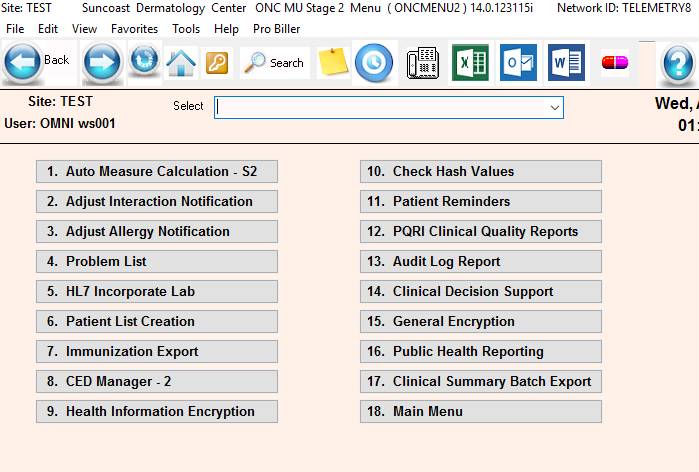
To obtain the numerators and denominators used throughout this process, there are a set of reports located under the “ONCMENU”.
Type “ONCMENU” from the main menu and select item #1 “Attestation Reports” – see below
If
ONCMENU is not available type “EMRQUERYAMCS2.rpt” <Enter> from the main
menu – This is the attestation reporting module.
ONCMENU – Shown below
EHRQUERYAMCS2EMRQUERYAMC2.rpt shown below
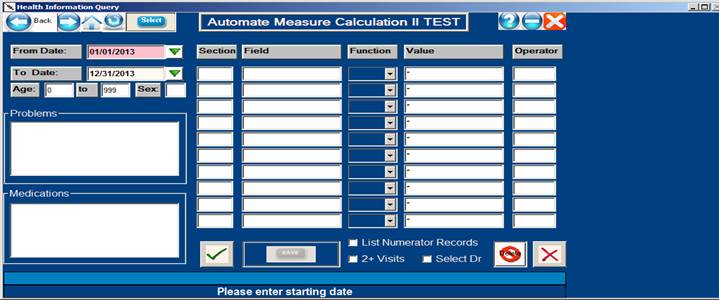
To
run all the attestation reports, enter the starting and ending dates of the
attestation period and then click the green checkmark OK icon.
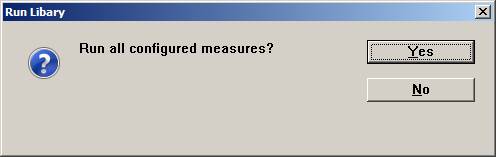
Click “Yes” to run all configured measures ( Everything needed to populate the attestation report )
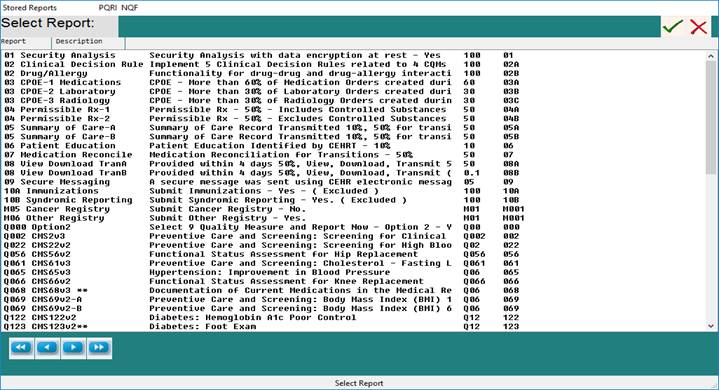
If individual or special reports are needed, click the “SELECT” ( 5th button ) located on the upper toolbar – These are configured predefined reports to help with the attestation process numerators and denominators.
Now select report number to run. Example: click “03 CPOE Medications”
The following screen will come up:

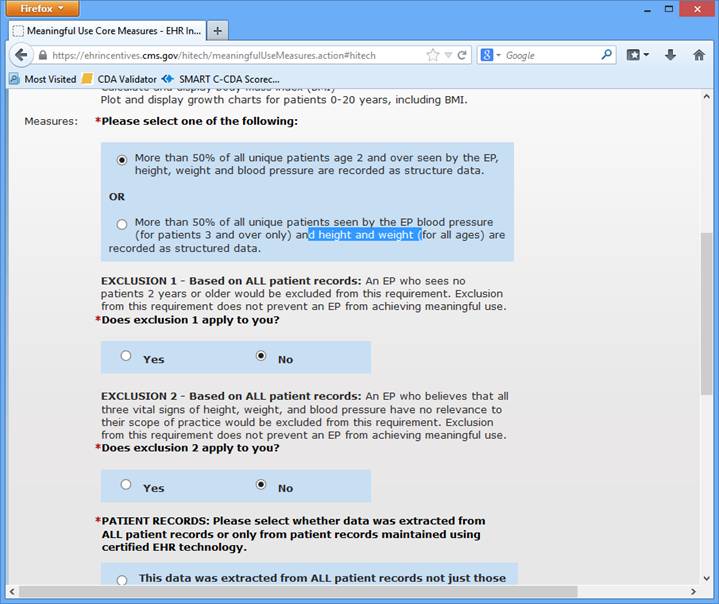
A. Correct the dates on this report to match your 365
or 90 day period as needed. ( Ex: 10/01/2014
– 12/31/2014) For a 90 day period in 2014
Note: If you are only conforming the
minimum STAGE I requirements and are using the “VS” screen instead of the full
EHR, press <enter> through all
the fields and change any report that uses the section code “EXAM” to “VS” as
per the example screen below for BMI.
This will also need
to be done for several other reports if the section code is “EXAM”.
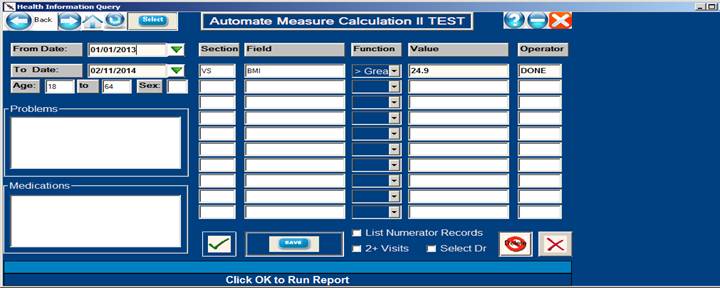
Click “OK” check mark and the following report will be generated:
09:08:41 AM TEST EHR Query: 10/01/2014 - 12/31/2014 PAGE: 0016
01/05/2014 CPOE (30%) TEST PGM: EMRQUERYAMC.rpt
OPID:OMNI VER: 12.0.021411i
__________________________________________________________________________________
Patient Date Doctor Result Form Field
__________________________________________________________________________________
TEST, PATIENT 04/06/2013 005 04062011 EXAM:Plan notes
__________________________________________________________________________________
Objective Records (numerator): 9
Denominator: 10 resulting percentage: 90.0%
TEST 001 Numertor: 9 Denominator: 10 resulting percentage: 90.0%
Record the numerator and denominator for CPOE in the attestation system screen
Note: If you need to make corrections to the data stored in the EHR based on what is seen on the report – please do so – the re-run the report.
It is suggested that a report folder for attestation reports is created and the reports generated to the “Auto Report Viewer” or “PFE Text File” files are saved to this folder for future reference.
Important:
This first measure is a good place to come up with a total number of patients
seen for the attestation day period. This number is called the common
denominator and will be re-used in many of the subsequent items.
Example:
Core Measure for Patient Demographic Fields.
In
office medicine you cannot enter a patient into the EHR or VS screens without
already being in patient demographics so the number should be the same as the
total number of patients seen.
Core
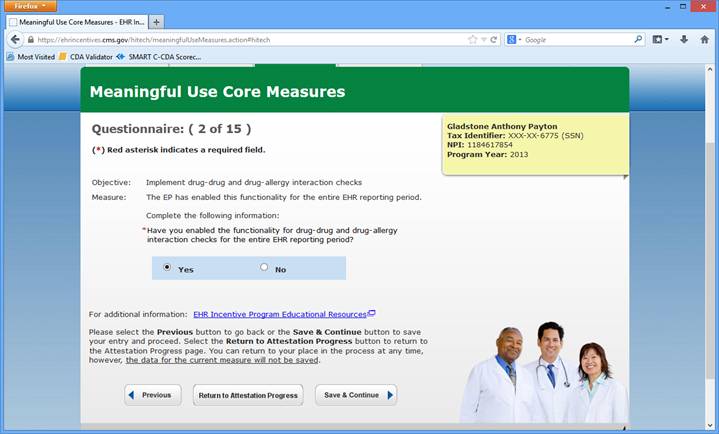
#2: “YES” – Office Medicine has incorporated this feature by default.
Core
#3: Problem List
01 – Problem List – shown above
Correct
the dates on this report to match your 90 day period. ( Ex: 02/01/2011 – 05/01/2011)
Note: If you are only conforming the
minimum STAGE I and are using only the “VS” screen instead of the full EHR,
press <enter> through all the
fields and change the report to use “*” for problems, then change the section code
“EXAM” to “VS” and field to “BMI” >
“BlANK” as per the screen below: This will also need to be done for several
other reports for “VS” only users.
Note2: In office
medicine, there is not a way to avoid recording a problem if the billing
was done.
So unless you are seeing patients for free, the numerator and denominator would
be the same or nearly the same for this item. So every patient seen would most
likely have a problem recorded.
The requirement for
this core is 80%. By using Office Medicine you would automatically have 100%.
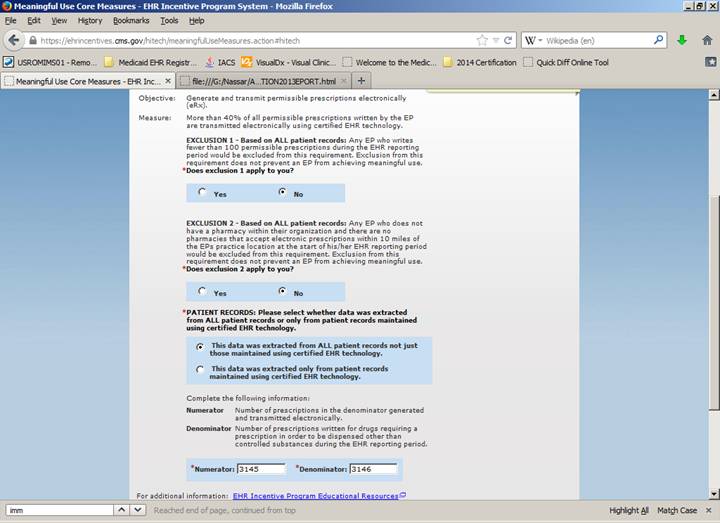
This item wants the total number of e-prescribes done ( numerator ) and the total number of patient prescriptions done whether e-prescribed or not ) denominator.

By using the Rx writer – All patients will have this measure done automatically.
So use the total number of patients seen for the core item #1 as the numerator and denominator.
The minimum requirement for this measure is 80%.
If you are using the Rx writer – All patients will have this measure done automatically.
So use the total number of patients seen for the core item #1 as the numerator and denominator.
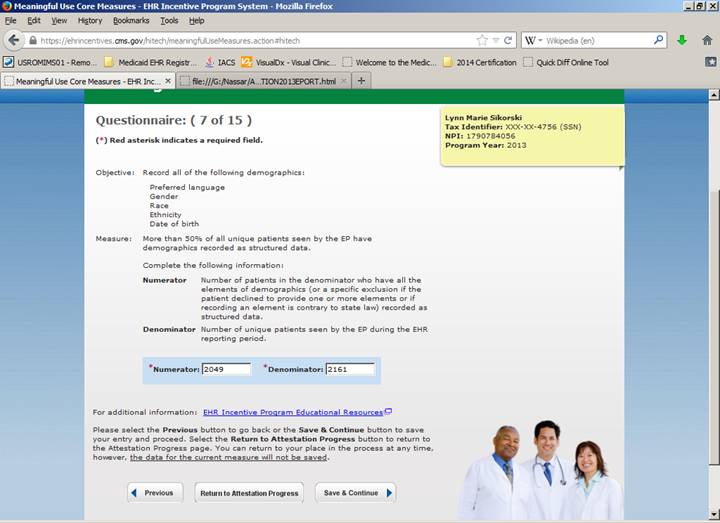
In
office medicine you cannot enter a patient into the EHR or VS screens without
already being in patient demographics so the number will be the same as the
total number of patients seen.
There
is a report for this measure if needed under the select button.
There
is a report for this measure under the select button.
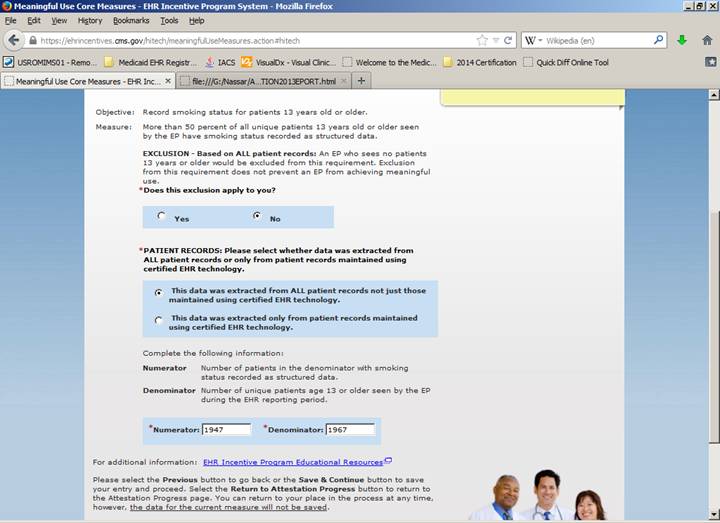
Every
patient should have had a smoking status recorded. Numerator and denominator
should be nearly the same.
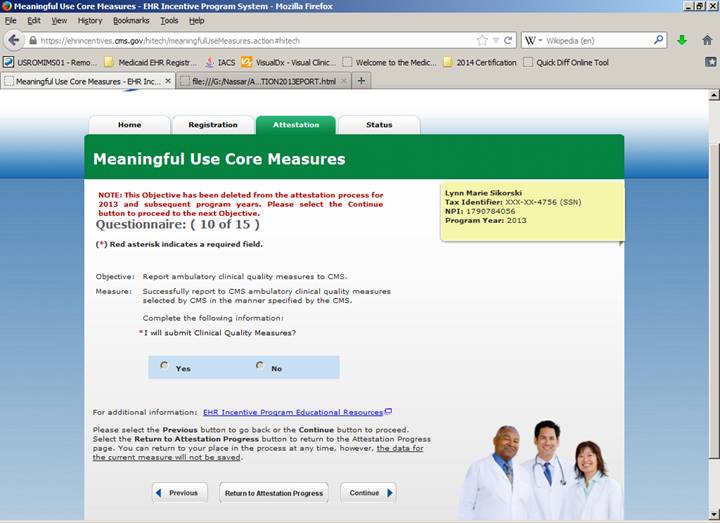
Was “Yes” - For 2013 This measure was deleted.

“YES”
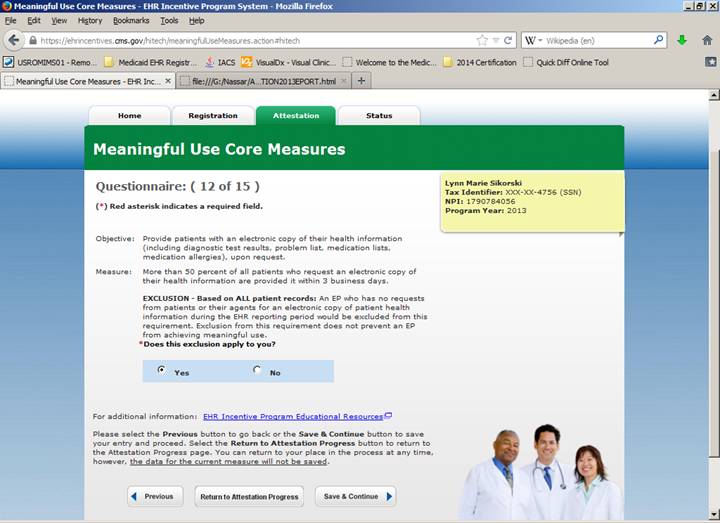
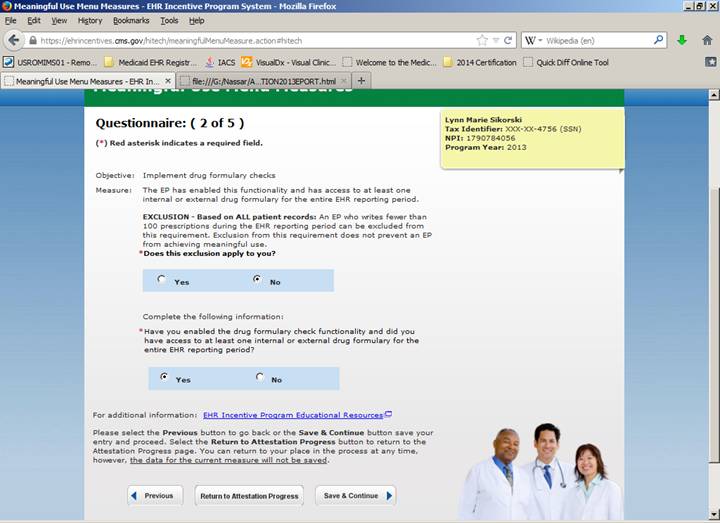
Exclusion – No Requests “YES” ( Unless you have had some requests then enter that number from the report )
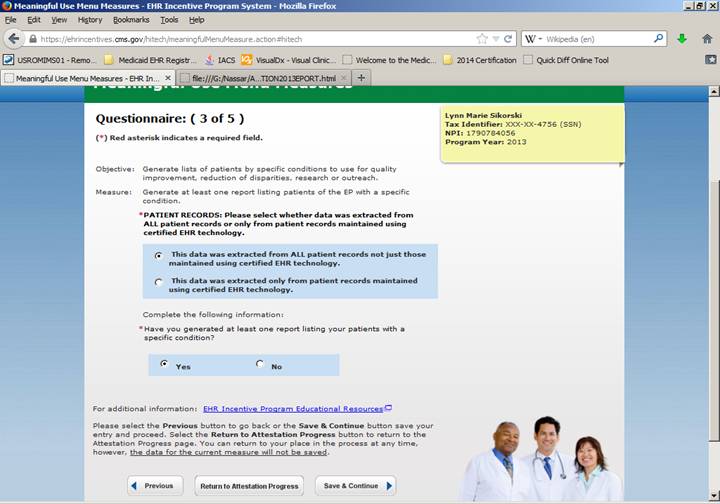
No exclusion
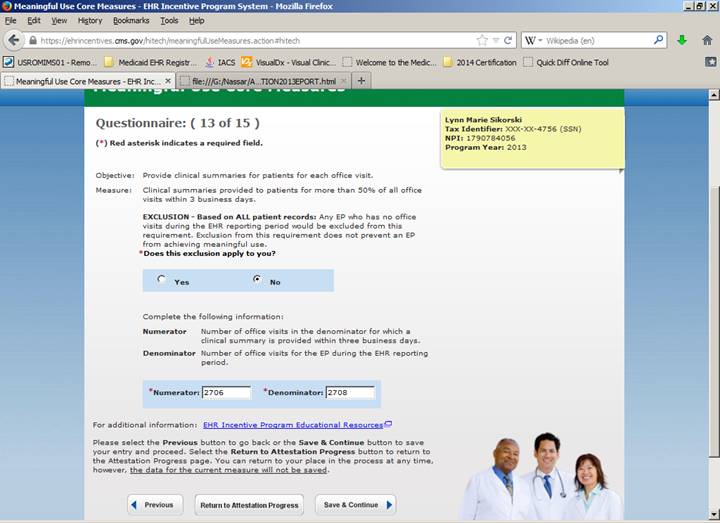
Every patient entered into the office medicine system automatically has a clinical summary generated and Clinical exchange data available for electronic export immediately.
This number should be the number of office visits for the reporting period.
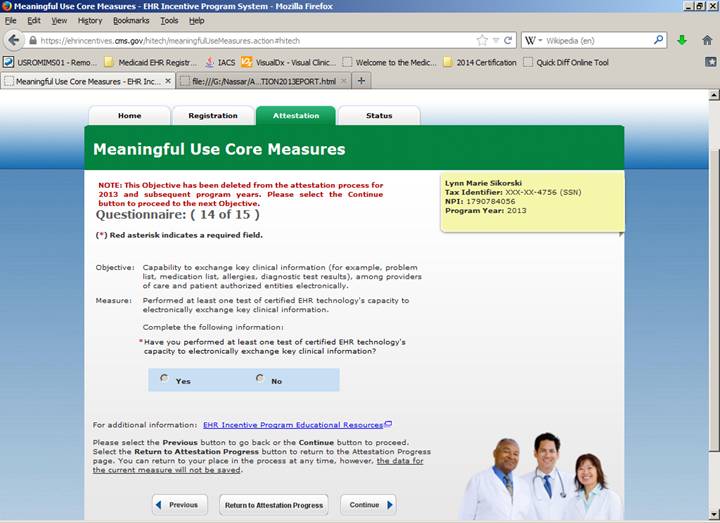
Every patient entered into the office medicine system automatically has a Clinical exchange data available for electronic export immediately. This measure is deleted in 2013.
“YES”
Next Section:
Check you report, but
almost always select the following Menu Measures:
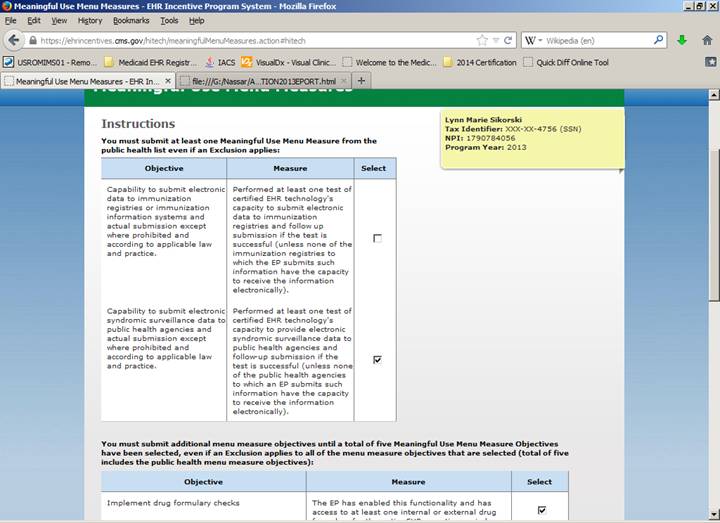
The next section
is continued on the following page.
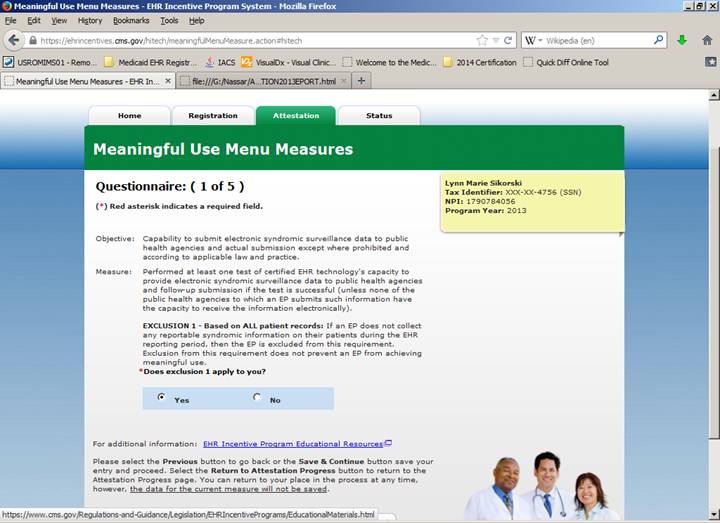
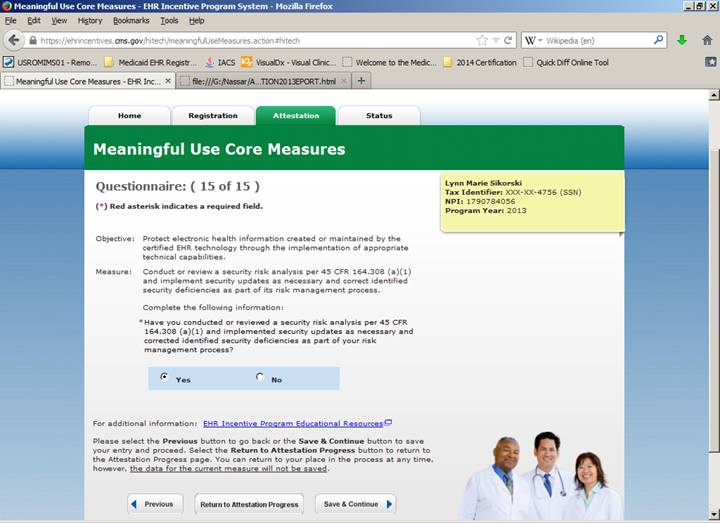
Yes for
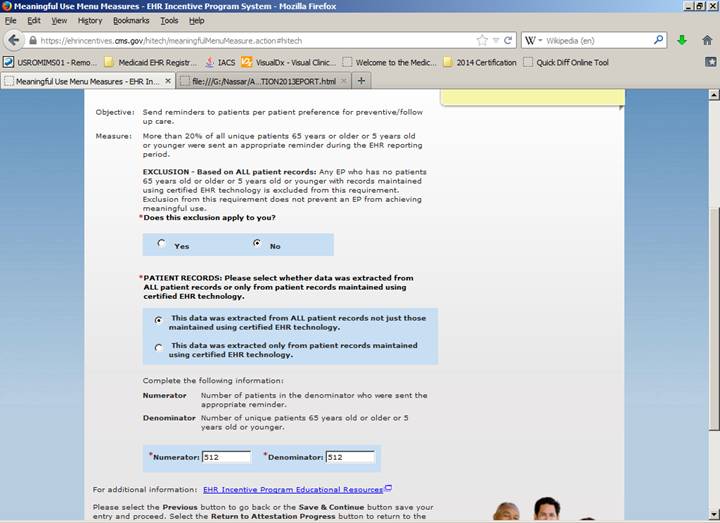
Exclusion 1.
In 2013,
only emergency rooms reported syndromic disease information.
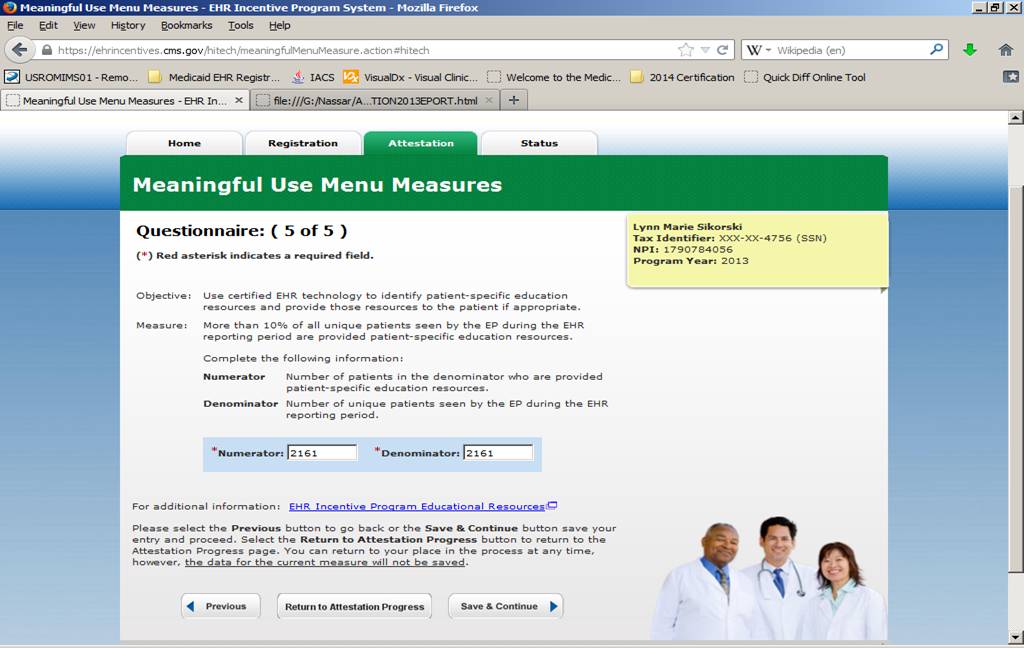
There
is a report for this measure under the select button. ( Patient Advice )
Double Checking:
Please use the meaningful use test calculator link below to be sure your numbers are within the compliance window before final submission:
http://www.cms.gov/apps/ehr/meaningful-use-calculator-professionals.aspx