Quick Setup Guide:
1. Add facility fee codes to procedure dictionary
2. Add link field to professional procedures.
3. Add toggles with TOB.
4. Setup Revenue centers in UB Form Setup.
5. Setup UB Form Control.
AUTOMATED BILLING INSTRUCTIONS FOR UB92 (FACILITY) BILLING
OVERVIEW: The Automated Billing Programs provide the means
to review and correct all UB92 claims entered in the system. Blue
Cross/Blue Shield, Medicare and Medicaid claims entered for a given
day can be approved and then transferred into telecommunication
files or printed out as hard copy ( UB92 – HCFA 2450 forms).
Most private insurance for UB92 claims MUST BE HARD COPIED
after reviewing and making corrections due to limitations of
accepting electronic claims for UB92.
Also provided is the capability of batch rebilling
open or partially paid claims (secondary) and listing these
claims.
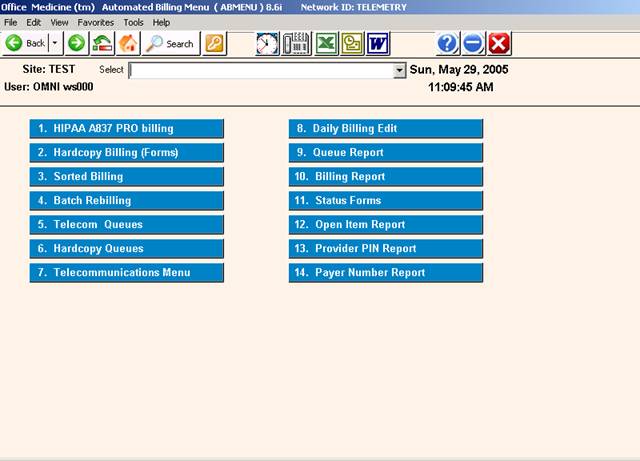
PROCEDURE: From the Main Menu select Option 8 and press <Enter>.
EXAMPLE MENU:
______________________________________________________________________
After selecting Option 8, a new menu will appear with choices
that will permit you to print out claims and listings as
described in the overview. Please see the next page.
TELECOMMUNICATION BILLING
OVERVIEW: Telecommunication Billing allows you to correct
and review any or all PRIMARY claims in the
system for Blue Shield, Medicare, and Medicaid.
This program marks the claim to be included with
the next session.
IMPORTANT: When building telecommunication files for Blue
Shield/Medicare, be sure that the previously
sent file has been ERASED before entering new
claims in this file.
______________________________________________________________________
Select Option 1, Telecommunication Billing, and press <Enter>.
This selection will allow you to build your telecommunications
File for UB92. The system will prompt as follows:
Enter your initials in upper case and press <Enter>.
The screen prompts below will then be displayed.
EXAMPLE SCREEN:
Enter your selection at the flashing cursor by typing the
number that precedes your selection or use the <Up>/<Down>
arrow keys to highlight the line and press <Enter>.
Once you have made your selection, the screen on the
following page will be displayed.
EXAMPLE SCREEN:

THE SITE PROMPT WILL BE PROMPTED ONLY IF YOU HAVE MORE THAN ONE LOCATION.
TO BILL OR REVIEW A CLAIM:
PATIENT METHOD: To view a particular patient's claim, enter
the patient's ID number or a few letters of the patient's last
name and press <Tab>. The system will display a Master Search
Screen which provides several selections by which you may
search.
D/O/S METHOD: To view ALL claims from a particular date of
service, press <Enter> once to pass the field PATIENT, and
enter the date of service you wish to view at the D/O/S prompt.
Press <Tab> to list dates of service.
D/O/E METHOD: To view ALL claims from a particular date of
entry, press <Enter> twice; first, to pass the PATIENT prompt
and second, to pass the D/O/S prompt. Enter the DATE OF ENTRY
of the claims you would like to view at the D/O/E prompt and
press <Enter>. The system will search for ALL claims entered
on or after that D/O/E. When a claim is found, a screen similar
to the one below will be displayed.
EXAMPLE SCREEN:
NOTE: Each claim should be reviewed prior to transmission for charges
posted to correct patient; proper insurance billed for service(s); a
diagnosis code is entered for each procedure being billed.
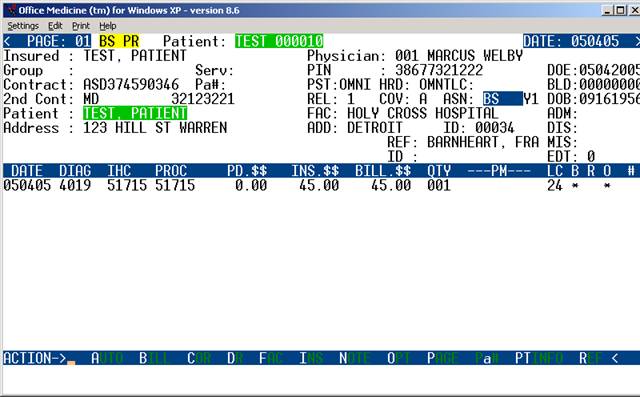
EXPLANATION OF TOP (PATIENT INFORMATION) PORTION OF SCREEN:
The top portion of the claim contains the data entered on the
Patient Information screen: Patient's name, subscriber's name,
patient's address, patient's insurance type, subscriber's
insurance contract numbers, relationship code and the patient's
date of birth. The top portion of the screen also contains the
provider's name, ID number and license number, areas for an
admission date, discharge date, miscellaneous date, facility
name and referring doctor's name when required.
TYP: These are Michigan specific fields that pertain to
Michigan Medicaid. The information (what type of physician
they are, i.e.: MD, DO, etc) entered here is pulled from the
Provider/Referral Dictionaries.
PST: Each claim is marked with the INITIALS of the person
who POSTED or entered the claim.
HRD: Each claim is marked with the INITIALS of the person
who HARD COPIED (PRINTED) a form.
TLC: Each claim is marked with the INITIALS of the person
who put the claim in the TELECOMMUNICATION FILE.
BLD: Each claim will have a BILLED DATE automatically entered
indicating the last date the claim has been hard copied or tele-
communicated. If there is no date, the claim has not been billed.
EXPLANATION OF CENTER (PROCEDURE INFORMATION) PORTION OF SCREEN:
The center portion of the screen contains the information
pertaining to the procedures performed.
DATE: The DATE that the service described was performed.
DIAG: The DIAGNOSIS CODE used for billing this procedure.
IHC: The IN-HOUSE CODE that was used when this procedure was
entered in Patient Checkout.
PROC: The PROCEDURE CODE as entered in your Procedure/Charge
Code Dictionary.
PD.$$: The DOLLAR AMOUNT that has been PAID by the INSURANCE
CARRIER on this procedure.
INS.$$: The DOLLAR AMOUNT that is EXPECTED from the INSURANCE
CARRIER on this procedure.
BILL.$$: The DOLLAR AMOUNT that will be BILLED to the INSURANCE
CARRIER on this procedure.
QTY: The QUANTITY or NUMBER of times this procedure was performed
on this date of service.
PM: The MODIFIER(s) required on this procedure for billing/
reimbursement purposes (i.e.: FS=FULL SERVICE, 50=BILATERAL,
X3=RIGHT FOOT, etc.). There are two fields in this area for
entering up to two PRICING MODIFIERS.
LC: The LOCATION CODE indicates the place this service was
performed (i.e.: 11=office, 21=inpatient hospital, 24=outpatient surgical center)
B R O: Asterisk * under B = Line previously has been billed out.
Asterisk * under R = Payment or Rejection has been received.
Asterisk * under O = Output. That line will be billed out.
EXPLANATION OF ACTION LINE FUNCTIONS:
A=AUTO: This command will AUTOMATICALLY COPY (into the
TELECOMMUNICATIONS FILE) all the claims that were entered
from the point where the AUTO command was given without
allowing for corrections.
B=BILL: If you wish to review each claim prior to billing,
you would use after completing your review. This command
will copy all the appropriate billing information from this
claim and place it in the file for telecommunication.
C=COR: This function will allow you to correct all fields
except PROC, and INS.$$.
Enter a C at the Action Line and press <Enter> to have the
cursor move to the first line of billing. Press the <Right>
arrow key to go to the DATE column. You may change the date
of service. Continue to use the <Right> arrow to move across
the line. When the correction(s) are complete, press the
<Home> key to return to the Action Line.
EXAMPLE SCREEN:
DATE DIAG IHC PROC PD.$$ INS.$$ BILL.$$ QTY ---PM---LC B R O #
020195 463 93307 933307 20.00 0.00 20.00 001 X6 25 3
020195 463 93310 933320 5.00 14.25 25.00 001 -- -- -- *
020195 486 93372 933774 5.00 25.00 40.00 001 FS 3 *
^ ^ ^ ^ ^ ^ ^ ^ ^ ^ ^ ^ ^
ARROW KEY FUNCTIONS:
<Right> arrow key to go to column 1 (DATE) from the Action Line.
Continue using the <Right> arrow to move across the line.
<Up> arrow to go up one line in the same column.
<Down> arrow to go down one line in the same column.
<Home> key to return to Action Line.
D=DR: If the claim was entered under the INCORRECT DOCTOR NUMBER,
you have the opportunity to correct it at this time. Enter D for
DOCTOR NUMBER and press <Enter>. The system will open a window
listing the assigned provider. You may change the Provider.
Press the <Home> key to return to the Action Line. The changes
made do not alter the ledger or A/R files.
F=FAC: (You cannot do a search from here.) If the FACILITY
was not entered on either the Patient Information screen or in
Patient Checkout when this claim was created, it may now be added
to this claim by entering F for FACILITY. The cursor will move
up and allow you to enter the FACILITY CODE (as previously
defined in your Facility Code Dictionary), and then you press
<Enter>. The cursor will return to the Action Line.
H=HRD: After all information has been verified, enter H and
press <Enter> for a PRINTED COPY/HARD COPY of the claim on
the appropriate form.
I=INS: To add additional information, enter I and press <Enter>.
The system will open a window allowing you to add additional
insurance information such as: Admission Date, Discharge Date,
Onset, Prior Occurrence, and Disabled dates. This can be used
if the information was omitted when the claim was created in
Patient Checkout. Press <Enter> or the <Home> key to return
to the Action Line.
N=NOTE: You may also enter any ADDITIONAL INFORMATION that
you wish to appear on the claim form. By entering N for NOTE,
the cursor will move and allow you to type the additional
information. In the telecommunication files, there is room
for two lines of notes. When you have entered the additional
information, press <Enter> and the cursor will return to the
Action Line.
O=OPTIONS: If it is necessary to indicate that you are attaching
documentation to the claim, enter O (alpha character, not zero)
for an OPTION screen. Depending on which insurance you are
working with, one of the following option screens (HCFA 1500 or
Blue Cross) will be displayed. Please see the example on the next
page.
The item numbers in parentheses correspond to those found on the UB92 form.
EXAMPLE SCREEN:
UB OPTIONS SCREEN
ITEM-FIELD CURRENT VALUE ITEM-FIELD CURRENT VALUE
1. (2) BOX 2 : 20. (33b) OCCUR CODE:
2. (7) COV D. : 21. (34b) OCCUR CODE:
3. (8) N-C D. : 22. (35b) OCCUR CODE:
4. (9) C-I D. : 23. (36a) OCCUR SPAN:
5. (10) L-R D. : 24. (36b) OCCUR SPAN:
6. (11) BOX 11 : 25. (37) BOX 37 :
7. (16) MS : 26. (39a) VAL CODE :
8. (18) ADMIT HOUR: 27. (40a) VAL CODE :
9. (19) ADMIT TYPE: 28. (41a) VAL CODE :
10. (20) ADMIT SRC : 29. (39b) VAL CODE :
11. (21) D HR : 30. (40b) VAL CODE :
12. (22) STAT : 31. (41b) VAL CODE :
13. (24+) COND CODES: 32. (39c) VAL CODE :
14. (31) BOX 31 : 33. (40c) VAL CODE :
15. (32a) OCCUR CODE: 34. (56) BOX 56 :
16. (33a) OCCUR CODE: 35. (57) BOX 57 :
17. (34a) OCCUR CODE: 36. (76) ADM DIAG :
18. (35a) OCCUR CODE: 37. (77) E-CODE :
19. (32b) OCCUR CODE: 38. (78) BOX 78 :
ITEM # TO CHANGE, R FOR REMARKS, PRESS <Enter> TO RETURN TO CLAIM
P=PAGE: By entering P for PAGE, you may PAGE to the next
claim without billing this claim. The next claim that will
display depends upon how this claim was selected. If this claim
was retrieved by D/O/S (Date of Service), the next claim will
be sequential by patient number. If this claim was retrieved
by D/O/E (Date of Entry), the next claim displayed will be
sequential both by patient number and the date entered.
R=REF: (You cannot do a search from here.) The command R will
allow you to enter the REFERRING physician's code (as previously
defined in your Referral Codes Dictionary) on the claim, if it
is needed. This only needs to be added if the procedure(s)
listed and the REFERRING PHYSICIAN's name was not entered in
Patient Information or in Patient Checkout when the claim was
entered.
CORRECTING PATIENT INFORMATION: To correct information found
in Patient Information, enter PT at the command line.
******ACTION LINE HIDDEN COMMAND OPTIONS******
a=AUTH: Although not shown in the Action Line, if this claim
requires a PRIOR AUTHORIZATION NUMBER, and the number was not
entered during Patient Checkout, enter lower case "a" and press
<Enter>. The system will open a window in the middle of the
screen and allow you to enter a PRIOR AUTHORIZATION NUMBER.
Press <Enter> to close the window.
M=MENU: If you type M and press <Enter>, you will return
to the Automated Billing Menu.
S=ASSIGNMENT: If you type S and press <Enter>, you will
have the capability of changing the assignment on this
claim from YES to NO or from NO to YES.
Esc=END: If you type 0 (numeric zero) and press <Enter>,
you will END and return to the Site prompt.
TO EXIT: Type a 0 (numeric zero) and press <Enter> at the
Site prompt. You will be returned to the Automated Billing
Menu.
END OF TELECOMMUNICATION BILLING.
UB92 FORMS BILLING
OVERVIEW: This program allows you to print a hard copy
of the claim form. You also have the option
to view each claim prior to printing.
PROCEDURE: From the Main Menu select Option 8 and press
<Enter>.
After selecting Option 8, the Automated Billing Menu
will be displayed.
Select Option 2, Hard Copy Billing (Forms) and press <Enter>.
Enter your initials in upper case and press <Enter>. The screen
on the next page will then be displayed.
EXAMPLE SCREEN:

SELECT #: 1= Medical Services
1=All Carriers 4=Medicaid
2=Blue Shield 5=Commercial
3=Medicare 6=Workman's Comp.
Enter your selection at the flashing cursor by typing the
number that precedes your selection and press <Enter>,
or use the Directional Arrow keys to highlight the line
and then press <Enter>. A window will open allowing you
to select the forms to print. Please see the example below.
EXAMPLE:
the toggle for this program is
1. 1500 FORMS set to activate UB92 billing.
2. UB92 FORMS
SELECT#:
Enter the number of the forms you wish to process and press
<Enter>. The default is number 1.
Another window will open allowing you to select what type of
claims to process. Please the example below.
EXAMPLE:
1. BOTH
2. PRIMARY
3. SECONDARY
4. UNBILLED
SELECT#:
1. BOTH: Primary and Secondary claims.
2. PRIMARY: Claims being billed to the patient's Primary
insurance (first responsible carrier).
3. SECONDARY: Claims being billed to other than the Primary
insurance.
4. UNBILLED: Claims that, for some reason, have never been
billed.
After you have entered your selection, the system will open a
window displaying output devices. Please see the example
below.
EXAMPLE SCREEN:
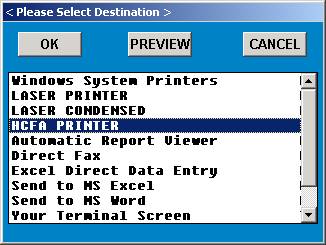
Select the appropriate output device and press <Enter>.
The system will then display the Hardcopy Claims Master
screen shown below. Enter patient name or ID number.
EXAMPLE SCREEN:
Press <Tab> to List Open Dates of Service, <Down Arrow>=All
Enter the Site you want to process and press <Enter>.
You may page through claims by Patient Name and then Date of
Service or Date of Entry. You may also bypass Patient Name
and page through all claims by Date of Service or Date of Entry.
After you have satisfied these prompts, the system will begin
sorting and display the first claim. An example claim is shown
below.
EXAMPLE SCREEN:
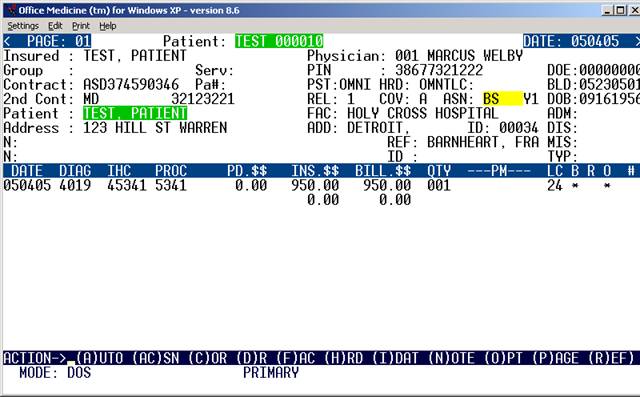
VIEWING A CLAIM
EXPLANATION OF TOP (PATIENT INFORMATION) PORTION OF SCREEN:
The top portion of the claim contains the data entered on the
Patient Information screen: Patient's name, subscriber's name,
patient's address, patient's insurance type, subscriber's
insurance contract numbers, relationship code and the patient's
date of birth. The top portion of the screen also contains the
provider's name, ID number and license number, areas for an
admission date, discharge date, miscellaneous date, facility
name and referring doctor's name when required.
TYP: These are Michigan specific fields that pertain to
Michigan Medicaid. The information (what type of physician
they are, i.e.: MD, DO, etc) entered here is pulled from the
Provider/Referral Dictionaries.
PST: Each claim is marked with the INITIALS of the person
who POSTED or entered the claim.
HRD: Each claim is marked with the INITIALS of the person
who HARD COPIED (PRINTED) a form.
TLC: Each claim is marked with the INITIALS of the person
who put the claim in the TELECOMMUNICATION FILE.
BLD: Each claim will have a BILLED DATE automatically entered
indicating the last date the claim has been hard copied or
telecommunicated. If there is no date, the claim has not been
billed.
EXPLANATION OF CENTER (PROCEDURE INFORMATION) PORTION OF SCREEN:
The center portion of the screen contains the information
pertaining to the procedures performed.
DATE: The DATE that the service described was performed.
DIAG: The DIAGNOSIS CODE used for billing this procedure.
IHC: The IN-HOUSE CODE that was used when this procedure was
entered in Patient Checkout.
PROC: The actual PROCEDURE CODE as entered in your Procedure/
Charge Code Dictionary, preceded by the type of service code.
PD.$$: The DOLLAR AMOUNT appearing in the PD.$$ column is the
AMOUNT that has been PAID by the INSURANCE CARRIER on this
procedure.
INS.$$: The DOLLAR AMOUNT in the INS.$$ column is the AMOUNT
that is EXPECTED from the INSURANCE COMPANY.
BILL.$$: The DOLLAR AMOUNT appearing in the BILL.$$ column is
the AMOUNT that will be BILLED TO the INSURANCE COMPANY.
QTY: The QUANTITY or NUMBER of times this procedure was
performed on this date of service.
PM: The MODIFIER(S) required on this procedure for billing/
reimbursement purposes (i.e.: FS=FULL SERVICE, 50=BILATERAL,
X3=RIGHT FOOT, etc.) There are two fields in this area for
entering up to two PRICING MODIFIERS.
LC: The LOCATION CODE indicates the place this service was
performed (i.e.: 11=office, 21=inpatient hospital, 24=outpatient facility
hospital.)
B R O: Asterisk * under B = Line previously has been billed out.
Asterisk * under R = Payment or Rejection has been received.
Asterisk * under O = Output. That line will be billed out.
EXPLANATION OF ACTION LINE FUNCTIONS:
A=AUTO: All of the claims that were entered in Patient Checkout
can be printed AUTOMATICALLY by entering A for AUTO. This
command will AUTOMATICALLY print a hard copy of all the claims
that were entered from the point where the AUTO command was given.
AC=ASSIGNED CARRIER: If you type AC and press <Enter>, you
will have the capability of changing the carrier for this claim.
Once in this option, at the BILL CARRIER prompt enter the number
of the carrier you wish to assign and press <Enter>.
C=COR: This function will allow you to correct all fields
except PROC, PD.$$ and INS.$$.
Enter a C at the Action Line and press <Enter> to have the
cursor move to the first line of billing. Press the <Right>
arrow key to go to the DATE column. You may change the date
of service. Continue to use the <Right> arrow to move across
the line. When the correction(s) are complete, press the
<Home> key to return to the Action Line.
EXAMPLE SCREEN:
DATE DIAG IHC PROC PD.$$ INS.$$ BILL.$$ QTY ---PM---LC BRO #B
020195 463 93307 933307 20.00 0.00 20.00 001 X6 25 3
020195 463 93310 933320 5.00 14.25 25.00 001 -- -- -- *
020195 486 93372 933774 5.00 25.00 40.00 001 FS 3 *
^ ^ ^ ^ ^ ^ ^ ^ ^ ^ ^^^
CORRECTION ARROW KEY FUNCTIONS:
<Right> arrow key to go to column 1 (DATE) from the Action Line.
Continue using the <Right> arrow to move across the line.
<Up> arrow to go up one line in the same column.
<Down> arrow to go down one line in the same column.
<Home> key to return to Action Line.
D=DR: Allows you to change a doctor number or add a second
doctor number. Enter D for Doctor Number and press <Enter>.
The system will open a window listing the assigned provider.
Thru this window you may change a provider code or add a
second provider code. You can have up to three provider
codes assigned to one claim. Press the <Home> key to return
to the Action Line. The changes made do not alter the ledger
or A/R files.
F=FAC: You may <Tab> search from this field. If the FACILITY
was not entered on either the Patient Information screen or in
Patient Checkout when this claim was created, it may now be added
to this claim by entering F for FACILITY. The cursor will move
up and allow you to enter the FACILITY CODE (as previously
defined in your Facility Code Dictionary), and then you press
<Enter>. The cursor will return to the Action Line.
H=HRD: After all information has been verified, enter H and
press <Enter> for a PRINTED COPY/HARD COPY of the claim on
the appropriate form.
I=DAT: To add additional information, enter I and press <Enter>.
The system will open a window allowing you to add additional
insurance information such as: Admission Date, Discharge Date,
Onset, Prior Occurrence, and Disabled dates. This can be used
if the information was omitted when the claim was created in
Patient Checkout. Press <Enter> or the <Home> key to return
to the Action Line.
N=NOTE: You may also enter any ADDITIONAL INFORMATION that
you wish to appear on the claim form. By entering N for NOTE,
a window will open allowing you to enter up to eight lines of
information. On hard copy forms, there is room for three
lines of notes. Press the <Home> key to close the window and
return to the Action Line.
O=OPT: If it is necessary to indicate that you are attaching
documentation to the claim, enter O (alpha character, not
zero) for an OPTION screen. Depending on which insurance
form you are printing, one of the following option screens
(UB92, HCFA 1500) will be displayed. Please
see example screens on following pages.
UB OPTIONS SCREEN
The item numbers in parentheses correspond to those found on the
UB92 form.
EXAMPLE SCREEN:
ITEM-FIELD CURRENT VALUE ITEM-FIELD CURRENT VALUE
1. (2) BOX 2 : 20. (33b) OCCUR CODE:
2. (7) COV D. : 21. (34b) OCCUR CODE:
3. (8) N-C D. : 22. (35b) OCCUR CODE:
4. (9) C-I D. : 23. (36a) OCCUR SPAN:
5. (10) L-R D. : 24. (36b) OCCUR SPAN:
6. (11) BOX 11 : 25. (37) BOX 37 :
7. (16) MS : 26. (39a) VAL CODE :
8. (18) ADMIT HOUR: 27. (40a) VAL CODE :
9. (19) ADMIT TYPE: 28. (41a) VAL CODE :
10. (20) ADMIT SRC : 29. (39b) VAL CODE :
11. (21) D HR : 30. (40b) VAL CODE :
12. (22) STAT : 31. (41b) VAL CODE :
13. (24+) COND CODES: 32. (39c) VAL CODE :
14. (31) BOX 31 : 33. (40c) VAL CODE :
15. (32a) OCCUR CODE: 34. (56) BOX 56 :
16. (33a) OCCUR CODE: 35. (57) BOX 57 :
17. (34a) OCCUR CODE: 36. (76) ADM DIAG :
18. (35a) OCCUR CODE: 37. (77) E-CODE :
19. (32b) OCCUR CODE: 38. (78) BOX 78 :
ITEM # TO CHANGE, R FOR REMARKS, PRESS <Enter> TO RETURN TO CLAIM
ITEM #__ TO CHANGE: Type the item number for which you need to
enter a value and press <Enter>.
R FOR REMARKS: Type R to access a remarks line.
PRESS <Enter> TO RETURN TO CLAIM: Will return you to the claim
you are working with.
DEFINITION OF UB OPTIONS SCREEN FIELDS:
1. (2) BOX 2: This is an unlabeled field. Generally used for a
claim reference number or document control number.
2. (7) COV D: Covered Days. The number of days covered by the
primary payer, as qualified by the payer organization.
3. (8) N-C D: Not Covered Days. The number of days not covered
by the primary payer.
4. (9) C-I D: Co-Insurance Days. The inpatient Medicare days
which occur after the 60th days and before the 91st days in a
single benefit period and the SNF days from the 21st days in a
benefit period are considered co-insurance days.
5. (10) L-R D: Lifetime Reserve Days. Each Medicare beneficiary
has a lifetime reserve of 60 additional days of inpatient hospital
services during a benefit period.
6. (11) BOX 11: Medicaid sponsor physician identification number.
The Medicaid Provider Identification Number of the physician
primarily responsible for the medical care of a patient enrolled
in the Physician Sponsor Plan.
7. (16) MS: Patient Marital Status (MS). The marital status of
the patient at date of admission, outpatient service, or start
of care.
8. (18) ADMIT HOUR: Admission Hour. The hour when the patient
was admitted for inpatient care.
9. (20) ADMIT TYPE: Type of Admission. A code indicating the
priority of this admission (Hospital Inpatient only).
10. (20) ADMIT SCR: Source of Admission. A code indicating the
source of this admission or outpatient registration.
11. (21) D HR: Discharge Hour. Hour that the patient was
discharged from inpatient care.
12. (22) STAT: Patient Status. A code indicating the patient
status as of the Statement Covers Period date.
13. (24+) COND CODES: Condition Codes. Codes that have been
developed for the purpose of giving additional information about
the patient or circumstances regarding the services rendered.
The Condition Codes are grouped into eleven (11) categories.
Insurance Codes (01-16)
Special Conditions Codes (17-30)
Student Status Codes (31-35)
Accommodation Codes (36-45)
CHAMPUS Information Codes (46-54)
SNF Information Codes (55-59)
Prospective Payment Codes (60-70)
Renal Dialysis Setting Codes (71-76)
Other Codes (77-93)
IPD Codes 994-96)
State Assigned Codes (97-99)
Special Program Indicator Codes (A0-B9)
PRO Approval Indicator Codes (C0-C9)
Claim Change Reasons (D0-W9)
Medicaid Information (X0-Z9)
When preparing a claim where there is only one Condition Code,
F.L. 24 should be used.
If a claim requires more than one Condition Code, the Condition
Codes should be in ascending order in F.L. 24-30.
14. (31) BOX 31: Unlabeled - reserved for national use.
15. (32a) - 22. (35b): Occurrence Codes and Dates. The code of
a significant event relating to treatment. Fields 32a-35a must
be completed before fields 32b-35b.
23. (36a) - 24. (36b): Occurrence Span. When occurrence code
fields 32a-35b are filled, then 36a&b may be used to capture
additional occurrence codes. In some instances the through
date may be left blank.
25. (37) BOX 37: Internal/Document Control Number (unlabeled).
The control number assigned to the original bill by the payer
or the payer's intermediary.
26. (39a) - 33. (40c) VAL CODE: Value Codes and Amounts. A code
structure to relate amounts or values to identified data elements
necessary to process this claim, as qualified by the payer organi-
zation. The purpose is to determine eligibility of benefits.
34. (56) BOX 56: Unlabeled - reserved for state use.
35. (57) BOX 57: Unlabeled - reserved for national use.
36. (76) ADM DIAG: Admitting Diagnosis. The ICD-9-CM diagnosis
code provided at the time of admission as stated by the physician.
37. (77) E-CODE: The ICD-9-CM code for the external cause of
injury, poisoning, or adverse effect.
38. (78) BOX 78: Diagnostic Related Group (unlabeled). The
Diagnostic Related Group (DRG) code for the bill, as determined
by the provider.
H C F A 1500 FORM OPTIONS MENU
The fields in parentheses correspond to those found on the HCFA 1500 form.
EXAMPLE SCREEN:
ITEM FIELD DESCRIPTION CURRENT VALUE
1. (8) PATIENT STATUS :
2. (10a) EMPLOYMENT RELATED :
3. (10b) AUTO ACCIDENT :
4. (10c) OTHER ACCIDENT :
5. (10d) RESERVED FOR LOCAL USE :
6. (14) DATE OF CURRENT ILLNESS :
7. (15) DATE OF SIMILAR ILLNESS :
8. (16) DATE UNABLE TO WORK FROM:
9. (16) DATE UNABLE TO WORK TO :
10. (19) RESERVED FOR LOCAL USE :
11. (20) OUTSIDE LAB :
12. (22) MD RESUBMISSION CODE :
13. (22) MD ORIGINAL CLAIM REF NO:
14. (24h) EPSDT FAMILY PLAN :
15. (24i) MEDICAL EMERGENCY :
16. (24j) COB :
ITEM # __ TO CHANGE - PRESS <RETURN> TO RETURN TO CLAIM
ITEM #__ TO CHANGE: Type the item number for which you need to enter a value and press <Enter>.
PRESS <Enter> TO RETURN TO CLAIM: Press <Enter> to go back to
the claim you are working with.
DEFINITION OF HCFA 1500 OPTIONS MENU FIELDS:
1. (8) PATIENT STATUS: Valid responses are E=Employed, F=Full Time
Student, P=Part Time Student, or you may leave this field blank.
2. (10a) EMPLOYMENT RELATED: Was this claim due to an employment
related accident. Valid responses are Y=Yes, N=No, or you may leave
this field blank.
3. (10b) AUTO ACCIDENT: Was this claim due to an auto accident.
Valid reponses are Y=Yes, N=No, or you may leave this field blank.
4. (10c) OTHER ACCIDENT: Was this claim due to an accident other
than the two mentioned above. Valid responses are Y=Yes, N=No, or
you may leave this field blank.
5. (10d) RESERVED FOR LOCAL USE: Valid responses vary from state-
to-state.
6. (14) DATE OF CURRENT ILLNESS: Using the MMDDYY format, enter the
date of the current illness (first symptom), injury (accident), or
pregnancy (LMP).
7. (15) DATE OF SIMILAR ILLNESS: Using the MMDDYY format, enter the
date the patient had same or similar illness.
8. (16) DATE UNABLE TO WORK FROM:
9. (16) DATE UNABLE TO WORK TO: Using the MMDDYY format, enter the
dates patient unable to work in current occupation.
10. (19) RESERVED FOR LOCAL USE: This field may be used for free
text.
11. (20) OUTSIDE LAB: If there are Lab charges, was the service
performed by an outside lab. Valid responses are Y=Yes, N=No,
or you may leave this field blank.
12. (22) MD RESUBMISSION CODE: For this code, you will need to
refer to Medicaid guidelines.
13. (22) MD ORIGINAL CLAIM REF NO: For this reference number, you
will need to refer to Medicaid guidelines.
14. (23) COB: Coordination of Benefits Indicator
P=PAGE: You PAGE to the next claim with or without making a
hard copy of this claim by entering P for PAGE.
PT=Patient Demographic. This command allows access to the demographic
Screens for the current patient. Changes will be reflected on the claim
Immediately after exiting the patient screens.
R=REF: You may <Tab> search from this field. The command R will
allow you to enter the REFERRING physician's code (as previously
defined in your Referral Codes Dictionary) on the claim, if it
is needed. This only needs to be added if the procedure(s) listed
and the REFERRING PHYSICIAN's name was not entered in Patient
Information or in Patient Checkout when the claim was created.
******ACTION LINE HIDDEN COMMAND OPTIONS******
a=AUTH: Although not shown in the Action Line, if this claim
requires a PRIOR AUTHORIZATION NUMBER, and the number was not
entered during Patient Checkout, enter a lower case "a" and
press <Enter>. The system will open a window in the middle
of the screen and allow you to enter a PRIOR AUTHORIZATION
NUMBER. Press <Enter> to close the window.
L, L1, L2 = VIEW PATIENT LEDGER This command will bring up the
Patient Ledger Screen. L,L1 = New Ledger, L2=Old Version Ledger.
Esc=END: If you type escape or 0 (numeric zero) and press <Enter>,
you will END and return to the Site prompt.
TO EXIT: Type ESCAPE or a 0 (numeric zero) and press <Enter> at the
Site prompt. The system will take you to the Automated Billing
Menu.
HCPCS code Short descriptor group payment group
--------------------------------------------------------------------------------------------
15836...................... Excise excessive skin tissue........ 3 5
15839...................... Excise excessive skin tissue........ 3 5
29873...................... Knee arthroscopy/surgery............ 3 4
37500...................... Endoscopy ligate perf veins......... 3 N/A
44397...................... Colonoscopy w/stent................. 1 3
45327...................... Proctosigmoidoscopy w/stent......... 1 3
45341...................... Sigmoidoscopy w/ultrasound.......... 1 2, 3 & 9
45342...................... Sigmoidoscopy w/us guide bx......... 1 2, 3 & 9
45345...................... Sigmoidoscopy w/stent............... 1 2, 3 & 9
45387...................... Colonoscopy w/stent................. 1 3
57288...................... Repair bladder defect............... 1 9
62264...................... Epidural lysis on single day........ 1 N/A
--------------------------------------------------------------------------------------------
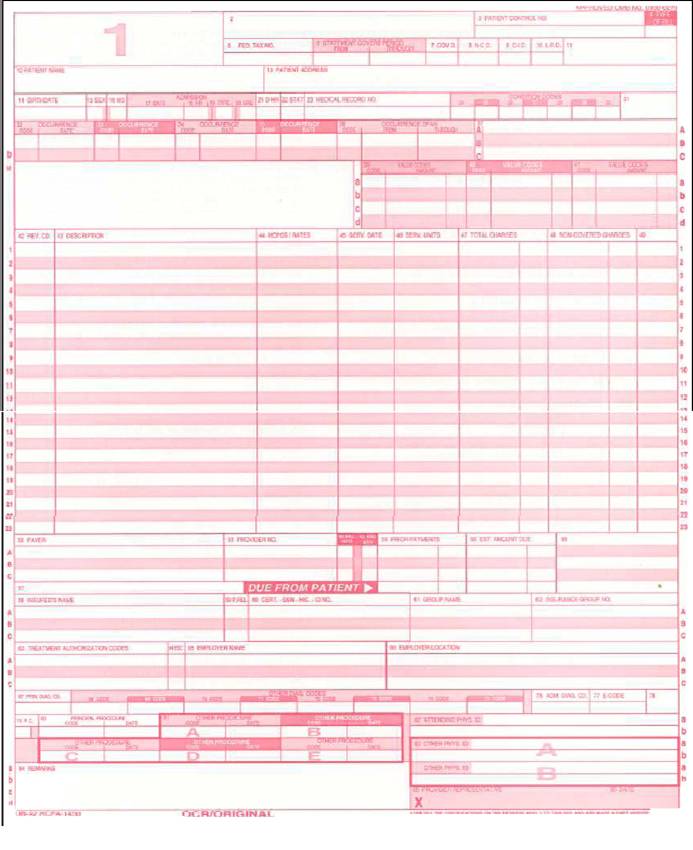
An example of a UB92 claim form is illustrated above
|
This section explains how to complete each form locator on the UB-92 claim form for billing Inpatient hospital services. Inpatient UB-92 Claim Form Instructions
|
Dictionary Control Points for UB92 ( Facility and Institutional ).
The following sections discuss file maintenance programs used
To control UB92 billing. These include the Procedure Code dictionary, UB92 Revenue codes, and UB92 form setup programs.
Procedure Code dictionary
( Specific for UB92 )
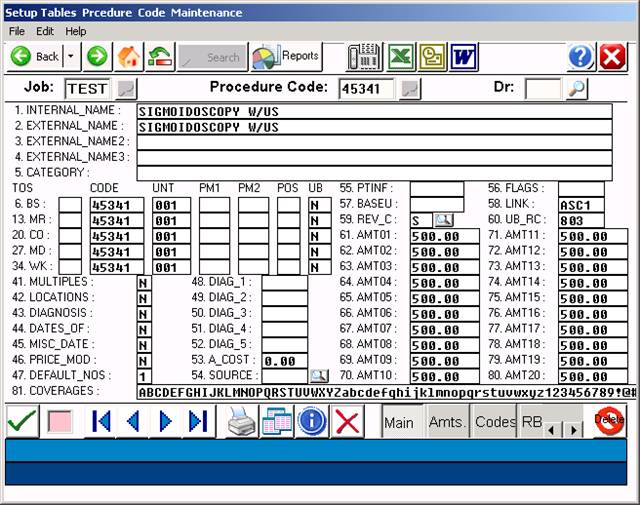
Above entry shows professional procedure only – link is to the facility fee charge code.
Field 12: UB
UB = ENTER ONE OF THE FOLLOWING FOR EACH INSURANCE:
Y=YES (UB92s only), N=NO (1500s only),
B=BOTH (1500 and UB forms)
Field 53: LINK Links one procedure code with another and automatically
puts the code into Patient Checkout. Example: Facility Fee
Field 60: UB_RC
Enter the Universal Billing Revenue Code here. Any
procedures that you will bill using the UB92 forms need a three-
digit Revenue Code.
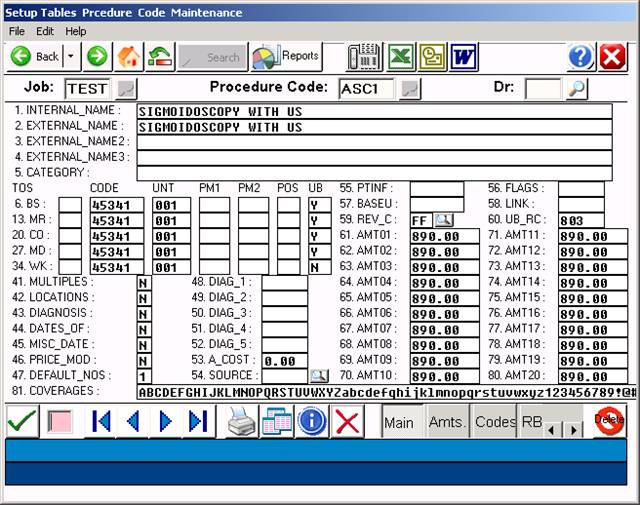
Above screen shows facility fee for the ASC.
|
Revenue Code |
HCPCS Code |
Description |
||||
|
278 |
|
E0749, E0782, E0783, E0785 |
Implanted Durable Medical |
|||
|
|
|
|
Equipment |
|||
|
278 |
|
E0751, E0753, L8600, L8603, |
Implanted Prosthetic Devices |
|||
|
|
|
L8610, L8612, L8614, L8619, |
|
|||
|
|
|
L8630, L8641, L8642, L8658, |
|
|||
|
|
|
L8670, L8699 |
|
|||
|
302 |
|
86485-86586 |
Immunology |
|||
|
305 |
|
85060-85102, 86077-86079 |
Hematology |
|||
6
|
31X |
|
80500-80502 |
Pathology - Lab |
|
310 |
|
88300-88365, 88399 |
Surgical Pathology |
|
311 |
|
88104-88125, 88160-88199 |
Cytopathology |
|
32X |
|
70010-76999 |
Diagnostic Radiology |
|
333 |
|
77261-77799 |
Radiation Oncology |
|
34X |
|
78000-79999 |
Nuclear Medicine |
|
37X |
|
99141-99142 |
Anesthesia |
|
413 |
|
99183 |
Other Services and Procedures |
|
45X |
|
99281-99285 |
Emergency |
|
46X |
|
94010-94799 |
Pulmonary Function |
|
480 |
|
93600-93790, 93799, G0166 |
Intra Electrophysiological |
|
|
|
|
Procedures and Other Vascular |
|
|
|
|
Studies |
|
481 |
|
93501-93571 |
Cardiac Catheterization |
|
482 |
|
93015-93024 |
Stress Test |
|
483 |
|
93303-93350 |
Echocardiography |
|
5lX |
|
92002-92499 |
Ophthalmological Services |
|
51X |
|
99201, 99215, 99241-99245, |
Clinic Visit |
|
|
|
99271-99275 |
|
|
510, 517, |
519 |
95144-95149, 95163, 95170, |
Allergen Immunotherapy |
|
|
|
95180, 95199 |
|
|
519 |
|
95805-95811 |
Sleep Testing |
|
530 |
|
98925-98929 |
Osteopathic Manipulative |
|
|
|
|
Procedures |
|
636 |
|
A4642, A9500, A9605 |
Radionclides |
|
636 |
|
90296-90379, 90385, 90389- |
Immune Globulins |
|
|
|
90396 |
|
|
636 |
|
90476-90665, 90675-90749 |
Vaccines, Toxoids |
|
73X |
|
G0004-G0006, G0015 |
Event Recording ECG |
|
730 |
|
93005-93014, 93040-93224, |
Electrocardiograms (ECGs) |
|
|
|
93278 |
|
|
|
|
|
|
|
731 |
93225-93272 |
Holter Monitor |
|
75X |
95812-95827, 95950-95962 |
Electroencephalogram (EEG) |
|
762 |
99217-99220 |
Observation |
|
771 |
G0008-G0010 |
Vaccine Administration |
|
88X |
90935-90999 |
Non-ESRD Dialysis |
|
901 |
90870,90871 |
Psychiatry |
|
903 |
90910, 90911, 90812-90815, |
Psychiatry |
|
|
90823, 90824, 90826-90829 |
|
|
909 |
90880 |
Psychiatry |
|
910 |
90801, 90802, 90865, 90899 |
Psychiatry |
|
914 |
90804-90809, 90816-90819, |
Psychiatry |
|
|
90821, 90822, 90845, 90862 |
|
|
915 |
90853, 90857 |
Psychiatry |
|
916 |
90846, 90847, 90849 |
Psychiatry |
|
917 |
90901-90911 |
Biofeedback |
|
918 |
96100- 96117 |
Central Nervous System |
|
|
|
Assessments / Tests |
|
92X |
95829-95857, 95900-95937, |
Miscellaneous Neurological |
|
|
95970-95999 |
Procedures |
|
920, 929 |
93875-93990 |
Non Invasive Vascular |
|
|
|
Diagnosis Studies |
|
922 |
95858-95875 |
Electromyography (EMG) |
|
924 |
95004-95078 |
Allergy Test |
|
940 |
96900-96999 |
Special Dermatological |
|
|
|
Procedures |
|
940 |
98940-98942 |
Chiropractic Manipulative |
|
|
|
Treatment |
|
940 |
99195 |
Other Services and Procedures |
|
943 |
93797-93798 |
Cardiac Rehabilitation |
UB92 REVENUE CODES
OVERVIEW: The UB92 Revenue Codes Dictionary is used to set up
and maintain facility Revenue Codes, controlling how
each Revenue Code will print on the UB92 Form.
PROCEDURE: Select Option 16 from the Dictionary Menu and
press <Enter >.
EXAMPLE SCREEN:
_
After you select Option 16 and press <Enter >, the following screen
will be displayed.
EXAMPLE SCREEN:

DEFINITION OF FIELDS:
ST: This stands for state. Enter the two-letter abbreviation
for the state being billed and press <Enter >.
TYPE OF BILL: Enter the first two digits of the code that
represents the type of billing you will be doing.
FORMAT: You may enter a special format or press <Enter > for
a generic format.
REVENUE CODE: Enter the Revenue Code that will be billed on
the UB form.
NOT ON FILE ADD? If the UB Revenue Code is not on file, you
may add it by typing a Y at this prompt. If you do not want
to add it, type an N.
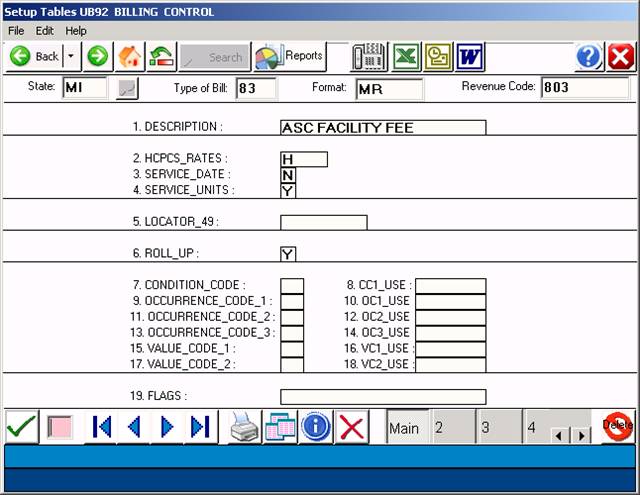
1. DESCRIPTION: This is the description that will print in
column 43. Use a standard description from the UB92 Manual.
Services for a facility fee generally include:
Nursing services, services of technical personnel, and related service.
Use of the ASC facilities by the patient
Drugs, biologicals, surgical dressings, supplies, splints, casts,
appliances and equipment
Diagnostic or therapeutic items and services
(including simple preoperative laboratory tests, e.g.,
urinalysis, blood hemoglobin or hematocrit);
Administrative, record keeping and housekeeping items and services.
Blood, blood plasma, platelets, etc., except for those to which the
blood deductible applies.
Materials for anesthesia.
2. HCPCS_RATES: This controls what prints in column 44.
Options here are:
H= HCPCS code
R= Rate (price rate)
N= No (print nothing in column 44)
3. SERVICE_DATE: This controls what prints in column 45.
Generally you will enter an N for No here.
4. SERVICE_UNITS: This controls what prints in column 46.
This is a quantity column. Valid responses are:
Y= Yes
N= No
V= Visits
1= Literally print a one in column 46.
5. LOCATOR_49: For use as needed for each type of billing.
6. ROLL_UP: Should these codes be rolled-up into one another or
not. Responses are: Y=Yes or N=No. If you choose Y, the system
will add identical Revenue Codes together and report it on one
line.
7. THROUGH 19 FIELDS: These fields are for inpatient billing.
ACTION LINE DEFINITIONS:
# to Correct: Enter the number of the field you need to correct
and press <Enter >. Your cursor will move to that field. To
return to the Action Line press the <Home> key.
(P)rt: To print a hard copy of this screen, type P and press
<Enter >. The system will open a window asking you to select
a printer. Select the appropriate printer and press <Enter >.
(F)wd: To go forward one description, type F and press <Enter >.
(B)ck: To go back one description, type and press <Enter >.
(K)py: To make a copy of the information you entered and have
it copied to another Revenue Code, type K and press <Enter >.
Your cursor will move to the ST prompt. Starting at this
prompt, enter new information across this line. This will
make a copy of the existing information on the new entry.
(D)el: To delete the code entirely, type D and press <Enter >.
The system will ask:
Confirm Deletion? (Y/N):
A Yes response will delete the code entirely.
(V)fy: Displays who added this code and when. Displays who
updated this code and when. Type V and press <Enter >.
Esc=END: To exit and save your entry type Escape or 0 (zero)
<Enter >. Your cursor will move to the ST prompt. You may
make another entry or press 0 (zero) again and press <Enter >
to go to the Dictionary Menu.
ICD9 PROCEDURE CODES
OVERVIEW: The ICD9 Procedure Codes Dictionary allows you to maintain
a list of procedure based DRG descriptors to
facilitate DRG billing for institutional claims.
This option is usually not required for Facility claims.
PROCEDURE: Select Option 17 from the Dictionary Menu and
press <Enter >.
______________________________________________________________________
After you select Option 17, the screen below will be displayed.
EXAMPLE SCREEN:
ENTER CODE: Enter a procedure lcode and press <Enter >. The
procedure codes will consist of 3,4, or 5 alpha-numeric characters.
The sixth character, if any, is used for procedure codes that have
more than one description. Do not use the . (period) in the code
number. The code may not be an in-house abbreviation.
The facility portion is suppose to be based on resource use, etc.
There is no expectation that the physician E/M and the faility E/M
should match per CMS. Facilities should develop nursing criteria in
assigning the level of care for facility.
EXAMPLE: ENTER CODE: 71020
If this code is not on file, the system will prompt:
NOT ON FILE ADD? (Y=YES, N=NO)
If you do not want to add this code, type an N and press
<Enter >. The cursor will return to the ENTER CODE prompt.
If you do want to add this code, type a Y and press <Enter >.
The screen shown on the next page will be displayed.
EXAMPLE SCREEN:
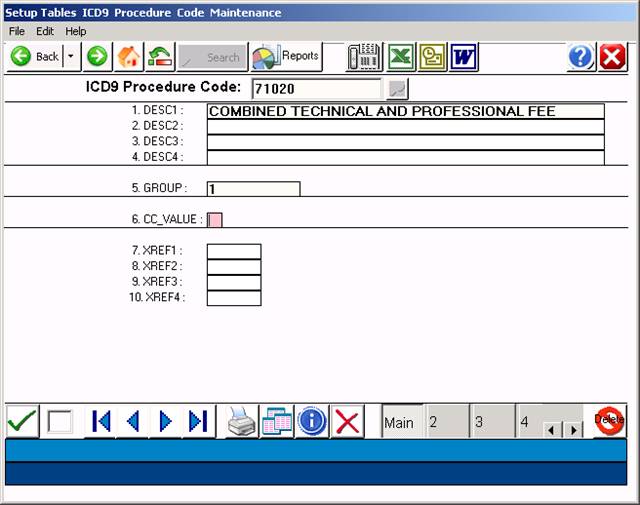
Your cursor will be flashing in Field 1. After each entry,
press <Enter > to store data and move to the next field.
DEFINITION OF FIELDS:
1. DESCRIPTION 1: Enter the description of the procedure and
press <Enter >. Although this line will hold 45 characters,
only 20 characters appear when using the search function.
An example would be an XRAY. Enter the proper heading
(ie: XRAY) followed by the specific body site (CHEST).
EXAMPLE: 1. DESC1: XRAY CHEST TECHNICAL AND PROFESSIONAL
2. TO 4. DESCRIPTION: These fields are used for continuing
the description begun in Field 1.
5. GROUP: The Group code is reserved for future use.
6. CC VALUE: This is a chief complaint value used by Medical
Records. Valid responses are 1,2,3,4,5.
7. TO 10. XREF: Cross references for other coding schemes
of your choice.
DEFINITIONS OF ACTION LINE FUNCTIONS:
ENTER FIELD NUMBER: Enter the number of the field you need to
correct and press <Enter >. The cursor will move to the first
character on that line (information on that line will not be
erased). You may retype the entire line, or position the cursor
on the character that needs correcting. Press <Home> to go
back to the Action Line.
(P)RINT: Type P and press <Enter > to have the system print
a hard copy of your screen. The system will open a window
allowing you to select a printer. Please see example below.
Type in the number of your selection at the flashing cursor
and press <Enter >. You may also use the <Up> and <Down>
Directional Arrow keys to highlight your selection and then
press <Enter >.
(F)ORWARD: To go forward one code, type F and press <Enter >.
(B)ACK: To go back one code, type and press <Enter >.
(K)OPY: To make a copy of this information (be sure you O (zero)
and <Enter > to save it before you copy) and assign it a different
Procedure Code, type K and press <Enter >. The cursor will move to
the ENTER CODE prompt. Enter the Procedure Code you wish this in-
formation copied to and press <Enter >.
(D)ELETE: If you want to delete this code from the system,
enter a D and press <Enter >. Do not delete a Procedure
Code that has been assigned a patient.
(V)ERIFY: Type V to verify the original entry date and
the date this screen was last updated.
Esc=END: To exit and save your record, type escape or 0 (zero)
and <Enter >. The cursor will return to the ENTER CODE prompt.
You may continue entering other codes, or type 0 (zero) and press
<Enter > again to go to the Dictionary Menu.
ADDITIONAL CAPABILITIES
SEARCH: At the ENTER CODE prompt, type the name or the first
few letters of the procedure you are searching for and press
<Tab>. You may enter up to six characters of the procedure.
A screen similar to the following will then be displayed.
SELECT or SEARCH:
01 86140. C-REACTIVE PROTEIN
02 33533. CABG, ARTERIAL, SINGLE
03 33534. CABG, ARTERIAL, TWO
04 33535. CABG, ARTERIAL, THREE
<Up>=Last,<Dn>=Next,<R>=NPage,<L>=LPage,<Tab>=Add
<Up>/<Down> <Right>/<Left> refer to Arrow keys.
To select an entry, type the number shown at the far left of
the procedure code and press <Enter >. You may also use the
Directional Arrow keys to highlight the line and then press
<Enter >.
Explanation of Auxiliary Function Line:
<Up>=Last: The <Up> Directional Arrow key will take you
back one page.
<Dn>=Next: The <Down> Directional Arrow key will take the
cursor line by line down the list.
<R>=NPage: The <Right> Directional Arrow key will take you
to the next page.
<L>=LPage: The <Left> Directional Arrow key will place you
on the last page.
<Tab>=Add: To add a procedure code, press <Tab>, enter the
Code, complete the Procedure Codes screen, exit
and save (type 0 and press <Enter >). Go back
to Search and you will see it listed.
UB92 Field Locator Setup Program
Overview:
The Field Locator (FL) setup program allows absolute control over
Which field locators are present in the UB92 ( HCFA-1450 ) form.
Some insurance carriers require only certain locators be present on the
Form with the remainder of the fields left blank. ( Medicaid ).
Procedure: From the dictionary menu, select # 23 ( UB Form Setup ).
The following screen will display:
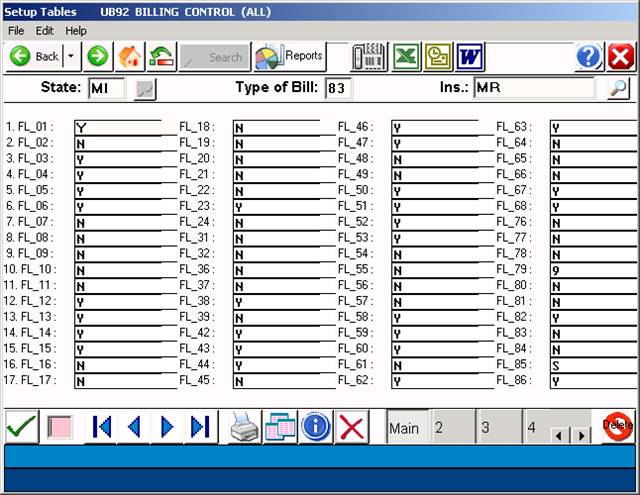
If a particular Field Locator is required, a “Y” response in the field
Is required. If the field should be omitted, enter a “N” in the field.
Enter Escape or 0 ( zero ) to save these settings for “D” to delete.
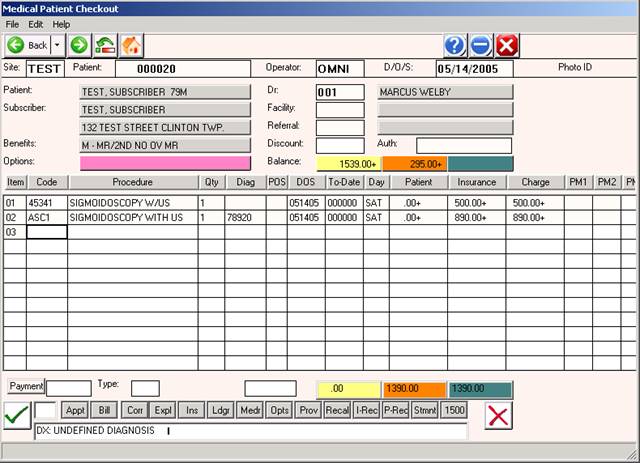
Example Charge Entry screen showing proper use of a Linked Procedure:
Line 1 displays the professional component, line 2 is the facility fee.
Required Toggle Codes:
CODE VALUE
PRTUB TOBMR=803
TOBBS=803
TOBCO=803
TOBMD=803 ( or as appropriate )
PRTALL UB=BOTH
TELALL UB=BOTH