30 60 90 PATIENT AGE REPORT
OVERVIEW: The 30 60 90 Patient ageing report allows you
to print a report that indicates all patient
balances, current as well as outstanding, from
30/60/90/120 and through 360+ days past due.
The program will provide the user with a phone
number for easy access when trying to contact
patients. Also, the program will alert you as
to the number of days an account is past due.
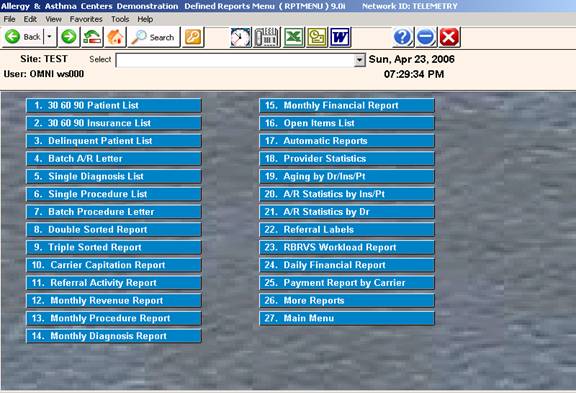
PROCEDURE: Select Option 1 from the Defined Report Menu
 and press <Enter>.
The screen below will be displayed.
EXAMPLE SITE PROMPT SCREEN:
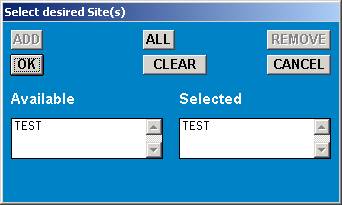
THIS PROMPT WILL BE DISPLAYED ONLY IF YOU HAVE MORE THAN
ONE Site LOCATION.
Click the code which identifies the Site location you wish to
work with and click <OK>. The system will open a window
asking you to select an ageing method.
Select the aging method by which you would like this report run
 and press <Enter>.
The following report parameters screen will then be
displayed.
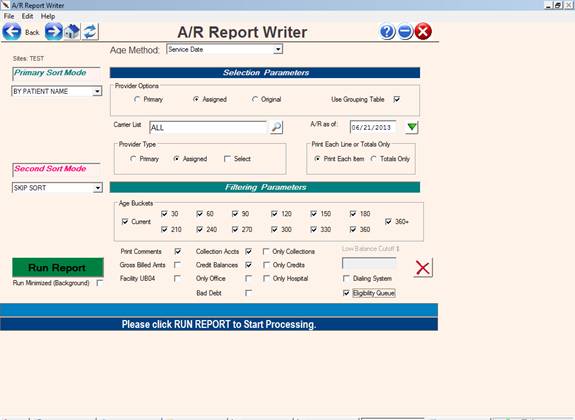
EXAMPLE REPORT PARAMETER SCREEN:
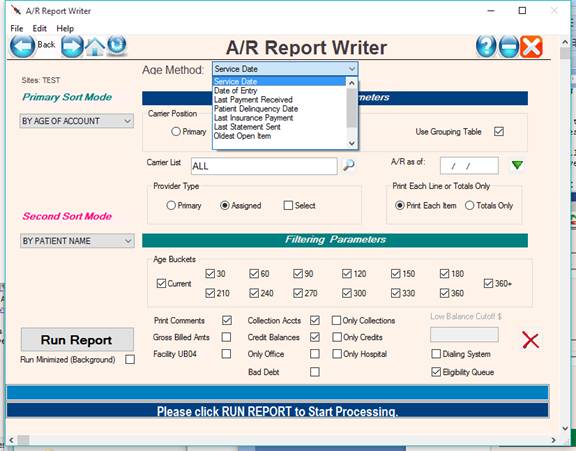
SORT OPTIONS
1. BY DELINQUENT DATE: This selection allows the user to obtain
a report of the patient's account by delinquent date. The
delinquent date is determined by the date of the last payment
made on the account or date of 1st statement printing.
2. BY AGE OF ACCOUNT: This option allows the user to print a
report of the patient's balances by age of account. The age
of account is determined by the date of the original charge.
3. BY CARRIER: This option allows the user to print a report
of the patient's balances by the type of insurance carrier
assigned to the claim.
4. BY PATIENT NAME: This option allows the user to print an
Accounts Receivable report in alphabetical order.
5. BY SUBSCRIBER NAME: This selection allows the user to print
a report from Accounts Receivable by subscriber name. The
advantage of this report over Option #4 is that family members
all covered under the same subscriber will be included in one
total amount due.
6. BY PHYSICIAN: This option allows the user to print a report
according to the Physician ID# assigned in patient information.
You may select specific providers or <Enter> for all.
7. BY FACILITY: This option allows the user to print a report
that sorts by Facility Codes entered in Field #26 in patient
information.
8. BY COVERAGE: This option allows the user to print a report
that sorts by coverage code as identified on Line 22 of patient
information. You may select a specific code or <Enter> for all.
9. BY BALANCE: This option will sort balances by highest to lowest
dollar amount. This is useful for collection efficiency.
10. SELECTED FIELD: This option allows sorting by any existing or user defined field which can be a list of any field in the currently defined system. The list of fields is not shown here due to the large number of fields.
Examples: Referring Source, Chart number, Next of Kin.
A D D I T I O N A L S E L E C T I O N S
Provider Options: By selecting the respective radio button, the
provider can be either the billed provider, or
the provider assigned to the patient in patient
demographics. The original provider would be same
as the assigned provider at the time of billing.
Grouping Table, under this set of options, allows
For grouping providers with the same “ID” as defined
In field #32 in the provider dictionary.
A/R as of DATE: Enter the date that you want the system
to calculate and age the balances as of
that date and press <Enter>.
Or, do not enter any date but just press
<Enter> to have the system calculate the
current balances.
CARRIER LIST: This field specifies specific carrier codes
For the report. Example: MEDICARE ( Code is MR )
When entering this field, type the carrier code
And press <Enter>. If another code is required,
Type the next code and <Enter>. etc.
PRINT EACH ITEM OR TOTALS ONLY: Select the radio button labeled
Each item, or Totals Only as needed.
SECONDARY SORT MODE
SECONDARY SORT: If you wish a second sort option,
Click on the drop down window and enter your
selection here.
AGE BUCKETS: A checkmark for a giving age bucket (current – 360+)
Will include amounts aged for this number of days.
Unchecking the bucket will exclude amounts aged
With this number of days.
OTHER
PRINT COMMENTS: This includes the comments or “OPTION” fields from
Patient Demographics on the report.
COLLECTION ACCOUNTS/ONLY: Checking this selection will cause the report
To include or print only accounts marked
in collection by way of the letter “C” in the
“BILLS” field in patient demographics.
CREDIT BALANCES / ONLY CREDITS: Click checkbox Yes to include credit
balances, Uncheck to not have them included,
or check Include Credits and Credits Only to show
only credit balances.
UB04, OFFICE AND HOSPITAL: These selections allow screening for these
specific bill types.
LOW BALANCE CUTOFF: Amounts below this amount will be omitted.
When selecting “Include Credits” this field
Is not used. You must uncheck “Include Credits”
In order to enter an amount in the cutoff field.
DIALING SYSTEM: If you have the reminder dialing system, the
System will call the accounts and play the
Collection Message sequence for delinquent accounts.
DIALING SYSTEM
OVERVIEW: The 30 60 90 Insurance List program allows the
user to print an accounts receivable report for
outstanding insurance balances. The program
sorts by the same parameters as the patient version above.
PROCEDURE: Select Option #2 from the Defined Report Menu
and press <Enter>. This report can be also run for
patient and insurance balances combined by selecting
menu item #21 from the defined reports menu and
repeating the above procedure.
Eligibility Queue:
Patients being listed on the report can be added to the eligibility file by select the checkbox labeled “Eligibility Queue“ located on the bottom right side of the report setup screen”
This file can be later submitted for eligibility checking in batch through Availity, Gateway EDI or Office Ally clearing houses.
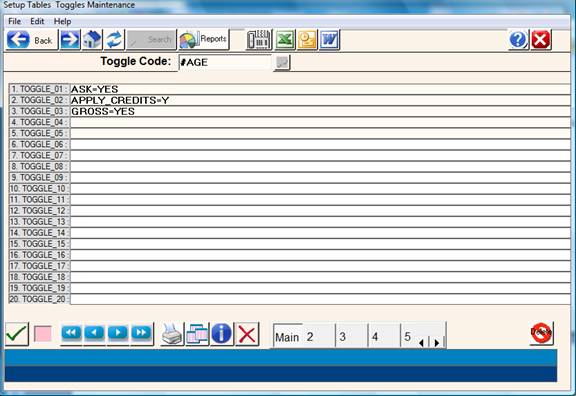
TOGGLES and
SWITCHES:
The APPLY_CREDITS=Y toggle will automatically apply credits balances to items with a balance starting with the oldest item first.
The GROSS=YES toggle will use gross billed amounts instead of expected amounts.