OVERVIEW: The Charge Codes Dictionary is used to set up and
maintain the dollar amounts for each procedure a
provider bills for. Procedure codes are defined
using numeric and/or alphabetic characters (maximum
five characters). Each office sets up their own codes
for each procedure. Multiple offices using a single
computer system may share procedure codes only if the
billing amounts are the same.
Should you need to copy all your charge codes to a
new SITE, at the Command Line type COPYPC in upper
case letters. You will need to answer two prompts
and then verify.
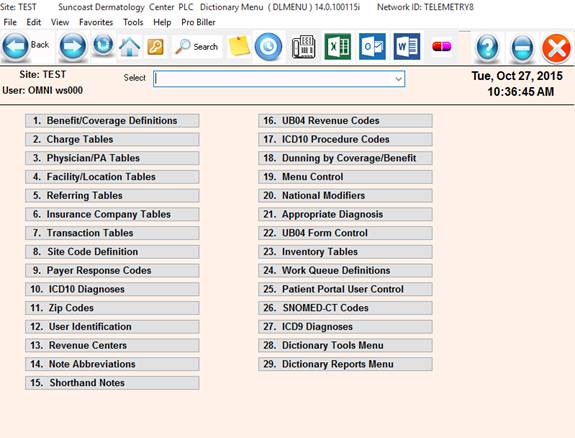
PROCEDURE: Select Option 2 from the Dictionary Menu and
press <ENTER KEY>.
EXAMPLE MENU:
 ______________________________________________________________________
After you select Option 2 and press <ENTER KEY>, the screen
below will be displayed.
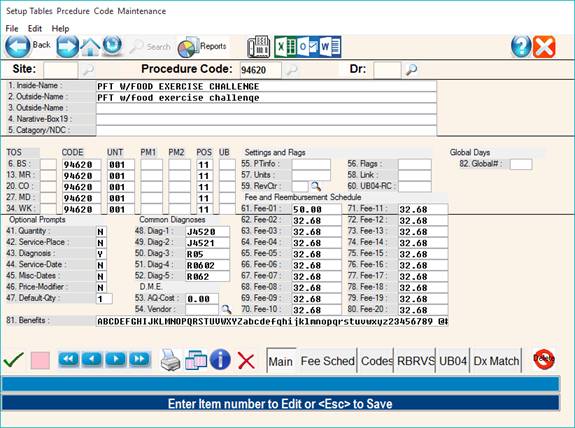
EXAMPLE SCREEN:
SITE: If you do not have multiple locations, the Site
prompt will not appear. If you are in a group practice
or have multiple locations, you may use letter codes or
assign particular number groups to each physician or
location.
ENTER CODE: Type in a maximum five-character code which
identifies the procedure and press <ENTER KEY>. This may be
an In-house or CPT code.
UB92 BILLING: When you set up UB92 billing, you need to
make a separate entry for each Revenue Code you will be
using in the Charge Codes Dictionary. Follow this
procedure: Enter the Revenue Code as a Procedure Code
and leave the Siteand DOCTOR blank. Then, enter the
description of the Revenue Code. No other information
is necessary. When billing, the system will get all the
information from the Charge Code. It just needs an entry
here for the description.
PHYSICIAN: If a specific physician is the only one who
performs this procedure, enter his ID number here and
press <ENTER KEY>. If many physicians perform this procedure,
just press <ENTER KEY> for all.
TRAINING NOTE: IF YOU ENTER A PROCEDURE FOR A SPECIFIC PHYSICIAN,
YOU MUST ENTER THE SAME CODE W/O A SPECIFIC PHYSICIAN OR
OR YOU MUST ENTER A SPECIFIC CODE FOR EACH PHYSICIAN.
IT IS SUGGESTED THAT FOR EFFICIENCY OF MAINTAINING THE FEE SCHEDULE
THAT YOU DO NOT ENTER A CODE FOR EACH PHYSICIAN UNLESS ABSOLUTELY
NECESSARY.
NOT ON FILE, ADD? (S=SINGLE, P=PROFILE, N=NO): This prompt
will appear at the bottom of your screen after you have
satisfied the Physician prompt.
S=SINGLE: Type an S if you wish to enter a single
procedure code and press <ENTER KEY>.
P=PROFILE: A profile code is used when a certain group of
procedures are always billed together. Type a
P if you wish to enter a profile code and press
<ENTER KEY>.
N=NO: Type an N if you do not wish to enter that code
and press <ENTER KEY>. The cursor will return to
the ENTER CODE prompt.
Enter your selection and press <ENTER KEY>.
SINGLE PROCEDURE CODE ENTRY
1. INTERNAL NAME: Using 20 or less characters, type a brief
description of the procedure code. The system allows entry
of up to 40 characters, but because of limits in screen display,
you will only be able to view the first 20 characters of the
description when searching or utilizing the procedure.
2. EXTERNAL NAME: This description will appear on the patient's
statement and the insurance. There are four lines of 40 characters
each available for this information; however, only the first 20
characters (including spaces) will print on your forms. Enter the
description and press <ENTER KEY>, or just press <ENTER KEY> to have the
internal name duplicated on this line.
3, 4, AND 5 FIELDS: What you enter here prints on statements,
but not on the patient's receipt.
6. BS-TOS: Enter the type of service (TOS) code for BS based
on the procedure and press <ENTER KEY>. Values are defined in
the CPT and MUPC books.
CODE - UNT - PM1 - PM2 - POS - UB: These abbreviations are used
in non-visible Fields 7-11. They are as follows:
CODE = PROCEDURE CODE
UNT = UNIT (DOSAGE MODIFIERS FOR INJECTIONS)
PM1 = PRICING MODIFIER (one)
PM2 = PRICING MODIFIER (two)
POS = PLACE OF SERVICE
UB = ENTER ONE OF THE FOLLOWING FOR EACH INSURANCE:
Y=YES (UB92s only), N=NO (1500s only),
B=BOTH (1500 and UB forms)
7. BS-CODE: Enter the procedure code as you would normally bill
Blue Shield and press <ENTER KEY>.
8. BS-UNT: This field is assigned as dosage/quantity units
for Blue Shield. Otherwise, enter 001 for quantity and press
<ENTER KEY>.
PRICING MODIFIERS: Pricing modifiers are used in the same manner
as the explanation code box on the Michigan Health Claim Benefits
form (i.e.: surgery services, anesthesia, medical emergency, etc.).
9. BS-PM1: If the modifier is always the same and is
mandatory, enter the appropriate pricing modifier for the
procedure and press <ENTER KEY>. If the modifier changes,
use price modifier prompt, Field 41, and type "Y".
10. BS-PM2: If a second modifier is necessary, enter
the BS pricing modifier for the named procedure and
press <ENTER KEY>.
11. BS-POS: Enter the most common place of service (POS)
for BS for the procedure and press <ENTER KEY>. If this
location changes each time this procedure is performed, you
will be able to change it at Patient Checkout by using typing
Y (yes) to activate the location prompt, Field 37.
BS-UB: Enter one of the following for each insurance:
Y=YES (UB92s only), N=NO (1500s only), B=BOTH (1500 and UB forms)
12. MR-TOS: Enter the type of service (TOS) code for Medicare
based on the procedure and press <ENTER KEY>.
13-17. FIELDS: The instructions are the same as Fields 7
through 11, except the information entered pertains to
Medicare.
18. CO-TOS: Enter the type of service (TOS) code for
Commercial insurance based on the procedure and press <ENTER KEY>.
19-23. FIELDS: The instructions are the same as Fields 7
through 11, except the information entered pertains to
Private carriers.
24. MD-TOS: Enter the type of service (TOS) code for Medicaid
or General Assistance based on the procedure and press <ENTER KEY>.
25-29. FIELDS: The instructions are the same as Fields 7
through 11, except the information entered pertains to
Medicaid or General Assistance.
OMNI Office Medicine(tm) for Windows XP
CHARGE CODES
v8.4
30. WK-TOS: Enter the type of service (TOS) code for
Workman's Compensation based on the procedure and press
<ENTER KEY>.
31-35 FIELDS: The instructions are the same as Fields 7
through 11, except the information pertains to Workman's
Compensation.
36. MULTIPLES PROMPT: If this procedure can be performed more
than once per patient, on the same visit, enter Y for YES and
press <ENTER KEY>. An example would be billing for subsequent
hospital days. When using Patient Checkout for this procedure,
a prompt will appear asking you for the quantity. Type an N
for NO if this procedure cannot be performed more than once.
37. LOCATIONS PROMPT: If this prompt is set to N (no), the
system will default to what you have in the POS column. If
this prompt is set to Y (yes), because this procedure is
performed at different locations (e.g.: office, nursing home,
out-patient hospital, etc) each time you bill for this
procedure, the system will ask for the place of service.
38. DIAGNOSIS PROMPT: If this procedure has multiple diagnoses,
enter Y for YES and press <ENTER KEY>. When using Patient Checkout
for this procedure, you will be prompted for an ICD-9. The
default diagnoses entered in Fields 43-47 will be displayed
following a PC=__.
39. DATES OF PROMPT: The date of service prompt is used when
you are billing procedures on the same claim that require more
than one date of service. For example, when billing hospital
care to Medicare or Medicaid, the initial day of hospital care
is billed on one date of service, and the subsequent days of
care are billed on a different date of service. If this is
what you need, type a Y for YES and press <ENTER KEY>.
If you do not wish to receive a prompt on this procedure, type
an N for NO and press <ENTER KEY>. The system will then use the
same date of service for all procedures billed on this claim.
40. MISC DATE PROMPT: If your procedure requires an additional
date such as a date of injury, onset, etc. type a Y at this
prompt and press <ENTER KEY>. In Patient Checkout you will be
prompted for an admitting date, discharge date, and miscellaneous
date. Enter an N if you do not need this information.
41. PRICE MOD PROMPT: If you need to change the price modifiers
each time this procedure is billed, enter a Y for YES and press
<ENTER KEY>. The Patient Checkout program will prompt you to enter
the appropriate modifier for that procedure. (PM-1?, PM-2?)
If your modifier does not change from those listed in the code
line, or they are not necessary, type N and press <ENTER KEY>.
42. DEFAULT NUMBERS: Default numbers refer to the typical number
of times you bill this procedure per visit. Generally, the
default will be 1. Type the default number and press <ENTER KEY>.
If the default number is set at 1, the billed dollar amount
should reflect the fee for a single procedure.
43-47. DIAG: If Field 38 is set with Y, enter the five (5)
most common diagnosis codes used in billing this procedure.
If you do not wish to have these diagnosis codes appear in
Patient Checkout, you just press <ENTER KEY> through these fields
and leave them blank.
48. A COST: Enter the acquisition cost (your cost not what
you are charging the patient) of the purchased diagnostic
testing and press <ENTER KEY>. This is a Medicare requirement
and Field 51, FLAGS, must be set to L. To omit this field,
simply press <ENTER KEY>.
49. SOURCE: Enter the three-digit source code from the
Referral Codes Dictionary for the purchased diagnostic
testing and press <ENTER KEY>. This is a Medicare requirement
and Field 51, FLAGS, must be set to L. To omit this field,
simply press <ENTER KEY>.
50. PTINF: List the procedure to update in the User-Defined
screen of Patient Information. Each time this procedure goes
through Patient Checkout, the matching field label will be
updated with the service date. This is helpful for tracking
the last Mammogram, Cholesterol, EKG, RBS etc.
51. FLAGS: Choices to enter are E, F, L, M, P, Q, S, U, $.
You may enter up to five flags.
E = Marks the EPSDT box on the HCFA 1500 form.
F = Marks the Family Planning box on the HCFA 1500 form.
L = By typing L, box 20 on the HCFA 1500 form will be marked
Yes. This is necessary for reporting purchased diagnostic
tests to Medicare.
M = Major procedure. TPA uses this flag to prevent any portion
of a Major procedure from being billed separately. A Major
procedure should be billed as one complete procedure.
P = Pharmacy. Prints the procedure on a pharmacy form.
Q = Special for PQRI reporting. Make the billed amount $0.00
When billing this type of procedure.
S = If a procedure needs to be billed in the Durable Medical
Equipment program, type S.
U = U is used for Labs, X-rays, and certain diagnostic testing.
Type U when you need to report the provider as the referring/
ordering/rendering provider. For Medicare claims the UPIN
(unique provider identification number) will be reported.
For all other carriers the License number is reported.
The CLIA number is also reported when flag “U” is present.
$ = Displays the prompt ENTER PRICE at Patient Checkout. This
allows you to change the expected dollar amount on the claim.
52. BASE ASGN UNITS: This is used for anesthesia billing only.
This will identify the base units assigned to this procedure.
Entries are numeric only. The base units are assigned by major
insurance companies.
53. LINK: Links one procedure code with another and automatically
puts it into Patient Checkout.
54. REVENUE CENTER: This field is used to group together
procedures that are used for the Monthly Revenue Center
Report. Enter a 1-2 character code, as defined in your
Revenue Centers Dictionary and press <ENTER KEY>.
55. UB RC: Enter the Universal Billing Revenue Code here. Any
procedures that you will bill using the UB92 forms need a three-
digit Revenue Code.
AMOUNT FIELDS:
The amount fields are used by the computer to determine various
amounts from patients and/or insurance companies as defined
in your coverage definitions (A-Z, a-z). All dollar amounts
entered are accepted as whole dollar amounts unless you enter
the decimal point. You are limited to the first 20 amount
fields when entering billed amounts.
There should be a dollar amount in every amount field. The
Coverage Matrix, Field 76, will determine whether or not
this procedure is covered by the insurance carriers.
Only the expected dollar amounts are added to the A/R not
the billed amounts. This is the amount reflected in
Patient Checkout.
56. AMOUNT #1: Enter the dollar amount that you wish to
bill for this procedure and press <ENTER KEY>.
57. AMOUNT #2: Enter the amount you normally expect to
receive from BS on this procedure and press <ENTER KEY>.
58. AMOUNT #3: Enter the amount approved by Medicare for
this procedure and press <ENTER KEY>.
59. AMOUNT #4: Enter the amount you normally expect to receive
from Medicaid for this procedure and press <ENTER KEY>.
60. AMOUNT #5: Enter the other amounts that are necessary for
the office. They may be expected dollar amounts for other
carriers or for patients without insurance.
61-65 FIELDS: Amounts 6 through 10 (Fields 61 through 65) may
be added as different billed amounts or expected amounts as
described above.
66-136 FIELDS: Amounts 11 through 80 (Fields 66 through 136)
are used for other, expected only, dollar amounts you need to
record. These fields are accessed by typing an A at the Action
Line and pressing <ENTER KEY>.
76. COVERAGE MATRIX: This line is very important. Field 76
records which insurance covers this procedure by displaying
the coverage definition code (A-Z, a-z) (1-9). You will notice
that underneath this line is an alphabet to be used as a guide
when filling in your own letters. Type the letter or letters
above the corresponding letter if this procedure is covered by
the insurance type. If a particular insurance does not cover
this procedure, space over that letter and continue entering
the letters that do cover the procedure.
NOTE: OMNI recommends you complete the insurance matrix
with those letters which are not defined in your Coverage
Definitions Dictionary. In the future, if you decide to
add another coverage definition to the Coverage Definitions
Dictionary, the letter will already be displayed on the
insurance matrix and you will not have to go through every
procedure code and add the letter to Field 76.
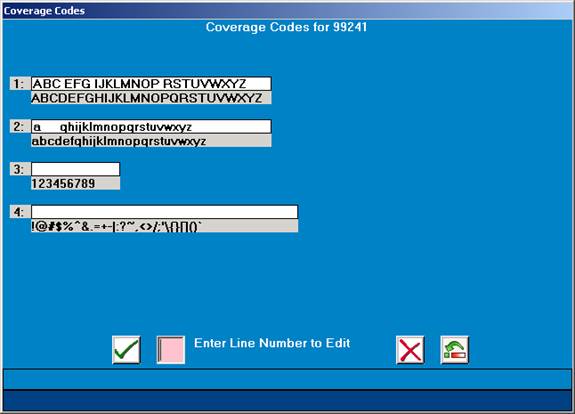
I have typed in A, B, C, D, E, F, a, b, c, e, f, g, h, i, j,
and k. By typing in these letters, the system knows that a
portion or all of the procedure is covered by the insurance
company for patients that have these coverage codes.
For those letters where there is no coverage, the space bar
has been pressed to erase the alphabet letter(s), leaving a
blank space(s). To do this hold down the Ctrl key, type t twice,
and then press the space bar. Removing a letter means the
patient will be billed 100% of what is in the BELOW DEDUCTIBLE
field in Coverage Definitions Dictionary.
Additional codes that you may use are:
You have now finished the input of one procedure code. At
the bottom of the screen an Action Line appears.
On the next page is an explanation of the Action Line functions.
Enter #1-76: Enter the field number (1-76) you need to correct
and press <ENTER KEY>. The information on that line will be erased.
Type in the new information. Press <ENTER KEY>to go back to the
Action Line.
For field number 76 you will notice the line does not go blank.
To add letters, use the Directional Arrow to move the cursor
to the appropriate position and enter the new letters. If
you need to delete a letter, use the Directional Arrow to
move the cursor to the appropriate position and press the
space bar over the letter you wish to delete.
(D)elete: If you type D and press <ENTER KEY>, you will delete
the procedure you just entered. DO NOT delete a procedure code
if it has been entered on a patient account, or at the time of
billing the claim form will print out blank.
(K)opy: If you enter K and press <ENTER KEY>, the cursor will move
up to the ENTER CODE prompt and allow you to change the In-house
code. This will make a copy of the existing procedure code and
allow you to call it up two different ways. If you have a Site
prompt, K will copy the procedure and recorded information to the
Site CODE you enter. If you do not enter 0 (zero) to save (done)
before using the K-command, the original code will not be saved.
and press <ENTER KEY> to open the Additional Procedure Codes window.
Identify the carrier and the outgoing code that is to be used.
You also have the option of setting the UB field to Y=Yes
(UB92 only), N=NO (1500 only), B=BOTH (1500 and UB forms). An
example is shown below.
-INS---TOS-CODE-UNT-P1-P2-PS--UB -INS---TOS-CODE-UNT-P1-P2-PS-U
1. : 11. :
2. : 12. :
3. : 13. :
4. : 14. :
5. : 15. :
6. : 16. :
7. : 17. :
8. : 18. :
9. : 19. :
10. : 29. :
ACTION-> <-Enter # to correct, (D)elete, (0)=End
(P)rint: To print a hard copy of the Procedure Codes screen,
type P and press <ENTER KEY>. Select the appropriate printer from
the window that displays them and press <ENTER KEY>.
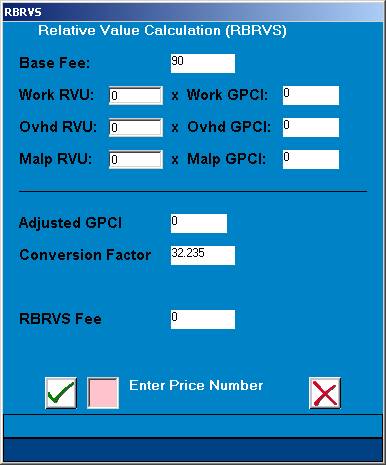
(R)el Value Sys: This stands for Relative Value Calculation.
After you type R and press <ENTER KEY>, the system will open a
window in the middle of your screen where calculations may
be made. Please see the example below.
EXAMPLE SCREEN:
< Relative Value Calculation (RBRVS) >
Enter Price Number or 0 = End:O
There are two calculations you may edit within this window.
They are:.
Enter Price Number: To change the BASE FEE, at the Enter Price
Number or (0)=End prompt type the AMT column Label Number
(Ex: 66.AMT11 12.00, type 11) and press <ENTER KEY>. That new
figure assigned that amount will then be displayed.
Conversion Factor: To change the conversion factor, at the Enter
Price or (0)=End prompt type C and press <ENTER KEY>. The system
will prompt:
Enter New Conversion:
Enter the new conversion factor and press <ENTER KEY>.
(A)mount: Allows access to additional amount fields. Maximum
of 80 amount fields. Type A and press <ENTER KEY>.
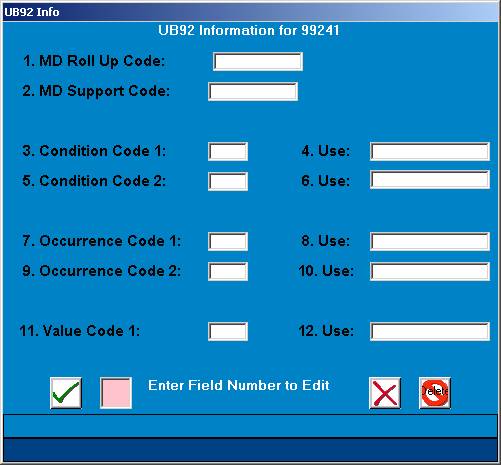
U=UB Information: You may type U and press <ENTER KEY> to have the
system open a window where you may enter additional UB information.
You may enter the value code to report on the UB form. For pro-
cedure codes with the same value codes, the value will be reported
collectively.
EXAMPLE SCREEN:
(V)erify: Displays who added this code and when. Displays who
updated this code and when. Type V and press <ENTER KEY>.
0=Exit: To exit the screen and SAVE your work, type 0 (zero)
and press <ENTER KEY>. The cursor will return to the ENTER CODE
prompt. Another 0 (zero) followed by a <ENTER KEY> will return
you to the Dictionary Menu.
SEARCH:
At the ENTER CODE or Site CODE prompt, type the first few letters
of the procedure name and press <Tab>. The system will list to
your screen all codes in the system that begin with those
letters. Please see the example below.
EXAMPLE SCREEN:
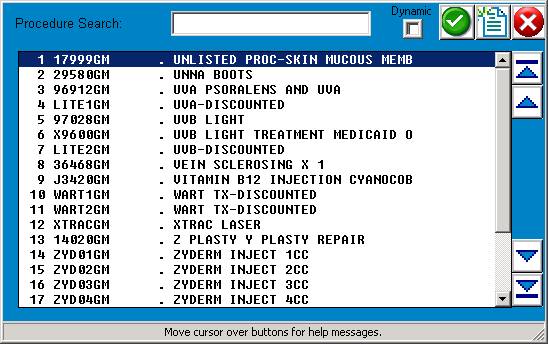
In our example we have entered a U. After you press <Tab>,
a screen similar to the one on the next page will be shown.
EXAMPLE SCREEN:
SELECT or SEARCH: O _________________________
<Up>=Last,<Dn>=Next,<R>-NPage,<L>=LPage,<Tab>=Add
<Up>/<Down> <Right>/<Left> refer to the Arrow keys
The screen displays the procedure codes that start with the
letter you entered and a brief description of each code.
To select a code, at the flashing cursor type the number to
the far left of the code and press <ENTER KEY>, or highlight
the line using the <Up>/<Down> Directional Arrow keys and
then press <ENTER KEY>. In either case, the system will display
the charge code information to your screen.
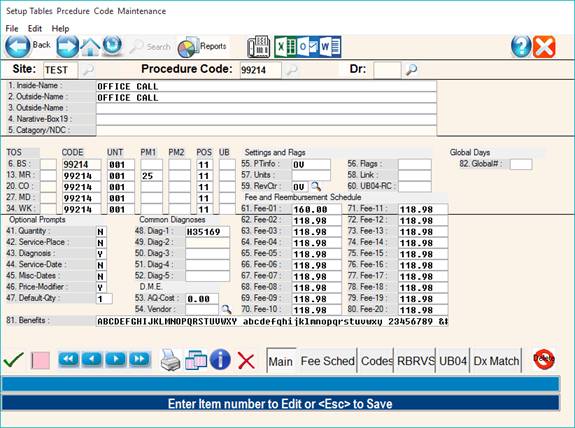
EXAMPLE OF A CORRECTLY COMPLETED PROCEDURE CODE SCREEN
EXAMPLE SCREEN:
A Profile Code is used when a certain group of procedures are
always billed together. For example, when billing for a CBC,
the Differential, SED rate, and Platelet count are also billed.
**When you enter P for Profile, the procedure codes used in
the profile must also be put in the Dictionary as individual
procedures. Profiles are useful for PQRI reporting.
EXAMPLE SCREEN:
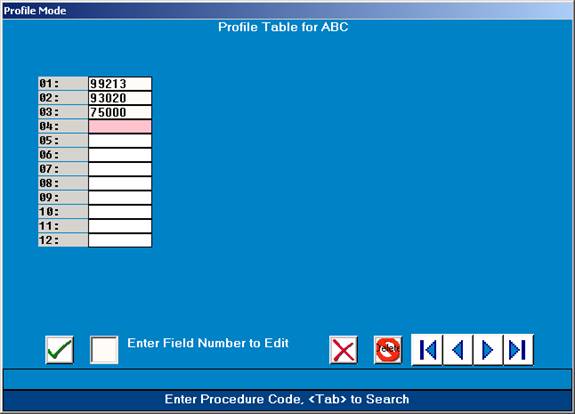
ENTER CODE: Identify this Profile Code using one to five alpha/
numeric characters and press <ENTER KEY>. This cannot be a CPT code.
Each procedure must already be individually defined in the Charge
Codes Dictionary. You may enter up to 60 procedures in one profile.
After entering the last procedure, press <ENTER KEY> to access
the Action Line. You may also press the <Home> key to go
directly to the Action Line bypassing lines you do not need.
Please refer to the next page for an explanation of the
Action Line functions.
DEFINITION OF ACTION LINE FUNCTIONS (PROFILE CODES):
ACTION? (ENTER # TO CORRECT, D=DELETE, Esc=END)
ENTER # TO CORRECT: If you need to correct a line, enter the
number of the line and press <ENTER KEY>. The cursor will move
to that line and you may make your correction. To return to
the Action Line, press the <Home> key.
D=DELETE: If you enter D and press <ENTER KEY>, you will delete
from the system the profile that you have just entered.
O=END: Type 0 (zero) and press <ENTER KEY>; the profile you
entered will be saved. The cursor will return to the
ENTER CODE prompt. You may continue to enter procedure codes,
or you may type 0 (zero) again and <ENTER KEY> to go to the
Dictionary Menu.
<Up>/<Down> ARROW KEYS: Although not listed in the Action
Line, when you are in the process of completing the procedure
code screen, you may use the <Up> Arrow to return to a previous
field and the <Down> arrow to move across a line. The information
will not be erased.
PRINTING: You will be able to print a list of your procedure
codes, definitions, and charges by typing two ** at the ENTER
CODE prompt. A window will open in the middle of your screen
listing available output devices. Select a printer and press
<ENTER KEY>.
SEARCH: To search for a procedure code, press <Tab> at the
ENTER CODE prompt. A window will open in the middle of your
screen listing the procedure codes in the system. The cursor
will be flashing at the following prompt.
SELECT or SEARCH:_
You may use the <Right>/<Left> Directional Arrow keys to
page through the search listing, or you may type the first
few characters of the procedure you are seeking and press
<ENTER KEY> to go directly to that section of the alphabet.
To select a procedure code from those displayed, enter the
number to the far left of the procedure code and press
<ENTER KEY>, or use the <Up>/<Down> Directional Arrow keys to
highlight the line and then press <ENTER KEY>. To exit the
screen, type 0 (zero) and press <ENTER KEY> or Escape.