OVERVIEW: The Table Maintenance Menu programs
allow offices
to
record all the information necessary to
bill
for services rendered. This would
include
provider numbers; procedure codes
and
fees; as well as diagnosis, referring,
and
facility codes.
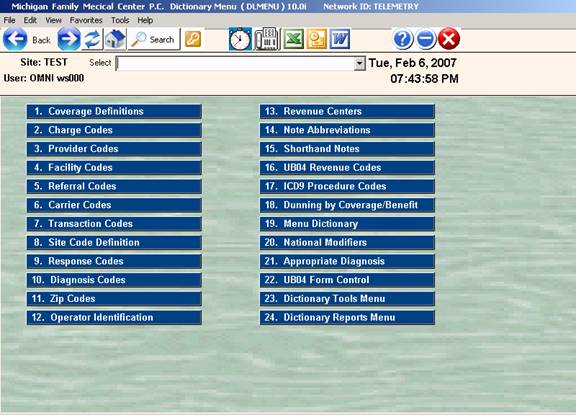
PROCEDURE: From the Main Menu, select Number 4
and
press
<ENTER KEY>.
EXAMPLE MENU:
______________________________________________________________________
After you select Number 4 from the Main
Menu, the Table Maintenance
Menu on the following page will be
displayed.
COVERAGE/BENEFIT
DEFINITIONS
v8.4
[OVERVIEW]: The Coverage Definitions program takes each
type
of
insurance benefit profile and
assigns
a single alpha character to represent
it
when calculating benefits. Combinations
of
insurances
are also defined in the same manner.
You may assign all alpha
characters, A-Z uppercase
and
a-z lowercase. Use of 40-50 coverages will
handle
all the major insurance companies.
Miscellaneous companies can
be put under a
Single
designation of Commercial.
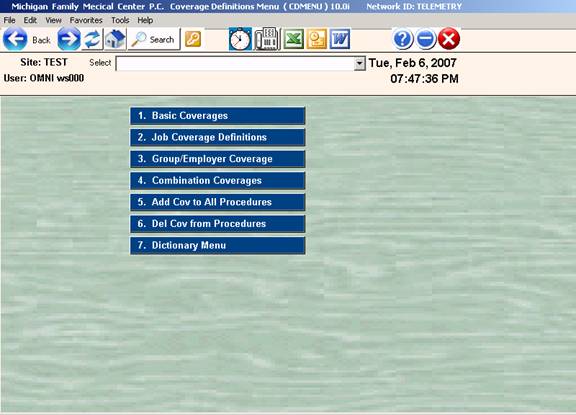
[PROCEDURE]: From the Table Maintenance Menu select Option
1, Coverage
Definitions, and press
<ENTER KEY>.
______________________________________________________________________
COVERAGE DEFINITIONS
[TRAINING
NOTE]: The training and
development staff at OMNI
strongly
recommend that you think and choose carefully
when entering
these definitions into your system. The
process will
become confusing once you begin assigning
coverages
to patients and then continually change them.
Below is a list of the most commonly
used codes.
INSURANCE TYPE CODE
BLUE CROSS/BLUE SHIELD, FULL
COVERAGE A
BLUE CROSS/BLUE SHIELD, $5 LAB &
XRAY B
BLUE CROSS/BLUE SHIELD, 10%
DEDUCTIBLE C
BLUE CROSS/BLUE SHIELD, 20%
DEDUCTIBLE D
BLUE CROSS/BLUE SHIELD, 25%
DEDUCTIBLE E
BLUE CROSS/BLUE SHIELD, 30%
DEDUCTIBLE F
BLUE CROSS/BLUE SHIELD, WITH OVC G
BLUE CROSS/BLUE SHIELD, WITH PRIVATE
INS H
BLUE CROSS/BLUE SHIELD, WITH
MEDICAID I
BLUE CROSS/BLUE SHIELD, WITH
MEDICARE J
MEDICARE K
MEDICARE---HIGH OPTION BLUE
CROSS/BLUE SHIELD L
MEDICARE---BLUE CROSS/BLUE
SHIELD M
MEIDCARE---MEDICAID N
MEDICARE--PRIVATE INSURANCE O
MEDICARE--BLUE SHIELD--MEDICAID P
MEDICARE--PRIVATE--MEDICAID Q
MEDICAID R
PRIVATE INSURANCES S
PRIVATE INSURANCE WITH OVC T
PRIVATE WITH BLUE SHIELD U
PRIVATE WITH BLUE SHIELD V
PRIVATE WITH MEDICAID W
PRIVATE WITH MEDICARE X
WORKMEN'S COMP Y
AUTO ACCIDENTS Z
PROFESSIONAL COURTESY a
NO INSURANCE z
After you choose Option 1 from the Table
Maintenance Menu and press
<ENTER KEY>, the submenu below
will be displayed.
[EXAMPLE MENU]:
______________________________________________________________________
1.
[Basic Coverages]:
Select this for entry of all basic
coverage codes. That means
codes that
are not specific to Site or GROUP coverages. Select
Option 1 and press <ENTER
KEY>. The screen below will be
displayed.
[EXAMPLE SCREEN]:
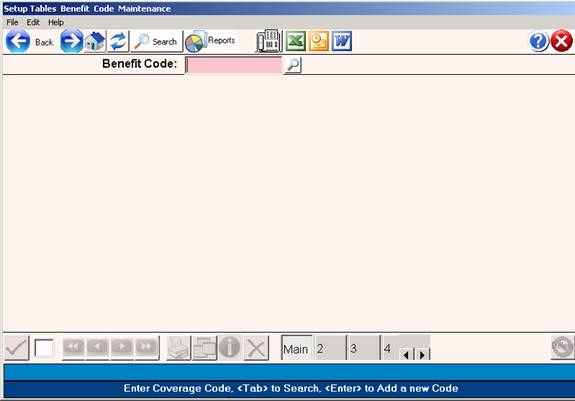
Enter the letter for your first type
of insurance coverage at
the flashing
cursor and press <ENTER KEY>. If
this code is not on
file, the
system will display the following message.
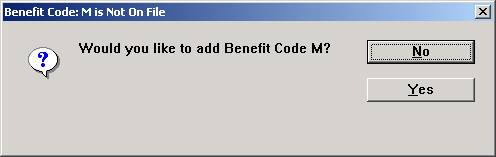
If you do not want to enter this
information into the system,
type an N for
NO. If you do want this code to be added
to
the system,
type a Y for YES and press <ENTER KEY>.
The screen
on the next
page will be displayed.
EXAMPLE SCREEN:

1. [FULL NAME]: Enter the name of the insurance coverage
on
Line 1 of the screen and press
<ENTER KEY>. The first 20
characters of
this name will display when you search for
a coverage
code for a patient.
EXAMPLE: 1. LONG NAME: BLUE SHIELD $5 LAB/XRAY
2. [SHORT NAME]: You may enter an abbreviated version of
the
long name here. This
may be the same as Line 1, but this
field is
limited to 15 characters.
EXAMPLE: 2. SHORT NAME: BS $5 LAB/XRAY
3 TO 42 RANGE TO DEDUCT AMOUNT: Lines 3 through 39 are used
when you want
to charge the patient less than 100%.
You use
these lines
to identify a specific range of procedures that
the insurance
requires the patient to pay. The amount
may be
either a flat
deductible or a percentage portion.
These
ranges are set up using the BCBS codes, not the In-house
codes.
Enter the appropriate information on
Lines 3 through 39 and
press
<ENTER KEY>. Enter procedure codes
in low to high order.
Enter numerical procedure codes first,
alpha codes second.
EXAMPLE: RANGE: 80000 TO 89999 DEDUCT
$ 5.00 OR 010% (>AMT)
If deductible procedure codes do not
exist for this particular
insurance
type, you may leave the fields blank by pressing
<ENTER KEY>.
43 TO 45 FIELDS: These fields allow the user to instruct
the system
which amount on each procedure to bill and which
amount you
should expect to receive.
43. BILLED AMOUNT CODE (1-20): Field
43 identifies which
amount to
pull from the Charge Codes Table Maintenance as the
billed
amount. This must be one of the first 20 amounts.
44. EXPECT AMOUNT CODE (1-80):
Field 44 identifies which
amount to pull from
the Charge Codes Table Maintenance as the
expected
amount for this particular insurance. This is one
of 1-80
amounts.
45. BELOW DEDUCT. CODE (1-80):
Field 45 identifies which
amount to
pull from the Charge Codes Table Maintenance as the
dollar
amount the patient should be charged for services
not
covered by the insurance company being defined.
This
is one of
1-80 amounts.
Field 45 codes may be different,
based on the following
criteria
of your practice:
A) You may choose not to charge patients the
full
billed
amount and only the approved allowed amount.
B) You may be required to charge patients only
the
approved
or allowable amount for carriers with which
you
participate; are required by law to charge a
maximum
amount (e.g. Medicare).
Example:
43 - BILLED FEE
AMOUNT - 1
44 – REEMBURSEMENT
FEE - 2
45 – NOT COVERED
FEE – 2
These fields instruct the system to
bill whatever dollar amount
is in AMT#01
(Field 56) from the Charge Codes Table Maintenance, to
the insurance
company. The office expects to receive
the dollar
amount in
AMT#02 (Field 57) for covered services.
If the
service is
not covered, the patient is charged the dollar amount
in AMT#01
(Field 56), the actual billed amount.
This may be difficult to understand
(at this point) because this
data is tied
into the amounts that you load into the Charge
Codes Table Maintenance,
selection 2 of the Table Maintenance Menu. If you
do not
understand this procedure, go into the Charge Codes
Table Maintenance
for clarification.
46. SPLIT OPTION (1=OFF 2=ON): Line number 46 allows the user
to enter a SPLIT OPTION.
This means you may bill the patient
the
difference between the billed amount and the amount expected
from the
insurance carrier. This option may vary
with carrier
participant
agreements and when in doubt, leave the option OFF.
When a 1 is entered, the system will
not bill the patient the
difference
(the option is OFF).
When a 2 is entered, the system will
charge the patient the
difference
between the billed amount and the amount expected,
for every
procedure performed (the option is ON).
47. OUTPUT (1=YES, 2=NO, 3=?): This
option affects (A)uto
Billing
only,
hardcopy or telecommunication.
1=YES:
This means (A)uto
bill all claims that have this
coverage
code.
2=NO:
This means do not (A)uto
bill a claim that has this
coverage
code. When A for (A)uto bill is done, these claims
will not be
included in (A)uto billing.
3=?: This means that when you take a patient
through Patient
Checkout with this coverage
code, the system will ask
you
to answer the following prompt:
PRINT
FORM (Y/N)? Y= SAME AS 1
ABOVE.
N= SAME
AS 2 ABOVE.
48. ASSIGN (1=Y 2=N 3=? 4=D): Line
number 48 allows you to
record
whether the office accepts ASSIGNMENT on this type
of insurance.
Type 1 for YES or type 2 for NO, type 3 if
you are not
sure, 4 for delayed.
49. BUDGET AMOUNT CODE: This is reserved for future use.
50. AUTO LOAD AMOUNT: This is reserved for future use.
51. OPTION-1 (1-OFF 2=ON): This is reserved for future use.
52. OPTION-2 (1=OFF 2=ON): This is reserved for future use.
It will activate Field 54 if you
select 2 for ON and press
<ENTER KEY>. Used only for capitated
carriers with copay amounts.
Copay must
be uniform for all procedures.
53. YEARLY DEDUCTIBLE AMOUNT: This allows you to enter the
yearly
deductible for this carrier.
If you enter a yearly deductible for
this insurance coverage,
the OMNI
Medical Software will calculate the deductible and
charge the
patient until the figure is met.
NOTE:
Remember, the only charges applied to this amount are
those entered
into your system. Some patients may be
treating
with other providers and the deductible may be paid
elsewhere.
54. PER VISIT DEDUCTIBLE: This field will set a per visit
deductible
limit for those carriers with maximum copay amounts.
Always use a dollar amount. Used by capitated
carriers.
If the copay
maximum out-of-pocket expenses apply, the
range field
must be completed and Option 52 set to ON.
An example of such
limits are those patients with a copay
on diagnostic
services and a maximum amount of $10.00 per
day. The range field contains, in numeric order,
all
diagnostic
codes. Line 52 has $10.00 and Option 2
is ON.
When Patient Checkout charges are
made, the patient will
pay $10.00
regardless of the number of tests performed.
An example of a completed screen may
be found on the next
page.
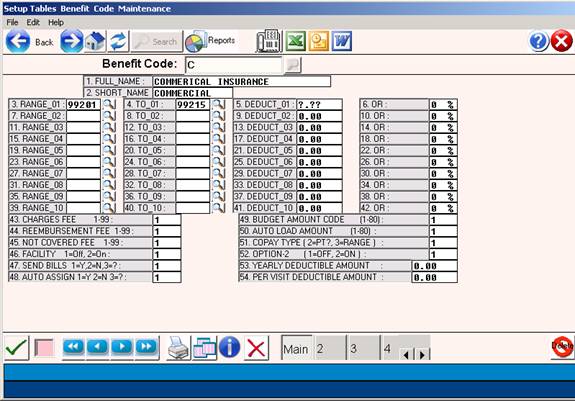
Below is an illustration of a
completed screen.
EXAMPLE SCREEN:
ENTER COVERAGE CODE-> C (TAB=SEARCH,
*=LIST, Esc=END)
When you have completed a Coverage
Code Definition screen, an
Action Line will appear at the bottom
of the screen. An
explanation
of the Action Line functions may be found on the
next page.
DEFINITIONS
OF ACTION LINE FUNCTIONS:
ACTION-> <Enter # to Correct,(P)rt,(F)wd,(B)ck,(K)py,(D)el,(V)fy,Esc=END
Enter # to Correct: Enter the number of the field you need
to
correct and
press <ENTER KEY>. The cursor will
move to the first
character on
that line (information on that line will not be
erased). You
may retype the entire line, or position the cursor
on the
character that needs correcting. Press
<Home> to go
back to the
Action Line.
(P)rint: Type P
and press <ENTER KEY> to print a hard copy of the
screen. The system will open a window in the middle
of your
screen
listing output devices. Please see the
example below.
1. Okidata
393 (LP)
2. Okidata
320 (P1)
3. HP Laser III (P2)
4. Canon (P3)
5. Your Terminal Screen (TE)
6. ----> EXIT
<----
Type in the number of your selection
at the flashing cursor
and press
<ENTER KEY>. You may also use the
<Up> and <Down>
Directional Arrow keys to highlight
your selection and then
press
<ENTER KEY>.
(F)orward: To go
forward one code (numerically or
alphabetically),
type F and
press <ENTER KEY>.
(B)ackward: To
go back one code (numerically or
alphabetically),
type and press <ENTER KEY>.
(K)opy: To make
a copy of this information (be sure you
(zero) and
<ENTER KEY> to save it before you copy) and assign
it a
different Code, type K and press <ENTER KEY>.
The cursor will move to the ENTER
COVERAGE CODE prompt.
Enter the code you wish this
information copied to and
press
<ENTER KEY>.
(D)elete: If you
want to delete this code from the system,
enter a D and
press <ENTER KEY>. Do not delete a
code that has
been
assigned a patient.
(V)erify:
Displays who added this code and when.
Displays
who updated
this code and when. Type V and press
<ENTER KEY>.
Esc=END: To exit and save your information, type a
0 (zero) and press <ENTER
KEY>.
The cursor will return to the ENTER
CODE prompt.
You may continue entering other
codes, or type 0 (zero) \
and press
<ENTER KEY> again to go to the Policy Coverage
Definitions Menu.
SEARCH:
At the ENTER COVERAGE CODE prompt,
type the first letter of the
the insurance
name and press <Tab>. All codes in
the system
for that
insurance company will be displayed to your screen.
EXAMPLE SCREEN:
In this example we have entered Code
B. After you press
<Tab>, a screen similar to the
one below will be displayed.
EXAMPLE SCREEN:
SELECT or SEARCH: O
01. C. BCBS 5$ DED
02. B. BCBS 5$ DED LAB
X-RAY
03. F. BCBS 5$ FEP
04. A.
BCBS FULL COVERAGE
05. A.
BCBS FULL POLICY
06. G.
MEDICARE
07.
I. MEDICARE AND PRIVATE
<Up>=Last,<Dn>=Next,<R>-NPage,<L>=LPage,<Tab>=Add
<Up>/<Down> <Right>/<Left>
refer to the Arrow keys
The screen displays the code with a
brief description. To
select the
code, at the flashing cursor type the number to
the far left
of the listed code and press <ENTER KEY>, or high-
light the
line using the <Up>/<Down> Directional Arrow keys
and then
press <ENTER KEY>. The system will then display the
coverage code
information to your screen.
To add a code when in a search screen,
press <Tab>. The system
will take you
to the ENTER CODE prompt. You may now
enter a
new code.
To exit the search screen, type 0 and
press <ENTER KEY>.
2.
SiteCoverage Definitions:
This selection will allow you to
define coverage codes
as they apply
to a specific SiteCenter, i.e.: clinic
and/or
doctor's office.
After you select Option 2 and press
<ENTER KEY>, the screen
below will be
displayed.
EXAMPLE SCREEN:
ENTER SITE: Enter the code which identifies the Sitesource
as defined in
the SiteCode Definition Table Maintenance. Press
<ENTER KEY> to go to the next
field.
COVERAGE CODE: Enter the code which identifies the
coverage
code that
defines the insurance coverage.
If this code is not on file, the
system will display the
message below
to the bottom of your screen.
NOT ON FILE, ADD? (Y=YES, N=NO)
If you do not want to enter this
information into the system,
type an N for
NO. If you do want this code to be added
to
the system
type a Y for YES and press <ENTER KEY>.
The screen
on the next
page will be displayed.
EXAMPLE SCREEN:
ENTER SITE-> COVERAGE CODE->__ (TAB=SEARCH, *=LIST, Esc=END
)
1. FULL NAME:O____________________________________
2. SHORT NAME:_____________________________________
3. RANGE: TO
DEDUCT $00.00 OR 000 %
(>AMT)
7. RANGE: TO
DEDUCT $00.00 OR 000 % (>AMT)
11. RANGE: TO
DEDUCT $00.00 OR 000 % (>AMT)
15. RANGE: TO
DEDUCT $00.00 OR 000 % (>AMT)
19. RANGE: TO
DEDUCT $00.00 OR 000 % (>AMT)
23. RANGE: TO
DEDUCT $00.00 OR 000 % (>AMT)
27. RANGE: TO
DEDUCT $00.00 OR 000 % (>AMT)
31. RANGE: TO
DEDUCT $00.00 OR 000 %
(>AMT)
35. RANGE: TO
DEDUCT $00.00 OR 000 % (>AMT)
39. RANGE: TO
DEDUCT $00.00 OR 000 % (>AMT)
43. BILLED AMOUNT CODE (1-20): 49. BUDGET AMOUNT CODE (1-80):
44. EXPECT AMOUNT CODE (1-80): 50. AUTO LOAD AMOUNT (1-80):
45. BELOW DEDUCT. CODE (1-80): 51. OPTION-1 ( 1=OFF,
2=ON ) :
46. SPLIT OPT(
1=OFF, 2-ON ) : 52. OPTION-2 ( 1=OFF,
2=ON ) :
47. OUTPUT ( 1=Y,2=N,3=? )
: 53. YEARLY DEDUCTIBLE AMOUNT : $.00
48. ASSIGN (1=Y,2=N,3=?,4=D)
: 54. PER VISIT DEDUCTIBLE AMT.:
$.00
Action-><-Enter # to correct,(P)rt,(F)wd,(B)ck,(K)py,(D)el,(V)fy,Esc=END
[DEFINITION OF FIELDS - COVERAGE BY
SITE]:
1. FULL NAME: Enter the name of the insurance coverage
on
Line 1 of the screen and press
<ENTER KEY>. The first 20
characters of
this name will display when you search for
a coverage
code for a patient.
EXAMPLE: 1. LONG NAME: BLUE SHIELD $5 LAB/XRAY
2. SHORT NAME: You may enter an abbreviated version of
the
long name
here. This may be the same as Line 1,
but this
field is
limited to 15 characters.
EXAMPLE: 2. SHORT NAME: BS $5 LAB/XRAY
3 TO 42 RANGE TO DEDUCT AMOUNT: Lines 3 through 39 allow
you to
identify a specific range of procedures that the
insurance
requires the patient to pay. The amount
may be
either a flat
deductible or a percentage portion.
These
ranges are
set up using the BCBS codes, not the in-house
codes.
Enter the appropriate information on
Lines 3 through 39 and
press
<ENTER KEY>. Enter procedure codes
in low to high order.
Please see the example on the next
page.
EXAMPLE: RANGE: 80000 TO 89999 DEDUCT
$ 5.00 OR 010% (>AMT)
If deductible procedure codes do not
exist for this particular
insurance
type, you may leave the fields blank by pressing
<ENTER KEY>.
43 TO 45 FIELDS: These fields allow the user to instruct
the system which
amount on each procedure to bill and which
amount you
should expect to receive.
43. BILLED AMOUNT CODE (1-20):
Field 43 identifies which
amount to
pull from the Charge Codes Table Maintenance as the
billed
amount. This must be one of the first 20 amounts.
44. EXPECT AMOUNT CODE (1-80):
Field 44 identifies which
amount to
pull from the Charge Codes Table Maintenance as the
expected amount for
this particular insurance. This is one
of 1-80
amounts.
45. BELOW DEDUCT. CODE (1-80):
Field 45 identifies which
amount to
pull from the Charge Codes Table Maintenance as the
dollar
amount the patient should be charged for services
not
covered by the insurance company being defined.
This
is one of
1-80 amounts.
Field 45 codes may be different,
based on the following
criteria
of your practice:
A) You may choose not to charge patients the
full
billed
amount and only the approved allowed amount.
B) You may be required to charge patients only
the
approved
or allowable amount for carriers with which
you
participate; are required by law to charge a
maximum
amount (e.g. Medicare).
e.g.
43 - BILLED AMOUNT - 1
44 - EXPECTED AMOUNT -
2
45 - BELOW DED. CODE -
1
These fields instruct the system to
bill whatever dollar amount
is in AMT#01
(Field 56) from the Charge Codes Table Maintenance, to
the insurance
company. The office expects to receive
the dollar
amount in
AMT#02 (Field 57) for covered services.
If the
service is
not covered, the patient is charged the dollar amount
in AMT#01
(Field 56), the actual billed amount.
This may be difficult to understand
(at this point) because this
data is tied
into the amounts that you load into the Charge
Codes Table
Maintenance, selection 2 of the Table Maintenance Menu. If you
do not
understand this procedure, go into the Charge Codes
Table Maintenance
for clarification.
46. SPLIT OPTION (1=OFF 2=ON): Line number 46 allows the user
to enter a
SPLIT OPTION. This means you may bill
the patient
the
difference between the billed amount and the amount expected
from the
insurance carrier. This option may vary
with carrier
participant
agreements and when in doubt, leave the option OFF.
When a 1 is entered, the system will
not bill the patient the
difference
(the option is OFF).
When a 2 is entered, the system will
charge the patient the
difference
between the billed amount and the amount expected,
for every
procedure performed (the option is ON).
47. OUTPUT (1=YES, 2=NO, 3=?): This field allows you to choose
whether or
not a claim should be available for Auto billing.
If you wish to print forms or bill via
telecommunication, enter
1 for YES. If not, enter 2 for NO and press <ENTER
KEY>. A 3
response will
ask if a claim is needed each time a patient with
this code is
taken through Patient Checkout.
48. ASSIGN (1=Y 2=N 3=? 4=D): Line
number 48 allows you to
record
whether the office accepts ASSIGNMENT on this type
of insurance.
Type 1 for YES or type 2 for NO, type 3 if
you are not
sure, 4 for delayed.
49. BUDGET AMOUNT CODE: This is the amount agreed upon between
you and the
patient as a monthly payment amount.
This field may
be used to
identify a discounted price.
50. AUTO LOAD AMOUNT: This is reserved for future use.
51. OPTION-1 (1-OFF 2=ON): This is reserved for future use.
52. OPTION-2 (1=OFF 2=ON): This is reserved for future use.
It will activate Field 54 if you
select 2 for ON and press
<ENTER KEY>.
53. YEARLY DEDUCTIBLE AMOUNT: This allows you to enter the
yearly
deductible for this carrier.
If you enter a yearly deductible for
this insurance coverage,
the OMNI
Medical Software will calculate the deductible and
charge the
patient until the figure is met.
NOTE:
Remember, the only charges applied to this amount are
those entered
into your system. Some patients may be
treating
with other
providers and the deductible may be paid elsewhere.
54. PER VISIT DEDUCTIBLE: This field will set a per visit
deductible
limit for those carriers with maximum copay
amounts.
If the copay
maximum out-of-pocket expenses apply, the
range field
must be completed and Option 52 set to ON.
An example of such
limits are those patients with a copay
on diagnostic
services and a maximum amount of $10.00 per
day. The range field contains, in numeric order,
all
diagnostic
codes. Line 52 has $10.00 and Option 2
is ON.
When Patient Checkout charges are
made, the patient will
pay $10.00
regardless of the number of tests performed.
An example of a completed screen may
be found on the next
page.
Below is an illustration of a
completed screen.
1. FULL NAME:BLUE SHIELD $5
LAB/XRAY______________
2. SHORT NAME:BS
$5 LAB/XRAY_______________________
3. RANGE:70000 TO 79999 DEDUCT $ 5.00 OR 000 % (>AMT)
7. RANGE:80000 TO 89999 DEDUCT $ 5.00 OR 000 % (>AMT)
11. RANGE:93000 TO 93479 DEDUCT $ 5.00 OR 000 % (>AMT)
15. RANGE: TO
DEDUCT $00.00 OR 000 %
(>AMT)
19. RANGE: TO
DEDUCT $00.00 OR 000 % (>AMT)
23. RANGE: TO
DEDUCT $00.00 OR 000 % (>AMT)
27. RANGE: TO DEDUCT
$00.00 OR 000 % (>AMT)
31. RANGE: TO
DEDUCT $00.00 OR 000 % (>AMT)
35. RANGE: TO
DEDUCT $00.00 OR 000 % (>AMT)
39. RANGE: TO
DEDUCT $00.00 OR 000 %
(>AMT)
43. BILLED AMOUNT CODE (1-20): 1 49. BUDGET AMOUNT CODE (1-80): 2
44. EXPECT AMOUNT CODE (1-80): 2 50. AUTO LOAD AMOUNT (1-80): 1
45. BELOW DEDUCT. CODE (1-80): 1 51. OPTION-1 ( 1=OFF,
2=ON ) : 1
46. SPLIT OPT(
1=OFF, 2-ON ) : 1 52. OPTION-2 ( 1=OFF, 2=ON ) : 1
47. OUTPUT ( 1=Y,2=N,3=? ) :
1 53. YEARLY DEDUCTIBLE AMOUNT : $.00
48. ASSIGN (1=Y,2=N,3=?,4=D)
: 1 54. PER VISIT DEDUCTIBLE AMT.:
$.00
Action-><-Enter # to correct,(P)rt,(F)wd,(B)ck,(K)py,(D)el,(V)fy,Esc=END
When you have completed a Coverage
Code Definition screen, an
Action Line will appear at the bottom
of the screen. An
explanation
of the Action Line functions may be found on the
next page.
DEFINITIONS OF ACTION LINE
FUNCTIONS:
ACTION-> <Enter # to Correct,(P)rt,(F)wd,(B)ck,(K)py,(D)el,(V)fy,Esc=END
Enter # to Correct: Enter the number of the field you need to
correct and
press <ENTER KEY>. The cursor will
move to the first
character on
that line (information on that line will not be
erased). You
may retype the entire line, or position the cursor
on the
character that needs correcting. Press
<Home> to go
back to the
Action Line.
(P)rint: Type P
and press <ENTER KEY> to print a hard copy of the
screen. The system will open a window in the middle
of your
screen listing output devices. Please see the example below.
1. Okidata
393 (LP)
2. Okidata
320 (P1)
3. HP Laser 4220 (P2)
4. Canon (P3)
5. Your Terminal Screen (TE)
6. ----> EXIT
<----
Type in the number of your selection
at the flashing cursor
and press
<ENTER KEY>. You may also use the
<Up> and <Down>
Directional Arrow keys to highlight
your selection and then
press
<ENTER KEY>.
(F)orward: To go
forward one code (numerically or
alphabetically),
type F and
press <ENTER KEY>.
(B)ack: To go
back one code (numerically or alphabetically),
type and press <ENTER KEY>.
(K)opy: To make
a copy of this information (be sure you O
(zero)and
<ENTER KEY> to save it before you copy) and assign it a
different
Code, type K and press <ENTER KEY>.
The cursor will move to the ENTER
COVERAGE CODE prompt. Enter the code you wish this information
copied to and
press <ENTER KEY>.
(D)elete: If you
want to delete this code from the system,
enter a D and
press <ENTER KEY>. Do not delete a
code that has
been assigned
a patient.
(V)erify:
Displays who added this code and when.
Displays
who updated
this code and when. Type V and press
<ENTER KEY>.
Esc=END: To exit and save your information, type a 0
(zero) and
press
<ENTER KEY>. The cursor will
return to the ENTER CODE
prompt.
You may continue entering other codes,
or type 0 (zero) and
press
<ENTER KEY> again to go to the Policy Coverage
Definitions Menu.
SEARCH:
At the ENTER COVERAGE CODE prompt,
type the first letter of the
the insurance
name and press <Tab>. All codes in
the system
for that
insurance company will be displayed to your screen.
EXAMPLE SCREEN:
ENTER JOB-> O COVERAGE CODE-> M (TAB=SEARCH,
*=LIST, Esc=END)B
In this example we have entered Code
M. After you press
<Tab>, a screen similar to the
one below will be displayed.
EXAMPLE SCREEN:

The screen displays the code with a
brief description of the
code. To
select the code, at the flashing cursor type the
number to the
far left of the listed code and press <ENTER KEY>,
or highlight
the line using the <Up> or <Down> Directional
Arrow keys and then press
<ENTER KEY>. The system will then
display the
coverage code information to your screen.
To add a code when in a search screen,
press <Tab>. The system
will take you
to the ENTER CODE prompt. You may now
enter a
new code.
To exit the search
screen, type 0 and press <ENTER KEY> or Escape.